

2026-08-13 08:00:00
A few years back I wrote about the dominator tree of a dependency graph, which is one of my favorite tricks for thinking about dependencies. It turns out a new tinkering project of mine again needs a dominator tree, so I invested some time to deepen my understanding.
In this post I present an algorithm for computing graph dominators along with the intuition behind it.
There are two central definitions that I will handwave some details about; you can read Wikipedia for those. Here's a graph to visualize them. Hover some nodes while you read.
a, in this
example) to y must go through x. If you hover a node here, its dominators are
shown in yellow.Again, see my earlier post for some other framings of what these mean or how to think about them.
There is a continuous stream of research going back to 1959 publishing different algorithms for computing dominators with varying levels of implementation complexity. Lengauer-Tarjan ("LT") from 1979 seems to be the standard but it is relatively complex, involving spanning trees and union find.
In LLVM, i.e. in a tool where performance really does matter, it appears they use LT but have changed their implementation over time. For example in this work in 2017 they mention in a large compile they were computing 6.5 million dominator trees(!) and they changed to an approach that supports incremental updates.
The paper "A Simple, Fast Dominance Algorithm" from 2001 describes a simple algorithm that they claim is both useful for learning and in practice about 2.5x faster than LT.
The later paper "Finding Dominators in Practice" compares multiple algorithms, and regarding the above claim they write: "a more careful implementation of [Lengauer-Tarjan] later led to different results (personal communication)", which is not a great sign. However, in that paper they also gather numbers comparing five different algorithms across a collection of graphs and find that they all land somewhere between 2-5x the time of a breadth-first search, which itself they measure in microseconds. Which is to say, for the kinds of graphs that you or I likely care about, the difference doesn't matter.
If you like reading papers (I do! it's a worthy habit to develop!), you're best off reading "A Simple, Fast Dominance Algorithm" directly. But in part for deepening my own understanding by saying it in my own words, the rest of this post will dive into the "Simple, Fast" algorithm.
Their presentation is roughly two parts. First, they describe a general approach for computing dominators and why it works. Second, they show an algorithm that uses some representation tricks to implement that approach efficiently.
The general approach is describing the computation as a data-flow equation, which defines a per-node computation that recursively depends on itself.
Define dom[n] as the set of dominators for node n. Then the data flow
equation is:
dom[root] = {root}
dom[n] = intersect(dom[p] for p in predecessors(n)) union {n}
In words, the dominator set of a node is the intersection of the dominators of
the node's predecessors, as well as the node itself. (To make sense of this,
don't overlook that dom[n] always includes n!)
To compute this, you run in a loop that updates each node until the output stops changing.
changed = True
while changed:
    changed = False
    for n in nodes:
        new = recompute(n)
        if new != dom[n]
            dom[n] = new
            changed = True
In the paper, they connect this to other research that shows this will converge on the correct answer in a relatively small number of iterations — if you iterate the nodes in reverse postorder, more on that in a moment. For our purposes of intuition, I think it's enough to say "this is guaranteed to converge on the correct result fast enough, see the paper for proof".
Why does this work? In the above sample graph, try hovering the predecessors of
node g or h and mentally intersect the sets in yellow to see it produce
their own yellow sets. Intuitively the sets represent something like a path from
the root (though they may not be a full path; witness the dominator set for
g), and intersecting the sets results in the nodes found on all paths from the
root.
As given this is inefficient to compute — though I suspect if you're writing Python or whatever and working with a small graph it's probably fine. The actual algorithm from the paper is more efficient.
To get to the algorithm we first must detour into graph traversal, as it relies on a reverse postorder traversal of the graph.
A preorder traversal visits a node then its children; a postorder visits the children before the node, recursively; a reverse postorder is the postorder's order but reversed.
Importantly, reverse postorder is different than preorder. In the below graph, I've numbered the nodes in their traversal order so you can compare them.
In a preorder traversal, the recursion makes its way all the way down the left side to the bottom before visiting the right side, so the right child of 0 is visited last. With a reverse postorder you get the invariant that each node is visited before any of its children, which is the important property the algorithm relies on.
(I fear in writing this section that it is all rather obvious to you, reader. I
think many years of working on build systems has given me intuition for
algorithms over acyclic graphs and for whatever reason as soon as cycles get
involved I start getting confused. In the first graph in this post there is a
"back edge", from g to b, but also the right way to think about it is that
in terms of a traversal g still comes "later".)
By the way, in "Finding Dominators in Practice" when discussing this algorithm and its use of postorder they write:
Initializing T as a [postorder] tree is bad both in theory and in practice because it causes the back edges to be processed, even though they contribute nothing to the [nearest common ancestors]. Intuitively, a much better initial approximation of the dominator tree is a [breadth-first search] tree.
This wording feels kind of aggressive to me! The general dataflow approach produces the correct answer regardless of the iteration order, so changing the order doesn't affect correctness, and in their results they measured both approaches and found their idea improved performance by roughly 10% on the graphs they were measuring.
But I believe the original paper's proof of the bound on the number of iterations relies on specifically reverse postorder. (I asked Claude about this and it found a counterexample 14-node graph where the RPO order takes one pass and the BFS order takes 3 passes.)
With reverse postorder ("RPO") defined, let's look at the actual algorithm.
The first trick of the algorithm is that instead of computing dominator sets, you instead compute for each node just its immediate dominator. If you look at each node's immediate dominator as a parent pointer you get a dominator tree. Given immediate dominators, you can read the dominator set of a given node by walking the dominator tree upwards.
Here's the first graph again, with its dominator tree (the thing we're trying to compute) alongside it. Look at a node and its ancestors in the dominator tree, and compare to the yellow nodes when you hover it on the left.
To compute immediate dominators, it's again an iterative data flow calculation.
idom[root] = root  # unlike the sets before, idom stores single nodes
idom[n] = intersect_dom(predecessors(n))
For example, to compute the immediate dominator of node g, we look at its
predecessors d and e and walk the dominator tree upwards to find the place
where their dominator sets intersect.
This is another cyclical definition, so we again iterate it for all nodes until it stabilizes.
The second trick of the algorithm is in how to efficiently find the intersection. This is where the RPO matters. Here is the graph again with the nodes labeled by their RPO index.
The RPO numbering gives the property that a parent always has a number lower than its children. Given two "fingers" pointing at two nodes in the tree, to find where they meet, move whichever finger is pointing at a larger number to its parent. To intersect more than two predecessors, intersect two at a time.
intersect(a, b):
    while a != b:
        while a > b:
            a = idom[a]  # walk a upwards
        while b > a:
            b = idom[b]  # walk b upwards
    return a
Try clicking a node with multiple predecessors in the graph (3, 6, or 7) to see this in action. (Note that we're finding the meet point of the predecessors of the node, which comes from the full graph, while the intersection operation uses the idom tree, which is a subset of the graph. This means the moving circles visually skip some nodes in the above graph.)
In the above I've been a bit loose about initialization: the code is reading
from a data structure while that data structure is still under construction,
which might feel like it wouldn't work. I think for intuition's purposes the
right way to think about it is that the "while changed" loop effectively
recomputes everything after any change anywhere, and that it's also guaranteed
to converge.
That looks inefficient, but the algorithm also does the per-node processing in RPO, which is effectively "top down". That doesn't guarantee a single pass, but it does mean it's not that many passes. (For an example of how it isn't a simple top down single pass, consider how the first time the algorithm visits node 3 in the RPO it hasn't yet computed idom for its predecessor node 6.)
Here's the complete Rust implementation I ended up with in my toy application. I cannot guarantee it's correct as I am still learning, but it at least passes some simple tests!
// Inputs:
// nodes numbered in reverse postorder, so node 0 is the start
// preds[i]: array of predecessors of node i
// order[i]: the ith node visited in the reverse postorder

// Output:
// idom[i]: the immediate dominator of node i
let mut idom = Vec::with_capacity(graph.len());
let unset = usize::MAX;
idom.resize(graph.len(), unset);  // initialize all results to unset
idom[0] = 0;  // idom[start] is itself

let mut changed = true;
while changed {
    changed = false;
    // compute idom[i] for all nodes except the root
    for i in order[1..].iter().copied() {
        // only consider predecessors that have been initialized
        let mut preds = preds[i].iter().copied()
            .filter(|&j| idom[j] != unset);
        let Some(mut new) = preds.next() else {
            continue;  // node is not reachable
        };
        for pred in preds {
            let mut f1 = new;
            let mut f2 = pred;
            while f1 != f2 {
                while f1 > f2 {
                    f1 = idom[f1];
                }
                while f2 > f1 {
                    f2 = idom[f2];
                }
            }
            new = f1;
        }
        if idom[i] != new {
            idom[i] = new;
            changed = true;
        }
    }
}
PS: If you're not familiar with Rust, you should know that this might look like
it's allocating where it isn't. The .filter() call only creates a filtering
iterator, not an array, which inlines to a loop when it's read from. And the
.iter().copied() calls mean to iterate by value rather than by reference,
where the copied thing here is just integers.
2026-07-22 08:00:00
A friend asked me how to learn to use the Jujutsu version control system, which has been my favorite new piece of tech from the last few years.
I thought I'd quickly write up the tutorial I'd wished I'd had. That snowballed into actually trying to write The Tutorial, complete with chapters and an index and so on.
(In particular it also contains a sales pitch about why learning this tool is worth your time. This is uncomfortable for me because I am not really the sort of person who advocates but I found it a useful exercise exactly because of that. Also it received this nice comment.)
2026-05-24 08:00:00
This post is part of a series on Theseus, my win32/x86 emulator.
Theseus now can produce WebAssembly output, allowing it to translate a .exe
file into something that runs on the web.
Try it out here, but note it is full of bugs
(e.g. Minesweeper crashes if you win).
This was pretty straightforward to get working, with the exception of one major detail that this post will go into.
The x86 emulation part of this is just recompiling the existing Theseus output
with a different CPU target. This is one of the main benefits of this binary
translation approach. The translated code is almost (with the exception of how
main gets invoked) wholly agnostic to the environment it eventually runs in.
In principle I now get optimized wasm compiler output for relatively free. The
main challenge was figuring out the code layout to get Cargo to cooperate with
my weird requirements.
The win32 part was changing things to abstract over a "Host" API that is able to do things like fetch mouse events and render pixels. That is now implemented once for SDL and once for the web. This was also relatively straight forward, at least in my first pass.
So what was hard? It comes to a part of the design space I hadn't previously explored well: whether the emulator is allowed to block.
In retrowin32, the emulator was designed to be able to step through some instructions and then return control to the caller. This is critical for the web version in particular, where you cannot block the main thread. In my earlier post "threading in two ways" I went into some detail on the various tradeoffs on how I could emulate threads in a browser, ultimately choosing a single thread.
This has its advantages, but is unsatisfying in a few important ways:
MoveWindow will
synchronously send Windows messages related to moving to the window, so it is
also async with respect to the message handling.In the spirit of exploring the design space, when I got to revisit this choice in Theseus I instead made everything synchronous and implemented threads using real OS threads. In particular because Theseus maps the original program's code to function calls, it makes the debugging experience pretty pleasant: if I set a breakpoint or if something crashes, I get a stack trace that goes through both the source program and emulator code.
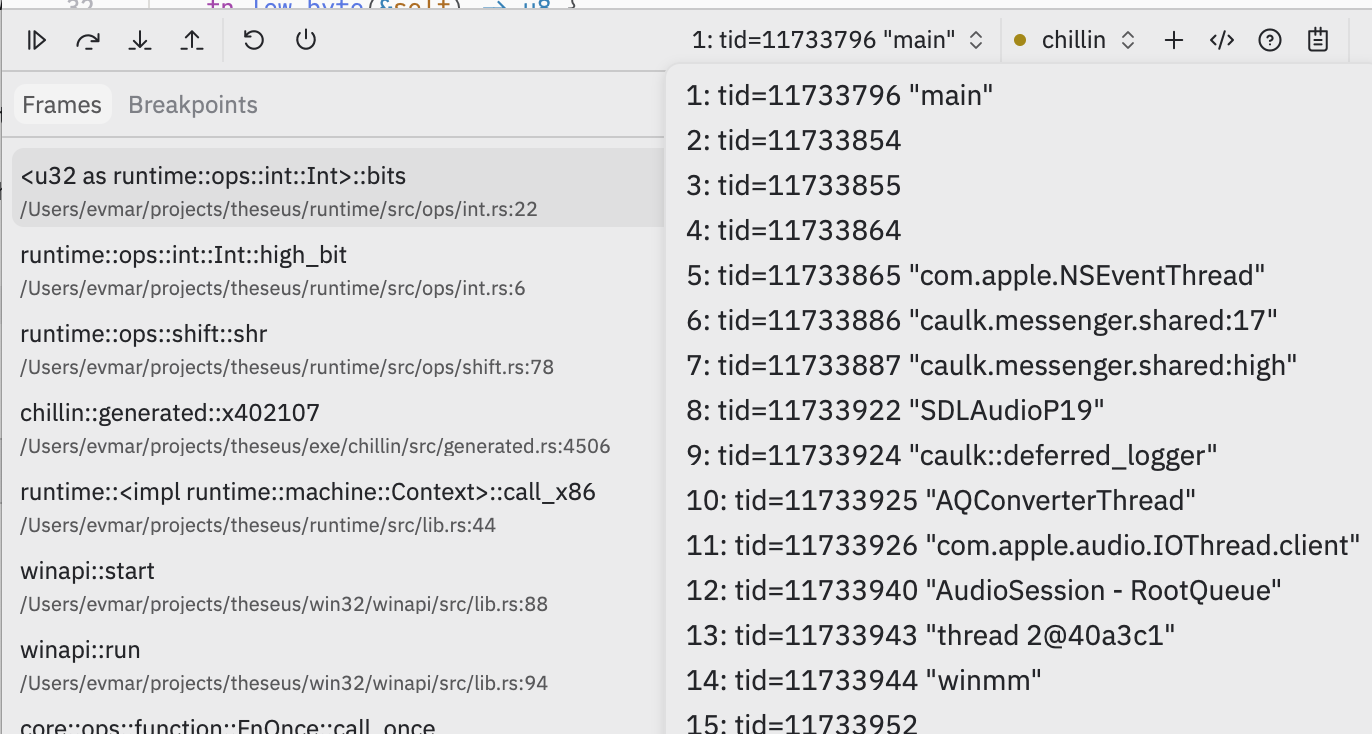
Picture: a Theseus program in a native debugger, with a stack trace including a generated x86 address on the left, and with a thread picker showing the Windows "winmm" multimedia thread on the right.
I mostly care about the developer experience here, but one additional reason this approach is nice is performance. Computers are really good at quickly running simple code made of nested function calls that store things on the stack. My asynchronous approach meant there was a lot of control overhead, even in tight loops.
In all, blocking is great. But on the web, you cannot block the main thread.
Even in a single-threaded program a call to a Windows API like GetMessage is
supposed to block until a message is available, but browser events will only
come in via the browser event loop once you've returned control. It would seem
you're stuck.
What it really means is that fundamentally, if you want to block, you must use a
thread — even in the case where the program you're emulating is itself
single-threaded — because worker threads are allowed to block. So here's the
approach: I run the emulator's threads in web workers. When the emulator needs
something from the browser, it can send a message via the postMessage API that
comes in on the main thread's event loop. And here I can make the worker block
until the message is handled.
This where the atomics API comes in. (Uh oh, synchronization code! The chances that I got this wrong are extremely high; I welcome your feedback on this, and I post it in part to provoke some reader who knows more than me to correct me.)
If you share memory between the main thread and worker, you can make the worker block on an atomic until the main thread is done. To do this, the worker sends the address of a local when it posts its message:
fn blocking_call() {
    let mut buf = 0i32;
    let msg = create_message(
        /* ... some JavaScript data indicating what function to call ... */,

        // ... and include the *address* of the above 'buf' variable
        &mut buf as *mut _ as u32
    );
    post_message(msg);
    unsafe {
        // wait while buf==0 until we get an Atomic notify on it
        wasm32::memory_atomic_wait32(&mut buf, 0, -1 /* forever */);
    }
}
The main thread receives these, and wakes the worker up when it's done by prodding the shared memory:
window.onmessage = (e) => {
  const msg = e.data;
  // ... handle message ...

  // interpret msg.buf as a pointer within the shared memory:
  const ints = new Int32Array(sharedMemory.buffer, msg.buf, /* length */ 1);
  ints[0] = 1;  // set `buf` from above to mark it successfully handled
  // wake up the waiting thread:
  Atomics.notify(ints, /* index */ 0, /* how many to wake up */ 1);
}
Note that because the worker is blocked until its message is processed, we know that the address of the local stack variable remains live until the main thread is done with it. This means we can effectively pass the address of any local variable from the worker and the main thread can safely modify it as it chooses.
From this sketch I hope you can see how I extended this to pass buffers in both ways. When the worker generates pixels, it sends a message just with a pointer to the pixels that the main thread can read directly from its memory (no copies!). And when the worker blocks to wait for an event, it can supply a buffer that the main thread can fill in.
The main limitation of this approach is that the main thread cannot transfer any
browser objects to the worker thread, because the only communication back is via
the shared memory buffer. Objects can only be transferred by attaching them to
postMessage, and those arrive via the browserevent loop.
You might have noticed the above code switches into TypeScript to show the main thread handler. At first I intended to write all of this as a single wasm blob that contained the code for both the main thread and the worker threads. I eventually turned back to TypeScript for a few reasons.
Because the main thread cannot block, this means it cannot practically share its memory with the workers if any synchronization might be involved. That would veto even using a malloc implementation. I think the best way to make this work is by running the main thread wasm with its own private memory, and handing it a reference to the workers' shared memory. I think because that shared memory object is opaque, you would need to call out to browser APIs to interact with it, rather than the native wasm memory APIs.
Unlike the main thread, the workers can safely malloc despite sharing memory because they can use locks like an ordinary program would. ...except that for reasons I don't fully understand, the Rust standard library under wasm isn't compiled with support for atomics turned on. Thankfully, there's a relatively supported but still nightly Rust path to rebuild the standard library itself as part of the worker build process. (It does however highlight that using shared memory web workers at all with Rust is still not exactly a supported path.)
The other main reason I turned back to TypeScript is that the worker threads cannot access the DOM, and while that can be cumbersome it also provides a nice wall between the Rust worker code and browser hosting code. The Rust/wasm support for interacting with the DOM is better than it could be, but it's still pretty clunky, where e.g. any DOM function you call gets wrapped in a JS helper that is imported by the wasm module. Instead I can write my Rust code without any knowledge of browser API, and do all of the DOM munging on the TypeScript side.
In general, it's hard to beat the experience of using TypeScript for web development. Tools like debugging and interactively inspecting objects are far superior to wasm debugging. (Also the recent TypeScript compiler rewrite in Go works well, it's so fast!)
The main downside so far is serialization. I still haven't yet figured out a mechanism I'm happy with for transporting more complex objects across the host/worker boundary. I saw a tech talk recently where someone used Rust's rkyv library for this purpose and it looked pretty neat.
Ultimately the purpose of any of these projects is just to learn about the things I was curious about.
From this excursion I conclude that writing apps in wasm is impressive but still not quite there yet — I am glad I have my native build to fall back on when I want to deploy fancier tools. This is definitely a pattern I learned at Figma (where they also had a native build of their wasm-based app) and one that I would recommend to you.
Similarly, I conclude that Rust with shared memory workers is still pretty early. I think for an app where you really cared it works pretty well, but "use a nightly compiler so you can recompile the standard library" is not a great sign.
For Theseus itself, I have a few ideas of where to go next, but those will have to wait for another post!
