


2026-09-03 19:15:31
There’s a lot to learn when it comes to communicating effectively with data. You can improve your charts, strengthen your narrative, get better at understanding your audience, or sharpen your presentation skills. But you probably don’t need to work on all of those things right now. A useful question to ask yourself is:
What skill would make the biggest difference in my work today?
We found ourselves thinking about this recently as we looked back across 100 episodes of the storytelling with data podcast. Rather than simply asking our team to pick their favorite episodes, we asked them, “When would you recommend this episode to someone?”
The answers revealed five different areas to focus on, depending on what you’re trying to improve right now.
Maybe you’re relatively new to data storytelling. You know you want to communicate more effectively, but you’re still figuring out what “good” looks like. At this stage, focus on the fundamentals: choosing appropriate charts, reducing clutter, using color intentionally, directing attention, and making your message clear.
Don’t wait until you feel like you know enough to start creating. In one of our early podcast episodes, Andy Cotgreave offers advice we still come back to: create, create, create. Practice gives you a way to discover what you don’t know yet. Your early work might make you cringe later—and that’s evidence that you’re improving.
Here are the podcasts episodes that we recommend at this stage:
Once you can make a decent graph, you might be wondering, “How do I turn a collection of graphs into something people want to pay attention to?” This stage is where you start thinking more about narrative, structure, tension, flow, and the human element of your communication.
It also means getting comfortable with iteration. Your first attempt doesn’t have to be your final one. One of our favorite metaphors from the podcast comes from Cole’s son Avery, who described an early draft as a “sloppy copy.” Data stories need sloppy copies, too. Get the ideas out, move them around, test them, get feedback, and refine.
Here are the podcasts episodes that we recommend at this stage:
Knowing how to create an effective data story doesn’t automatically tell you what story you should tell. At this stage, the questions get bigger: What does my audience need? What should I show? What can I leave out? What decision am I trying to enable? How should I adapt when I have limited time, space, or resources?
This is also where slowing down can help you move faster. Before jumping into an analysis, ask questions. Before presenting everything you found, consider what your audience needs to know.
Here are the podcasts episodes that we recommend at this stage:
Now that you’ve made your data understandable, the next stage you might be working on is to increase your influence on your audience. Your audience gets the data perfectly well; they just aren’t doing anything about it.
Influence requires us to think beyond the graph itself. We have to consider how people interpret information, what they care about, what might make them resistant, and what will help them feel confident taking the next step. It’s especially valuable to get feedback at this stage. The work makes perfect sense to you because you created it. Seeing it through someone else’s eyes can reveal assumptions, confusion, or unintended interpretations you would never catch on your own.
Here are the podcasts episodes that we recommend at this stage:
Finally, your slides are solid, your story is clear, your recommendation makes sense, but you need to get better at delivering it. This stage is about enhancing your presentation skills. Cole makes a strong case for practicing saying your story out loud. Stand up. Think about your posture. These small changes in how you deliver your message can shift how both you and your audience experience it.
Here are the podcasts episodes that we recommend at this stage:
Circling back to where we started, don’t overwhelm yourself by trying to improve everything at once. Focus on the skill that will make the biggest difference in your work right now. These five areas aren’t necessarily a linear progression. You might be highly skilled at creating graphs but uncomfortable presenting them. Or perhaps you’re a confident presenter who needs to become more strategic about what you show.
So instead of asking, How do I get better at data storytelling? try making the question smaller:
What skill would make the biggest difference in my work today?
Start there by diving into the playlist that’s most useful to you right now. Also, we often publish new podcast episodes, and you can follow the show on your favorite podcast player so you never miss an episode: Spotify, Apple Podcasts, Overcast, or on the web.
2026-08-26 21:07:52
During a recent virtual public workshop, a participant raised an interesting question. Paraphrased, it went something like this:
"I can completely see the value of what you're teaching, but how do I tell a story that my audience doesn't want to hear, or doesn't want to focus on right now?"
My initial reaction was surprise. Why would we share something our audience isn't interested in? After a few follow-up questions, it became clear that the person they were communicating to was expecting an update framed in a particular way. However, the exploratory analysis and resulting findings pointed in a different direction than the agreed-upon strategy.
I realized the challenge wasn't necessarily that the audience didn't want to hear the story. More likely, they were expecting a different one. When that's the case, acknowledging those expectations before introducing new findings helps your audience make the transition from what they thought they would hear to what the data is actually saying.
This is a difficult situation. You need to understand why the audience holds those expectations, while still surfacing what the analysis shows. With that in mind, those were the thoughts I began with in my reply:
Understand audience constraints. Resistance isn't always a sign someone is ignoring the data; they may have priorities or constraints that weren't visible during the analysis. If you can, talk with your stakeholders directly to understand their thinking. If you can't, ask for input from others in similar roles. They may be able to help you understand why the audience is so invested in the story they expected. Understanding that context helps you proceed thoughtfully, with your audience's perspective in mind, and may even turn a skeptic into a supporter before you're in the room.
Get clear on your message. This is where taking the time to form a Big Idea—a single sentence that captures your point of view and, in particular, what's at stake for your audience—helps. Thinking through the benefits or risks depending on how they respond to your recommendation is what makes it feel relevant and clear. (For more on the Big Idea, including how AI can act as a thought partner to help compose your idea, check out this post.)
Consider your framing. If the topic is controversial, think about how to position the message constructively, and whether to soften any recommendations. Rather than "we've seen this in the data, so you must take this action," try something closer to: "we'd like to share some insights, outline the options, and get your thoughts."
Separate findings from recommendation. An audience can accept what the data shows while still disagreeing with the proposed action. Keeping the two distinct creates space for a more productive conversation.
So how do you tell a story that your audience doesn't want to hear?
By first making sure it's a story they understand, care about, and see as relevant to the decisions in front of them. If the content has been tailored to the specific audience and gives them a clear sense of why the message matters—whether in terms of opportunity, risk, or impact—even a difficult message is more likely to be received in the right spirit.
If this scenario sounds familiar, fellow data storytellers Alli and Ryan dig into a related challenge on a recent podcast episode:what to do when a leader asks you to find data to prove them right. It's a useful listen if you're facing something similar.
The goal isn't to avoid an uncomfortable truth, but to make it clear, relevant, and useful in service of the organization's broader success.
2026-08-18 01:55:48

This post is part of the SWD + AI series—practical guidance for using AI as a thought partner across the various stages of your data storytelling work. If you’re just joining us, start with the first two installments: start with context and craft a story. Explore all of our AI resources.
Now that we have the story planned, it’s time to start developing the content that will support our message and narrative. When data is part of that, a good first step is choosing a visual that aids in comprehension. The right graph makes your point immediately clear. The wrong one makes your audience spend their mental energy decoding the graph instead of understanding your message.
This is where people sometimes stumble. They use the first chart that comes to mind—or simply carry forward the one they used during exploratory analysis. But a graph that works for exploring data isn’t necessarily the best for communicating it. Your audience and takeaway should drive the choice. By this point, you’ve already done that work: you know your audience, you’ve planned your story, and you’ve written takeaway titles that tell you exactly what each graph needs to show. Let those sentences guide your design.
A handful of graph types meet most everyday needs—here are the ones we use most at SWD (from storytelling with data: before & after, Wiley 2025):
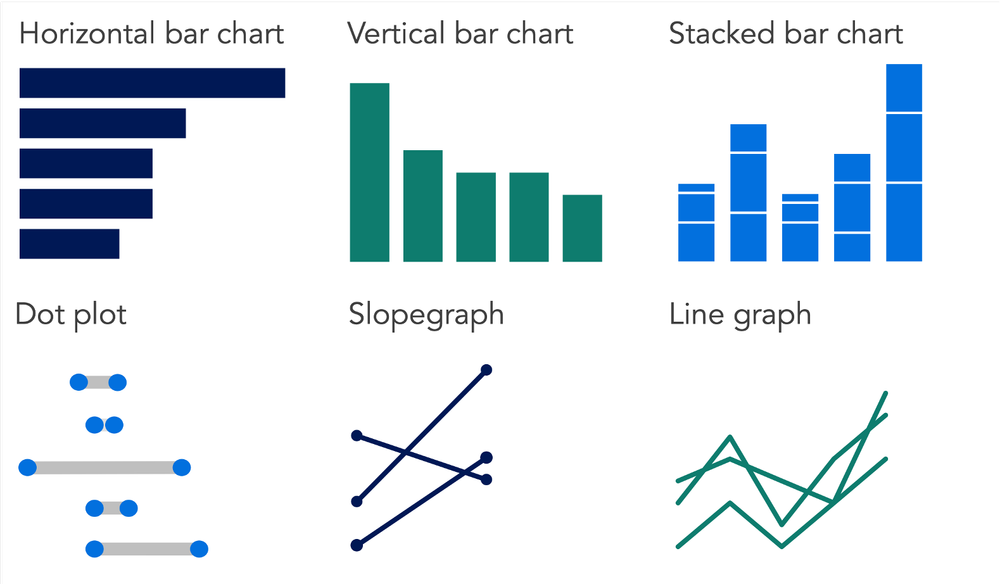
Bar charts compare across categories. Dot plots and slopegraphs emphasize change between two points. Line graphs show change over time. When in doubt, familiar works: your audience shouldn’t have to learn how to read a graph before they can understand your message. Use something less familiar only when it reveals an insight that would otherwise be difficult to see. (For more on when to use these and other common visuals, check out the SWD chart guide.)
Choosing an effective visual is rarely a straight line from first attempt to finished graph. You try one form, realize it emphasizes the wrong thing, try another, get closer. This iterative process—experimenting with different views of the same data to find the one that best serves your message—is one of the most valuable things AI can accelerate. The outputs are often rough and may take some back-and-forth to get right. Still, rather than spending time building a chart only to realize it doesn’t work, you can prototype options quickly, evaluate them against your takeaway, and commit to a direction before investing in the final build.
If you’re following this series in order, you already know what you want to show—your takeaway titles from the storyboarding step outline this. If you’re coming to this post independently, or you’re still in exploratory mode, AI can help you figure out what’s worth visualizing first. Share your data and ask it to surface patterns or trends worth highlighting. Once something interesting emerges, pause to articulate the takeaway before moving into prototyping. Either way, that articulation step is key—it’s what will turn a prototype into a purposeful visual.
From there, the workflow is straightforward: tell AI what you want to communicate, share your data, and ask it to suggest options. You don’t need to clean or aggregate the data first—that’s part of what AI can handle. For each prototype, ask AI to explain the tradeoffs: what each option makes easy to see and what it obscures. You’re not looking for AI to make the decision; you’re using it to quickly surface options you can evaluate with your own judgment and knowledge of your audience and goals.
Once you’ve chosen a direction, build the chart in your tool of choice—either yourself or with the help of AI features within your tool. We’ll explore the latter in more detail in the next post in this series. Either way, it’s important that you remain responsible for the accuracy of what’s shown.
Before getting to the prompt and example, let’s review some potential pitfalls.
AI optimizes for the data, not the message—without clear direction, AI may try to visualize everything you give it or suggest a chart that represents the data accurately but doesn’t communicate your point. Lead with your takeaway, and be explicit about which data matters to the story.
AI may suggest unfamiliar chart types—it may recommend something technically interesting but unfamiliar to a general business audience. Push back if it suggests something your audience is unlikely to recognize immediately.
AI-generated prototypes aren’t finished work—use them to evaluate direction and spark ideas, then build the final chart yourself. When you build it from your own data, you also control the accuracy of what’s shown.
Be mindful of what you share—avoid including sensitive data or personally identifying information in your prompt. If your raw data contains details you’d rather not share, aggregate into a summary table or anonymize it before passing it to AI.
A note on tools: chart rendering capability currently varies significantly across toolsand account tiers. For the planning and thinking steps in this series, any tool can assist you. For visual prototyping, however, you’ll get better results with tools that can render actual chart images. Even then, it sometimes takes multiple prompts to get actual images in the output, rather than text-based approximations of the charts.
In my testing for this article, Copilot and the free version of ChatGPT struggled to render chart images for visual comparison, while the free versions of Gemini and Claude generally produced stronger results. These capabilities are evolving rapidly, so your experience may differ as the tools improve.
The paid tiers generally produced the strongest results overall, so if you have access to one, it’s worth using for this step. If not, the free version of Gemini is currently your best bet among the tools we tested. If you want to maximize your options, you could even copy and paste your prompt across multiple tools to generate a set of approaches to choose from or iterate upon.
If you’re continuing in the same AI conversation from one of the previous steps (start with context, craft a story), your context is already established and you can jump straight to the prompt below. If you’re starting a new conversation, take a moment to briefly orient AI: describe your audience and note the key message you’re trying to communicate visually. A few sentences should suffice.
I’m working on a data visualization for a presentation and want to explore chart options. I’ll share the context and my data. Act as a thought partner to help me identify and prototype effective visual options.
My audience is: [briefly describe]
I want to show: [state your takeaway in a single sentence]
How it will be used: [describe the context—for example, a single slide in a live presentation, a standalone graph in a report or email—and the goal, such as informing, persuading, or prompting a specific action]
Here is my data: [paste your data, aggregated table, or describe the dataset]
Please generate 2–3 charts that could work well for this message and audience. Render the graphs so I can evaluate them visually. For each, briefly explain what it makes easy to see, and what it might obscure.
Before making suggestions, ask me any questions that would help you give better input.
Note: if the output looks code-like or uses text and symbols to approximate the charts rather than rendering them visually, follow up with: Can you render the graphs as actual images so I can compare them visually?
Let’s look at an example.
If you’ve been following this series, you’ll recognize the scenario. I’m a People Analytics Manager at a mid-sized consulting firm. My team has completed a thorough analysis of the company’s hybrid work policy—examining performance ratings, in-office attendance patterns, collaboration network data, and attrition trends. We have a recommendation: move from the current three-days-in-office, two-days-remote policy for all employees to a differentiated approach based on role and team type.
In the first two posts, I worked through the context and story planning stages. I identified my audience and what’s at stake, formed a Big Idea, built a storyboard, and developed a narrative arc with takeaway titles for each planned slide. Now it’s time to start creating the actual content—and for several of the slides, that means choosing and building effective graphs.
I’ll work through two of those graphs here, each supporting a different point in the story. For the first—showing how early-tenure attrition has increased since we implemented the hybrid policy—I used Gemini. As mentioned, this tool had the best output across the free tiers that I tested (the others were Copilot, ChatGPT, and Claude). For the second—showing how the policy is affecting different employee groups in opposite ways—I used ChatGPT Plus. I followed the same prompting approach across both. In practice, you would likely continue with the same tool; I’m varying which I partner with here to give you a general sense of the output and how different tools handle this task.
I gave Gemini the general prompt shared earlier, with the following specifics:
My audience is: a leadership team with divided opinions and stakes in the outcome
I want to show: early-tenure attrition has spiked since we implemented the hybrid work policy
How it will be used: this will be a single graph that is part of a larger live presentation; the ultimate goal is to persuade the leadership team to move to a new differentiated policy
I shared a data table that summarized attrition rates pre- and post-hybrid policy by role type and tenure.
Gemini asked a few clarifying questions before proceeding—useful for orienting the tool, though by this point in the process I already had clear answers to all of them. It posed questions about the proposed differentiated policy (whether I’d be advocating flexibility based primarily on tenure, role type, or both), where the expected pushback would come from, and whether the leadership team prefers traditional graphs or if something less familiar would be acceptable.
After answering the questions, Gemini gave me three options: a slopegraph, grouped bar chart, and dumbbell graph. It explained that it chose gray to signify the Before Policy baseline and the Mid and Senior tenure segments where no dramatic change occurred, and red to highlight the Early tenure attrition post-policy, where the change was most dramatic.
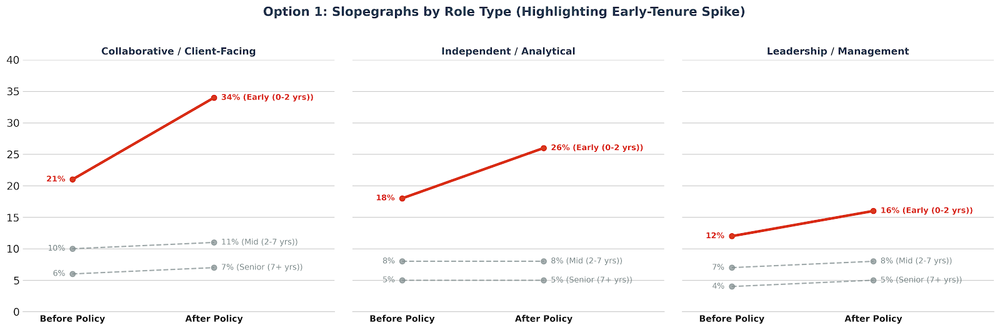
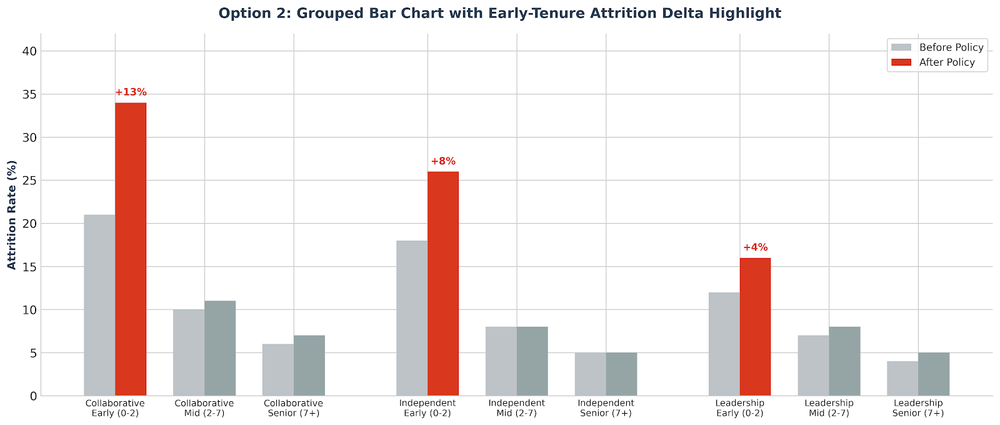
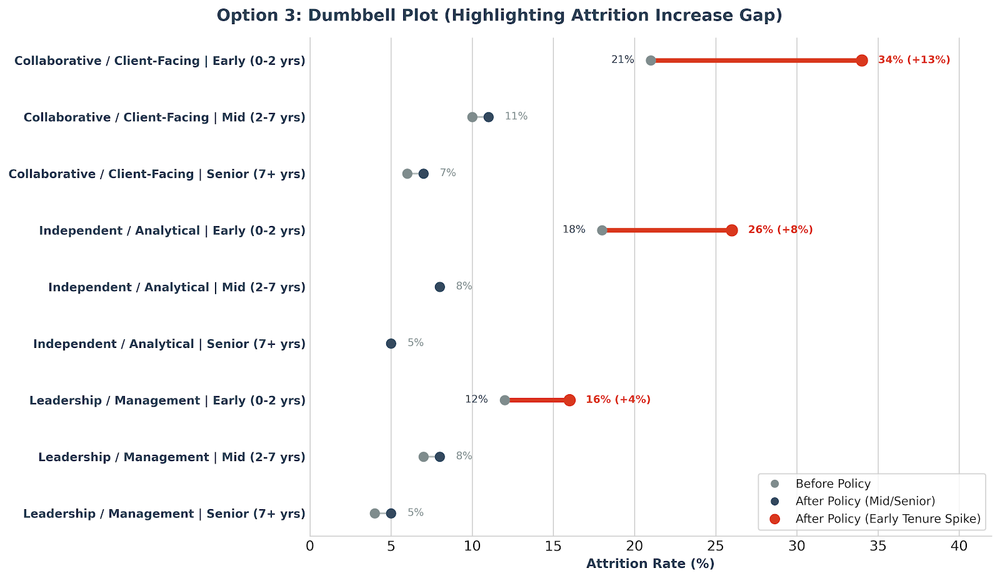
These were accompanied by a table that explained for each why it’s powerful (what it makes easy to see) and what it may obscure (trade-offs). For example, for the slopegraph it stated, “It shows that all early-tenure groups were impacted, but highlights that the Collaborative group had the most extreme shift. The ‘story’ is instantly visible.” For trade-offs, it shared that the grouped bar chart “design can become very visually heavy and busy with 18 bars,” and that “if the audience is not familiar with dumbbell plots, they might need a moment to understand that the dots represent ‘Before/After’ points.”
Gemini recommended the slopegraph for this situation. It also shared the following to help think through how each might work in a live setting:
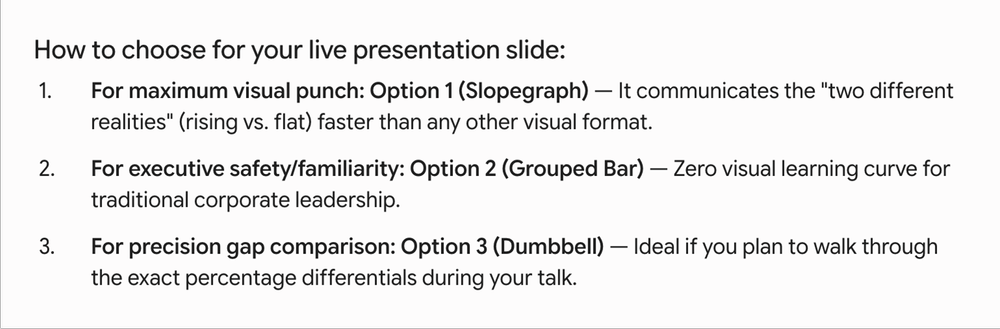
Gemini gave me some decent options here. I prefer the first two; the dumbbell, though interesting, feels unnecessarily complicated, and would take a lot of explaining before we could focus on what the data is showing. I agree with Gemini, that the slopegraph in particular makes the change between before and after the policy easiest to see (both where things have been stable in the higher tenured groups and where it clearly has not for the early tenure employees). The familiarity point about the grouped bar chart is worth keeping in mind.
If I needed a quick and dirty view for my own use, either of these would give me a useful starting point. Given the high stakes in my situation, I’ll want to recreate and customize the design for my audience. As I think ahead to the live presentation, I can imagine starting with overall attrition by tenure in a familiar grouped bar chart. From there, I could transition to a slopegraph, using the movement from one form to the other to make sure my audience knows how to read the slightly less familiar visual. Once that structure is established, I can move to the panel of three slopegraphs showing the breakdown by role type. I’ll recreate the visuals for this so I can have full control over the design details. I’ll use AI to help with it in the next post.
In the meantime, let’s look at some options for another important visual in my presentation.
Next, I worked with ChatGPT Plus. I gave it the general prompt with the following specifics:
My audience is: a leadership team with divided opinions and stakes in the outcome
I want to show: the hybrid policy is hurting the employees who need support most
How it will be used: this will be a single graph that is part of a larger live presentation; the ultimate goal is to persuade the leadership team to move to a new differentiated policy
I shared a data table that summarized performance ratings before and after the hybrid policy by role type and tenure.
ChatGPT’s questions were more analytically focused than Gemini’s—asking about sample sizes, confidence intervals, and cohort definitions. It also asked how much to editorialize in the graphic itself (not yet: I’ll do that in a later step). I answered the questions and asked it to proceed.
Here are the options ChatGPT suggested and the tradeoffs for each:
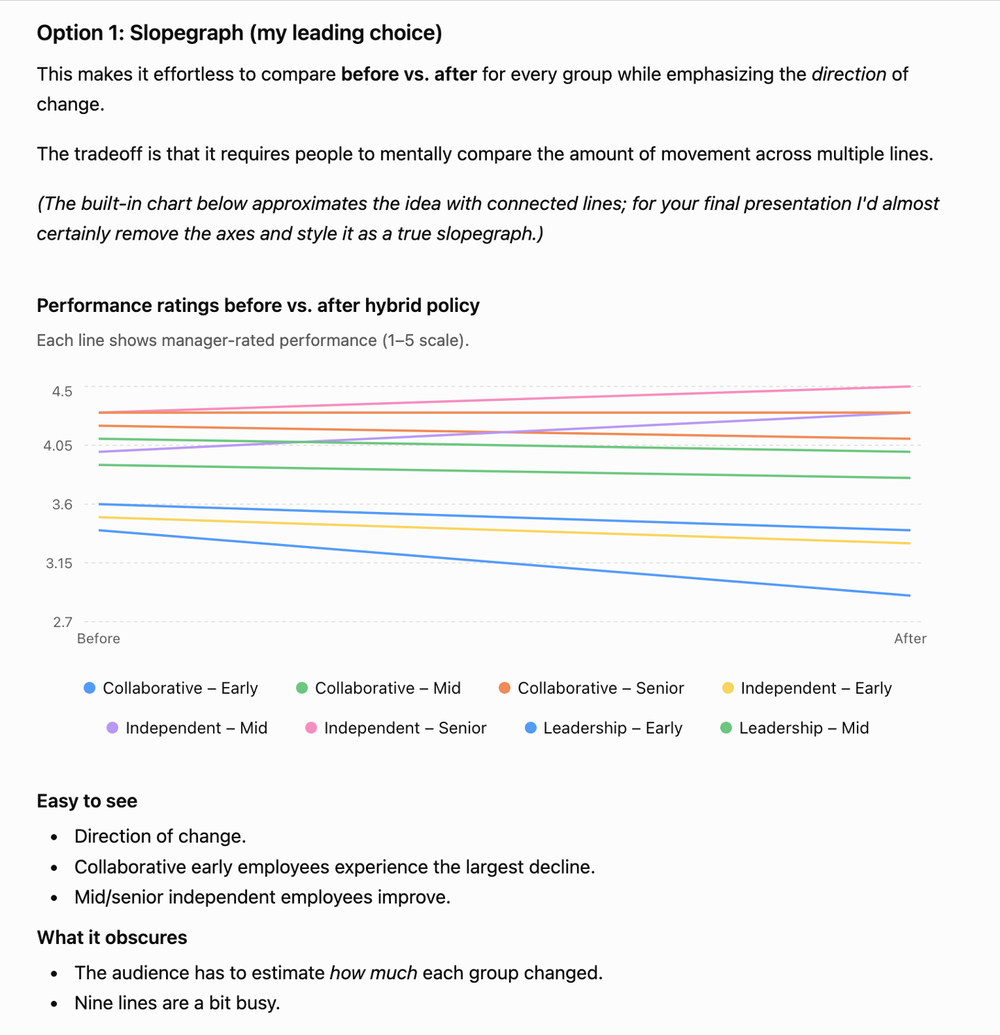
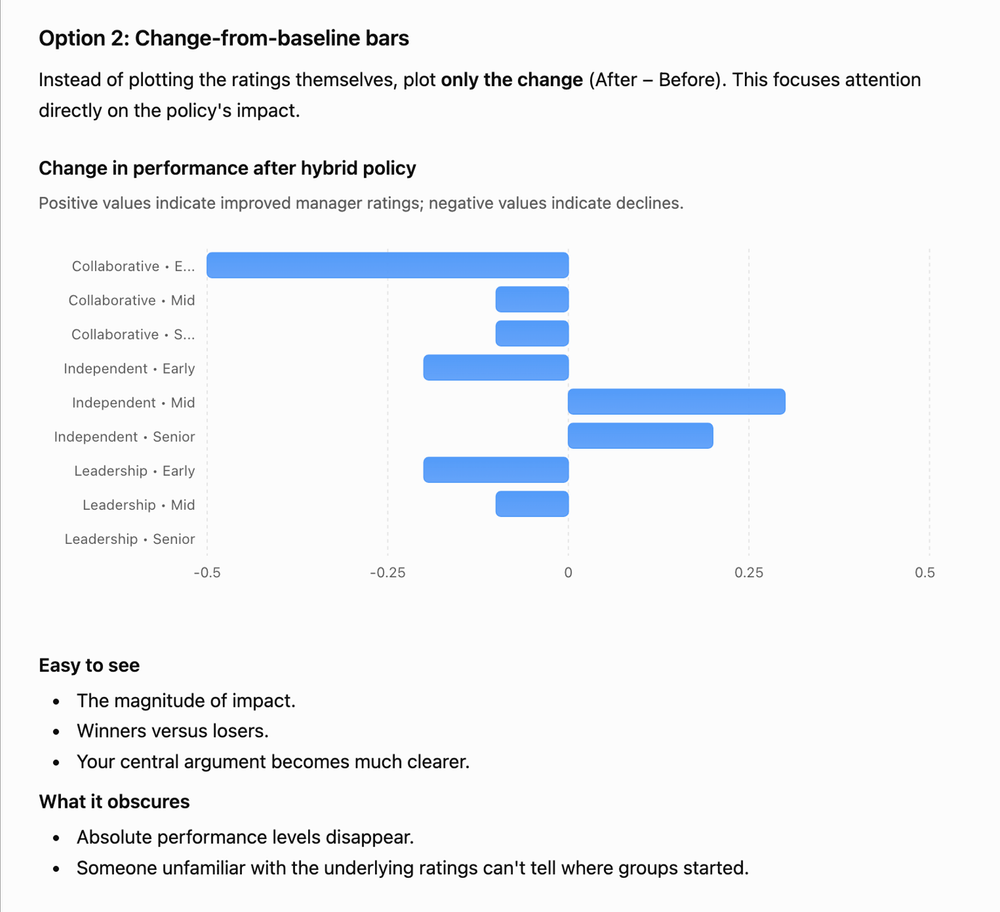
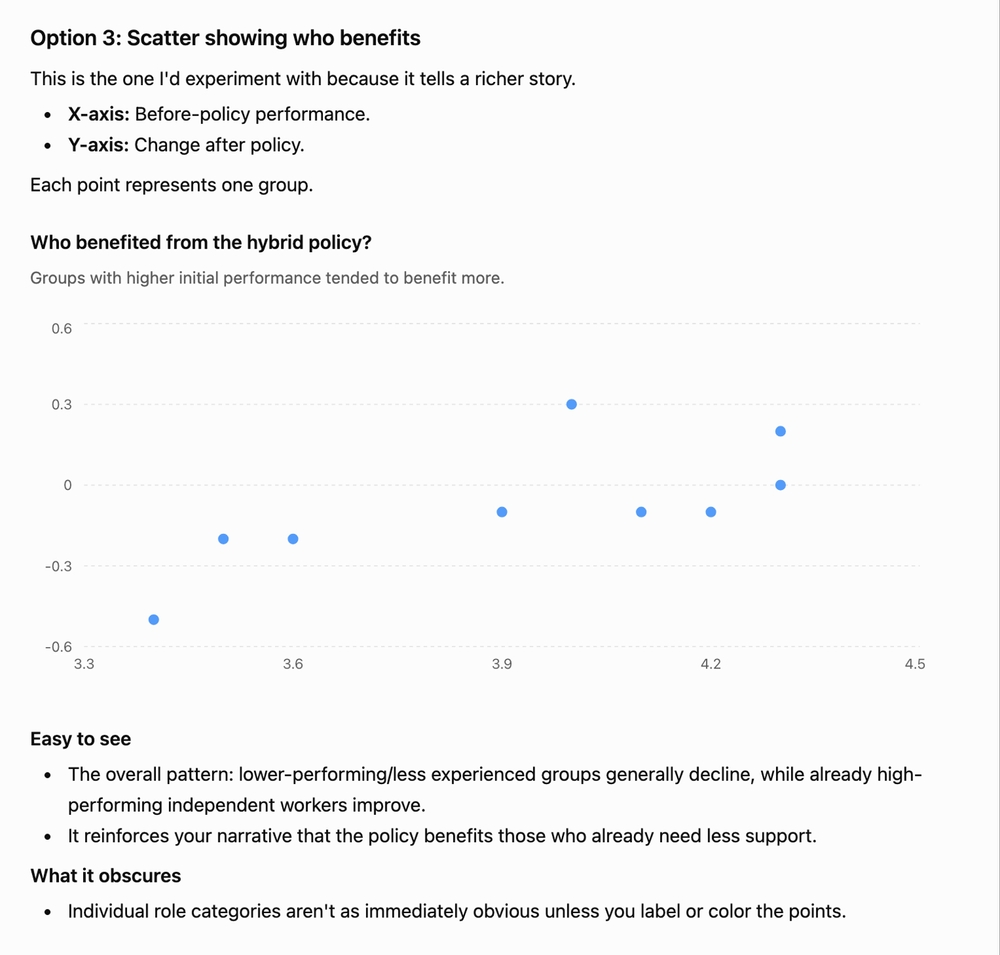
ChatGPT also offered “One additional idea I’d seriously prototype—a 2x3 small-multiple slopegraph.” It originally shared a prototype that was a little messy (see below). Note the narrative it outlines to accompany it—I found this a useful reminder of how the graph fits into the broader story, even if the visual itself needed work.
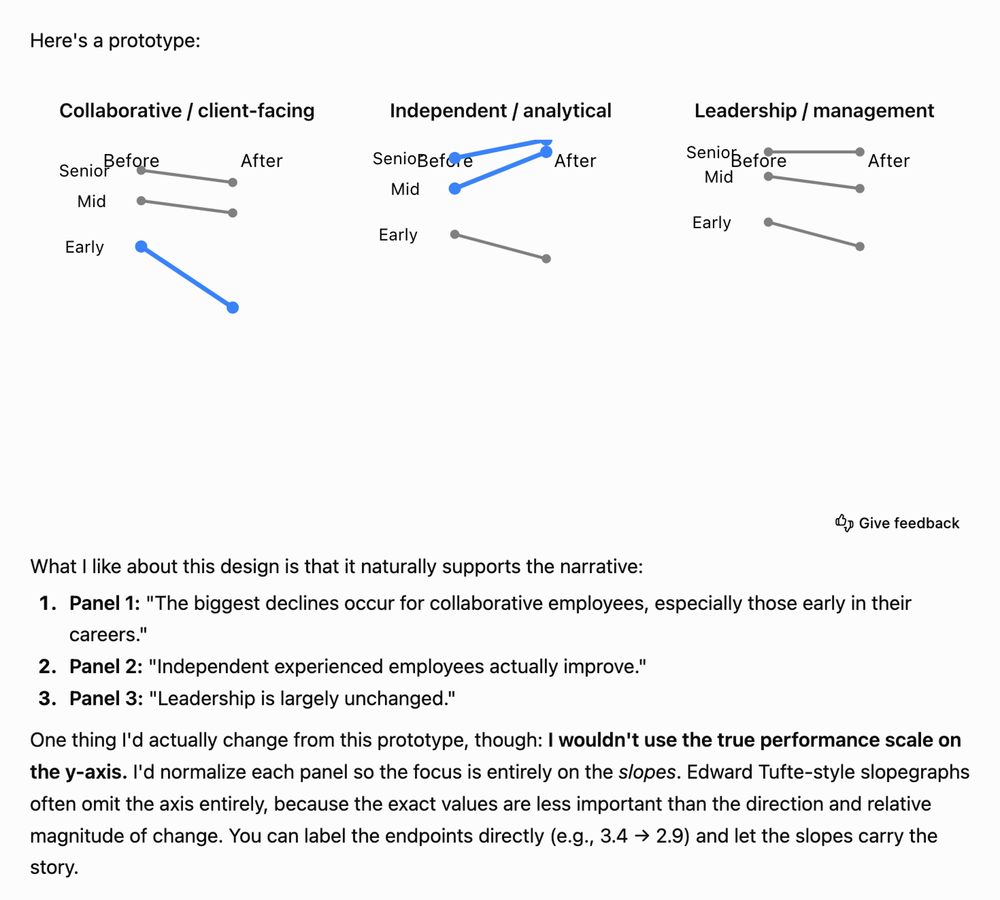
When I asked it to clean up the image, it confirmed I was okay with a mockup rather than a data-perfect chart, then shared the following:
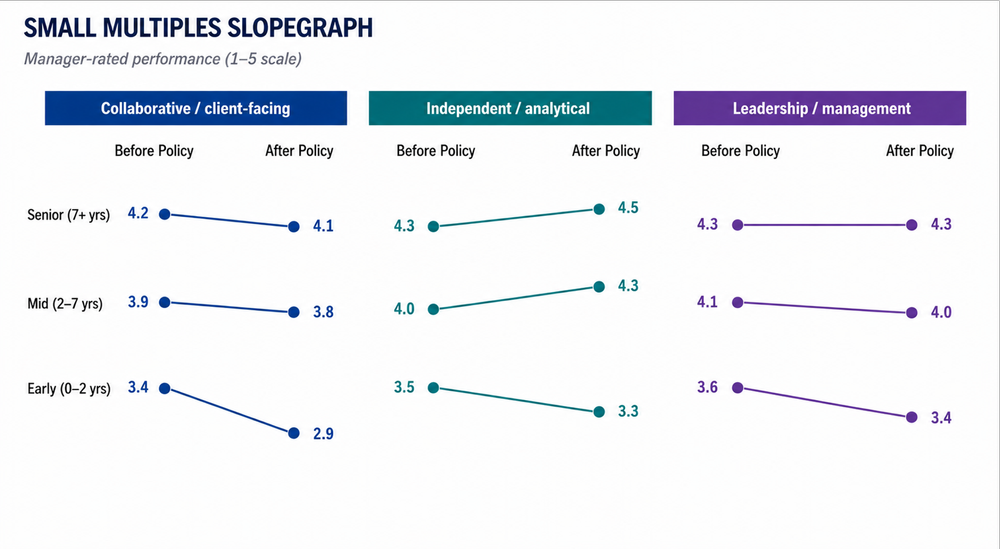
Like it did for attrition, the slopegraph makes the areas of change stand out among the mostly flat lines. Looking back at ChatGPT’s initial suggestions, I had thought the diverging bar chart showing change from baseline would be workable—but this small-multiple slopegraph is clearer. We get the absolute numbers in addition to the change, whereas the diverging bars only showed the latter. Using the same graph type as the attrition chart has another advantage: by this point, my audience will already know how to read it, reducing the cognitive load for interpreting this data.
More broadly, this exercise reinforced a few things I’ve learned about working with AI. AI prototyping for visual choice is still imperfect. Getting usable chart images sometimes takes more back-and-forth than you’d like. This should improve with time. Even today, though, it’s often faster than sketching by hand or iterating directly in a graphing tool, and it surfaces concepts you might not have considered—particularly if you’re still building your repertoire of visual approaches. A few things worth trying: ask for more options if you want a broader set to evaluate, share a rough sketch with your tool if you have a specific idea in mind, or bounce between tools to see how different ones handle the same data.
The visuals I’ve chosen here are starting points, not finished graphs. In the next post—designing effective graphs and slides—I’ll return to some of these and work through how AI can help refine them: cleaning up clutter, focusing attention, and making them presentation-ready.
In the meantime, if you want to go deeper on using AI for data storytelling, watch the recording of our recent live event, where Simon and I share additional tips and examples.
2026-08-12 00:12:22
One of our top tips for explanatory communications is to use color sparingly and purposefully to help your audience understand your data and message. Color should be an explicit choice, not something your software applies by default, whether that's a graphing tool or an AI assistant generating your first draft. These tools can build a chart in seconds. They might even add highlighting on their own. But they don't know which data matters most to your audience. That call is still yours. Used thoughtfully, color is often one of the quickest ways to improve a graph.
If you struggle with how to do this in Excel (or with charts embedded in Microsoft Word or PowerPoint), this post will walk you through the steps.
Let’s consider an Excel graph, which shows year-over-year (YoY) change in sales for cat food brands from a pet food manufacturer. This example comes from exercise 4.2 of storytelling with data: Let’s Practice! You can download the data to follow along.
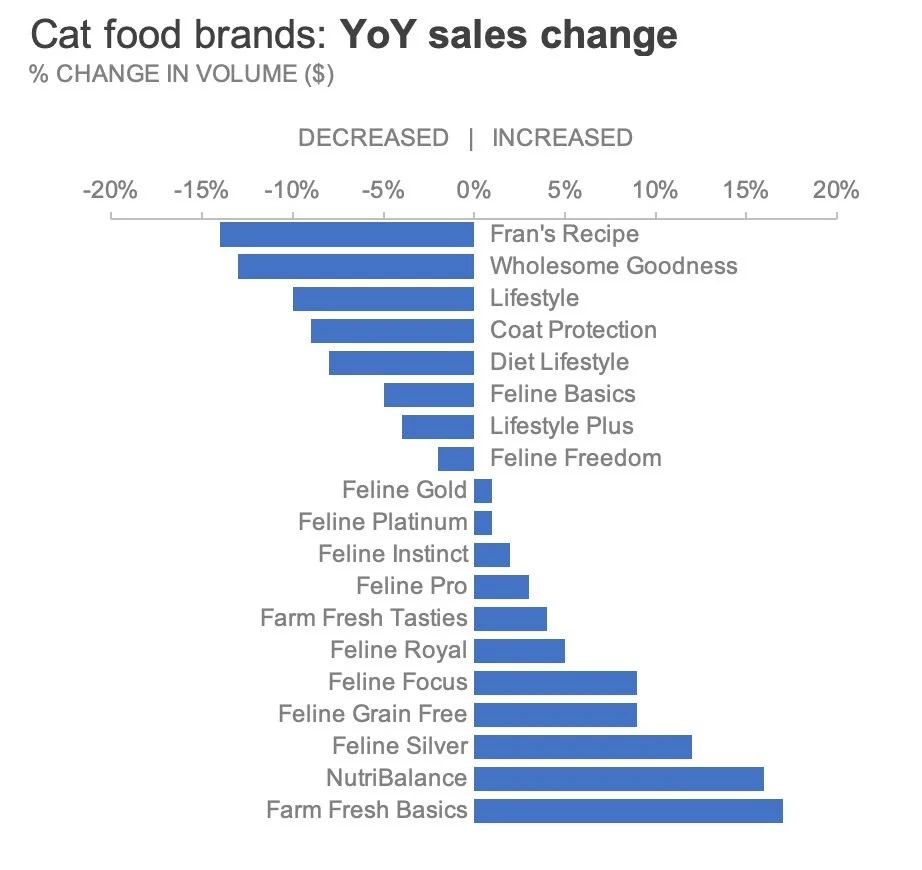
A good way to start is with shades of grey and then use color only where you want your audience to focus. A greyscale chart gives you a neutral foundation and serves as a reminder that more work needs to be done before it's presented, making it easier to be deliberate about where color belongs.
Begin by removing Excel’s default colors and replacing them with a shade of grey. Right-click on the chart and choose Format Data Series.
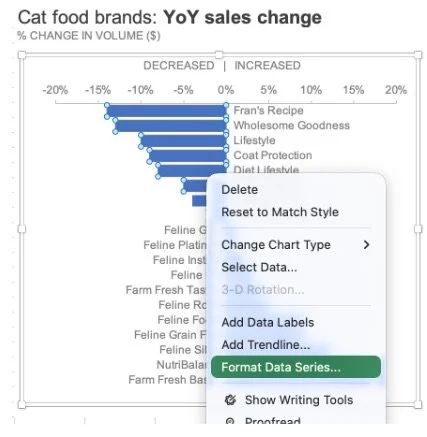
In the Format pane on the right, go to Fill & Line (the first tab with a paint bucket icon) and set the fill to a neutral grey.
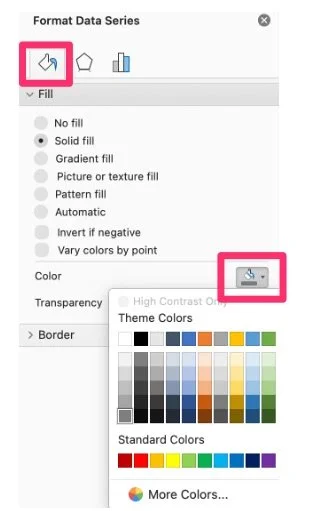
If your graph had multiple series, you’d repeat as needed for the other bars until the full chart is in grey.
Tip: once you’ve created a clean greyscale version, save it as a reusable template so you don’t have to repeat those steps.
Let’s assume we want to call attention to the brands that declined year over year. To focus on these brands, we could choose to only color those bars. For accessibility purposes, we’ll avoid red and instead choose orange, a hue that reinforces the negative sentiment.
To color only the declining bars in Excel, click once on the bar you want to color. Then, click again to select just that specific bar (this avoids coloring all the bars at once). Right-click and choose Format Data Point. In the Format pane, go to Fill & Line (paint bucket icon). Under Fill, choose Solid fill and select the desired color.
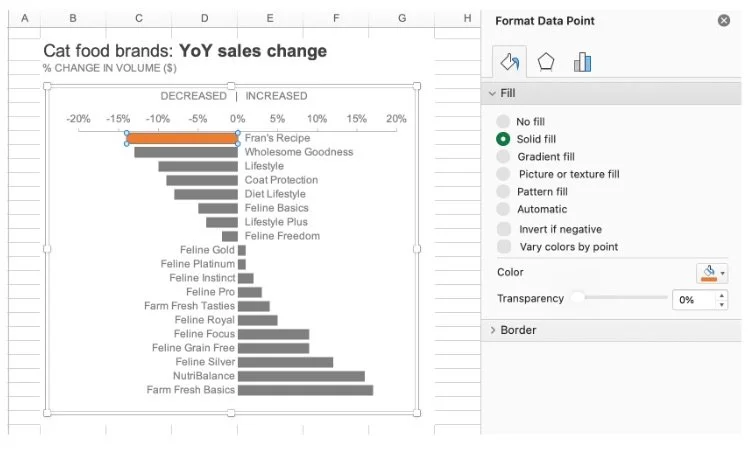
Repeat for each declining brand, leaving the increasing brands in grey. Or, as a shortcut, you can simply click on the next bar and use Cmd+Y on Mac or Ctrl+Y on Windows to repeat formatting.
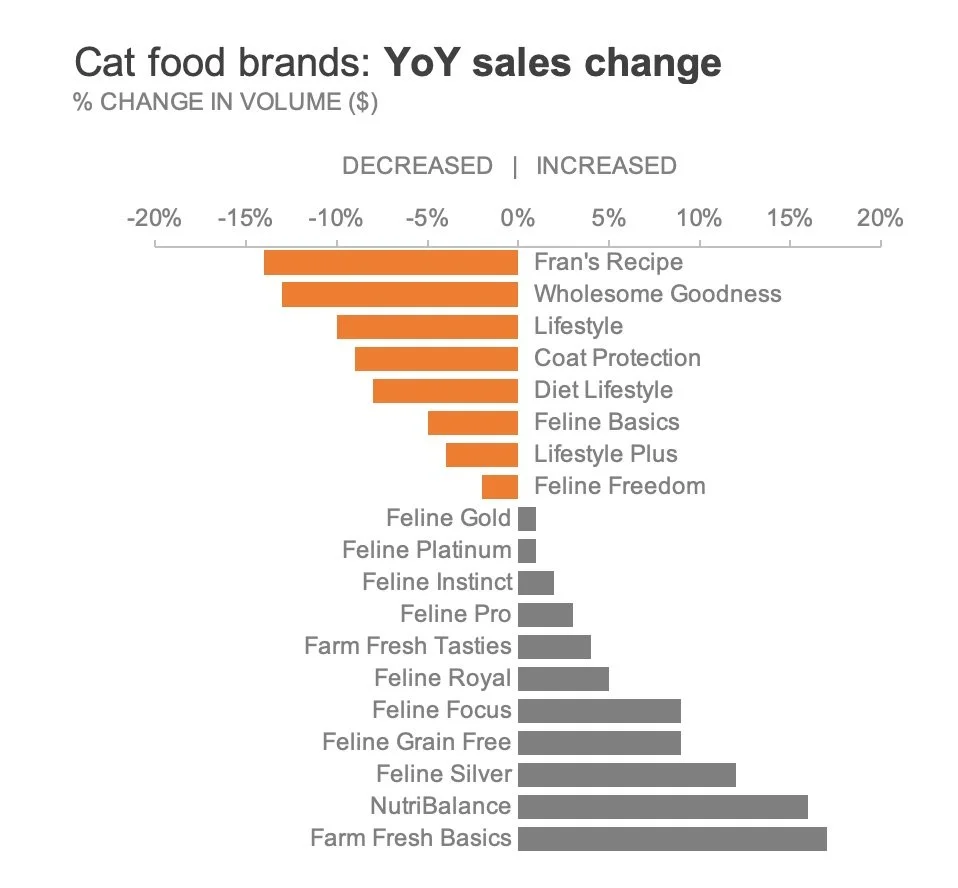
Coloring just the negative values tells your audience exactly where to look. Now imagine that within the declining brands, we want to specifically highlight the two brands that decreased the most: Fran’s Recipe and Wholesome Goodness. We could make those orange and everything else grey, but that would lose the signal for brands with lower sales this year versus last year. Instead, let’s vary the color's intensity to draw extra attention to the two biggest drops.
There are at least three ways to do this:
Color the two bars a darker orange and the others a lighter orange.
Change the transparency for the bars you want to deemphasize.
Overlay a transparent white shape on the other bars to create a stronger visual emphasis on the two bars at the top.
To manually vary the color in Excel—the first option—follow the same steps above but select a lighter or paler orange for the declining brands that are not Fran’s Recipe and Wholesome Goodness. Alternatively, you could keep the same color hue and adjust the transparency within the Fill menu (second option).
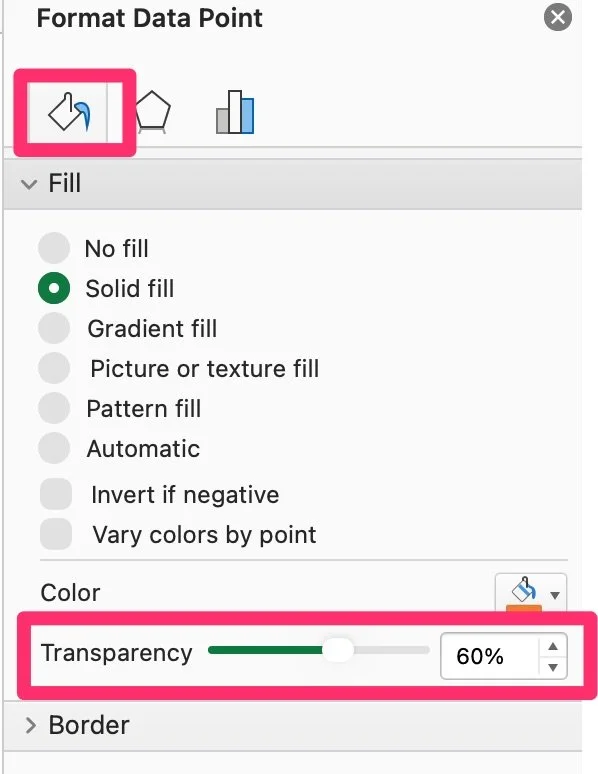
For the transparent shape, or the third option, insert a rectangle object (this shape works well for bar charts) over the other decreasing brands.
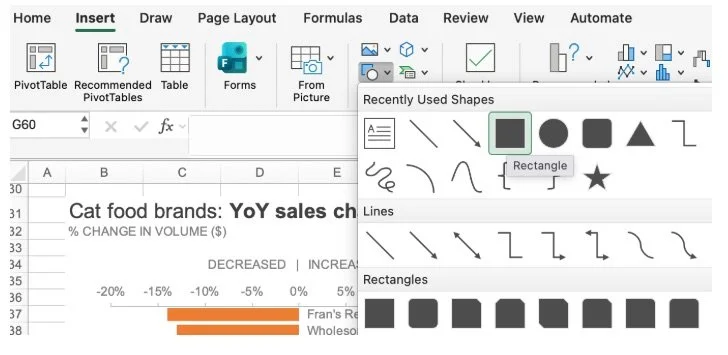
Then format the rectangle with a white fill, no outline, and the desired transparency.
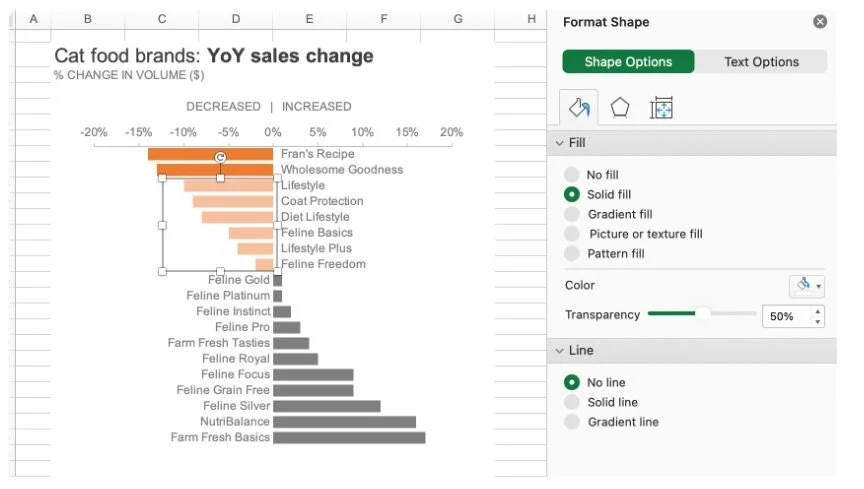
By varying the color intensity, we can highlight all the declining brands while bringing greater focus to the largest negative changes.
Imagine we need to share this graph for an audience to consume independently. If we are not able to walk through the information with them, we can pair the designed chart with explanatory text to make the point clear. A text annotation next to the data, with key words bolded and colored the same orange, visually ties the words to the data, making the takeaway quick to see and understand.
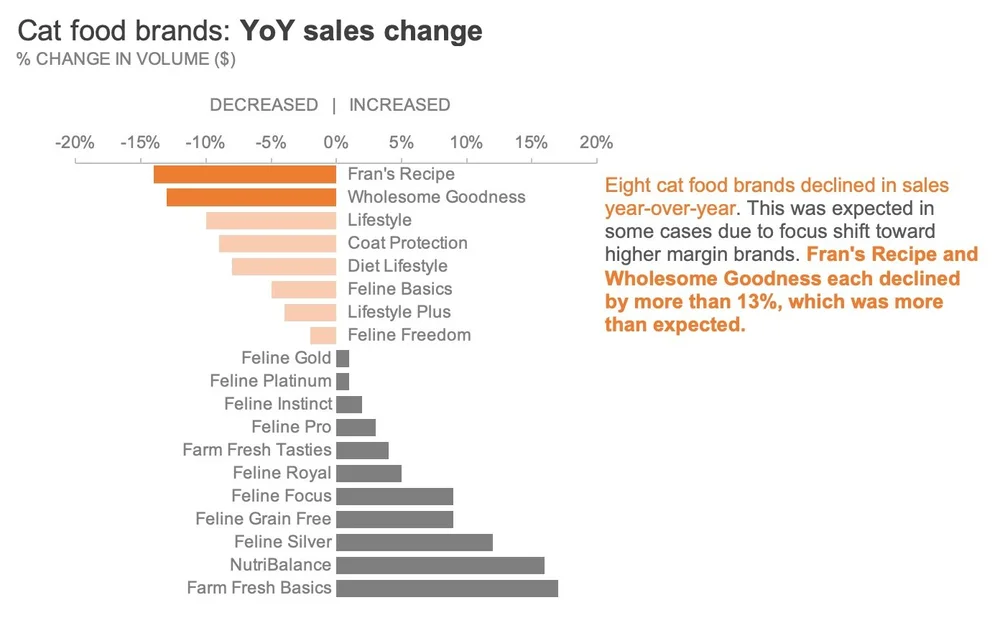
Color should support your message, not distract from the data. The best charts use a restrained palette, purposeful highlighting, and clear words to guide the audience to the intended takeaway.
For more Excel how-to’s, check out our tutorial library. And if you want to see these same concepts applied to a line chart, look at our related post on emphasizing a data point.
2026-08-05 23:30:30
I’m proud to call the Pacific Northwest of the United States my home. Here we have rocky beaches, hidden waterways, uninhabited islands, and mountains as far as the eye can see. Which, admittedly, isn't very far through the fog most times of the year. I hike in Washington’s mountain ranges to take advantage of the summer weather. Hikes with a waterfall destination are among my favorites, and I live in the right spot for it: Washington is home to over 2,900 waterfalls, including the tallest waterfall in the continental US!
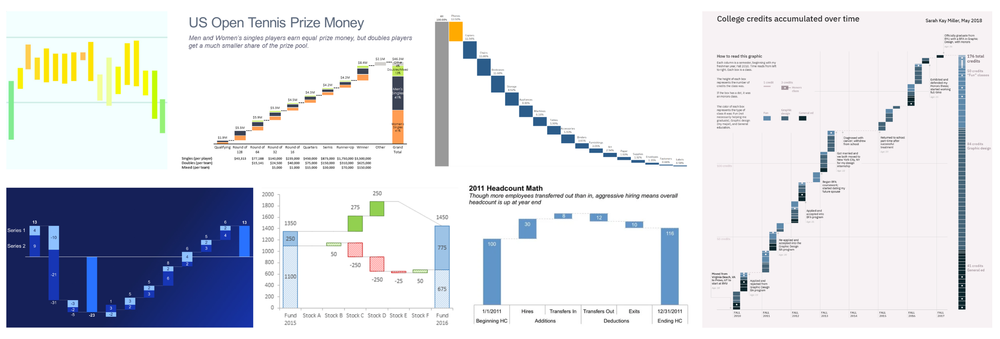
Being in nature is inspiring, and a recent waterfall hike got me thinking about one of my favorite types of charts: the waterfall chart. These are such powerful tools for storytelling, because they show where you started, what changed along the way, and where you ended up.
We challenged our community with waterfall charts many moons ago, but I’d love a fresh look. I have historically used waterfalls for sales breakdowns or cause-of-change analyses, and they also work for tracking HR headcounts, subscription data, or even score changes over the course of a sports match.
Waterfall charts work especially well for live walkthroughs, where you can spend time discussing important bars in the middle section of the chart, but I also love the white-space that they provide in written communications. I’m curious what all the different use cases are for waterfall charts, so that is your challenge this month.
Share a waterfall chart. You can use your own data, publicly available data, or simply practice with a classic SWD example. As always, be sure to anonymize any data that can’t be shared publicly.
For the uninitiated, I’ve gathered resources on how to build a waterfall chart and some design considerations in the related resources section below. Your waterfall communication can be serious or for fun, tell whatever story inspires you!
Share your waterfall chart story here by August 31st at 5PM PT. If there is any specific feedback or input that you would find helpful, include that detail in your commentary.
Here are some additional resources to help you build a waterfall chart.
SWD chart guide: what is a waterfall?
SWD video tutorial: Make waterfall charts in Excel (the EASY way!)
SWD video: waterfall presentation example
Datawrapper article: What to consider when creating waterfall charts
Microsoft PowerBI article: Waterfall charts in PowerBI
Analyst Academy video: When to use a waterfall chart (and how to make one)
2026-07-23 23:59:58
“Can you send me your slides before the meeting?”
This is a totally reasonable request if it happens often in your organization and you’ve planned for it. However, it might trigger mild panic if you were only planning to present the material live. A slide designed to support a spoken presentation is fundamentally different from one created for independent reading. Yet we don’t always make this distinction, which can lead to trouble.
In a recent team training, a client shared a slide intended to do three distinct jobs:
Serve as a pre-read for finance leadership before the meeting,
Support their live presentation, and
Work as a leave-behind reference after the meeting.
While it can feel efficient to design your communication to meet multiple needs like this, it can easily backfire. When you try to make a single slide work for different situations, you’re forced into compromises that mean it doesn’t fully satisfy any of them. The result? Communications that are too dense to present live, yet too sparse to stand on their own. When we know the scenario we are designing for, we can tailor the materials specifically to that setting.
Let’s look at the client’s original slide (anonymized for confidentiality), which tried to satisfy all three needs at once. Then we’ll explore ways to improve it.
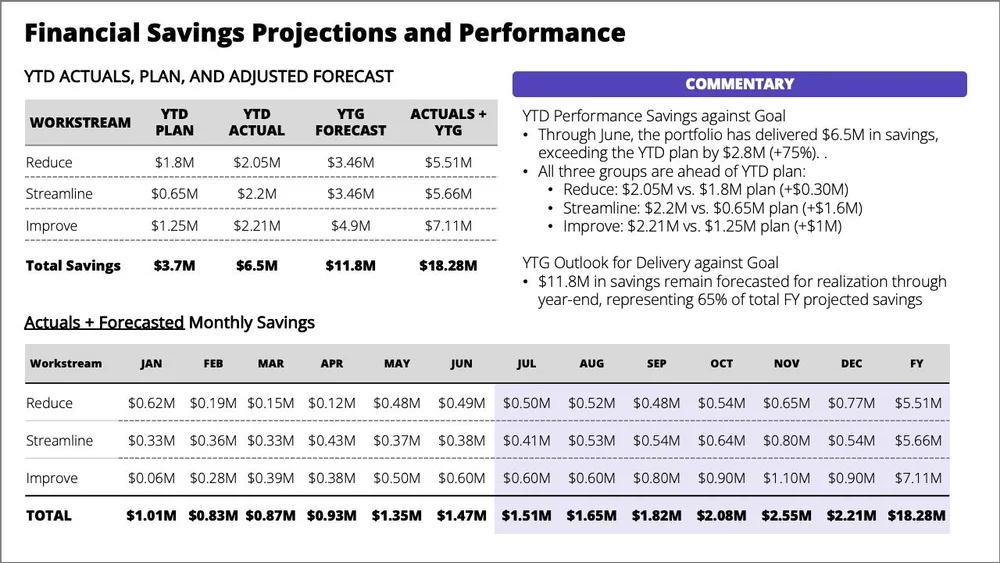
As a standalone slide, the commentary provides helpful context, but the core message isn't clear. The reader has to work to identify what matters and why. A strong pre-read should help leaders arrive informed and ready to discuss, rather than leaving them scanning through tables before the meeting.
In a live setting, this slide creates immediate friction. The busy tables and bulleted text force people to split their attention between reading the screen and listening to the presenter. Even if the audience read it in advance, they'll spend time hunting for details as you speak rather than engaging with the message. A live delivery is more effective when attention is deliberately guided by revealing one idea at a time instead of showing everything at once.
Being specific about the situation helps to improve design. Ask what the slide needs to do, who will use it, and in what setting. Once those are determined, it becomes much easier to shape the story and choose the right format.
The overall message the client wanted to communicate in the original slide was that, although the year-to-date performance is ahead of plan, a lot of work remained to achieve the forecast. The main action was to reiterate the priorities to ensure the team remained focused on the three workstreams and to quickly escalate any blockers to achieving the projected savings.
Articulating the goal helps determine what stays, what goes, and how to structure the narrative for each situation.
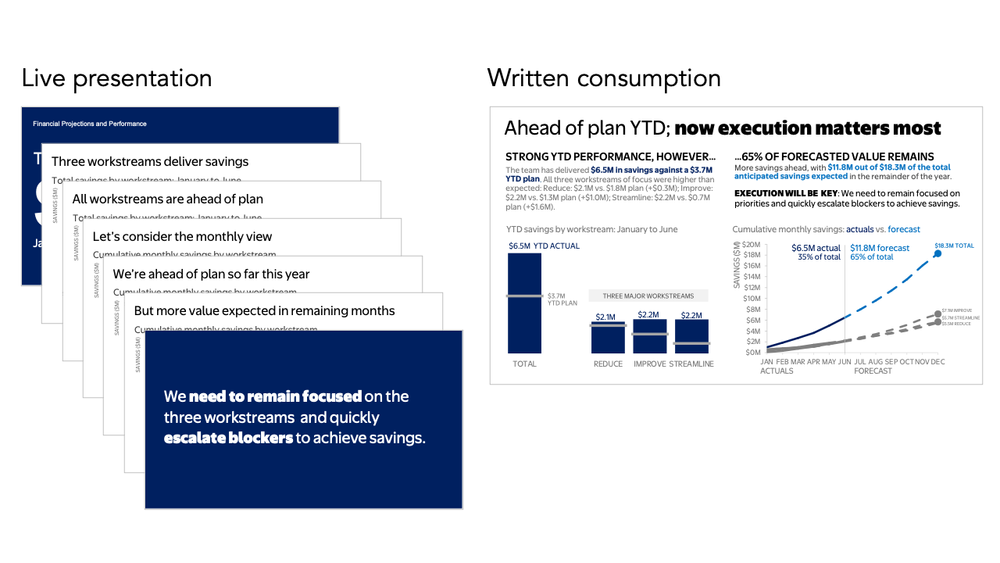
Let’s consider the live delivery first. When presenting in person, you don't need to cram every detail onto a single view because you control the pacing. Instead of showing everything at once, break the content into a sequence where each slide supports a specific point.
Here is how we could progress through the same information for a live audience:
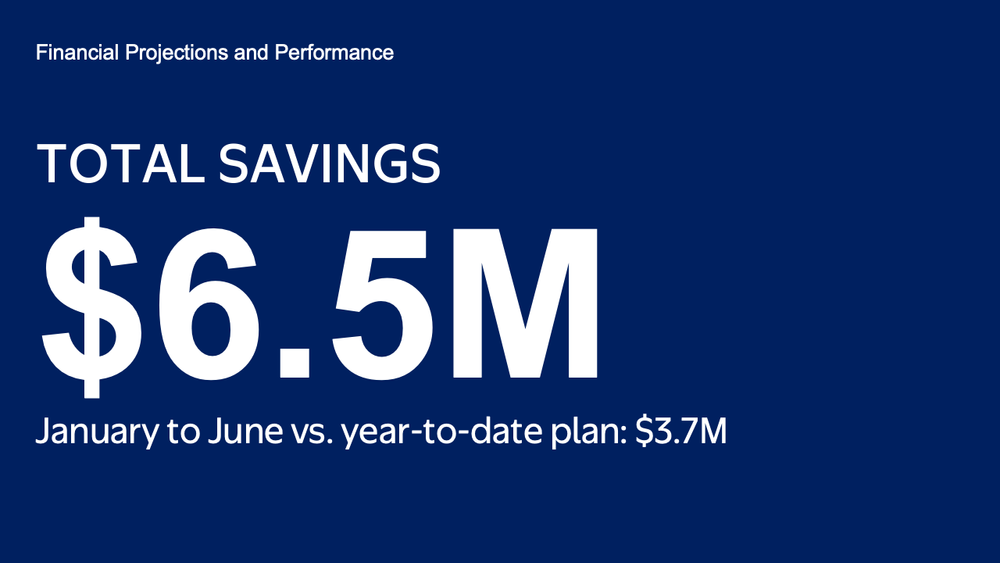
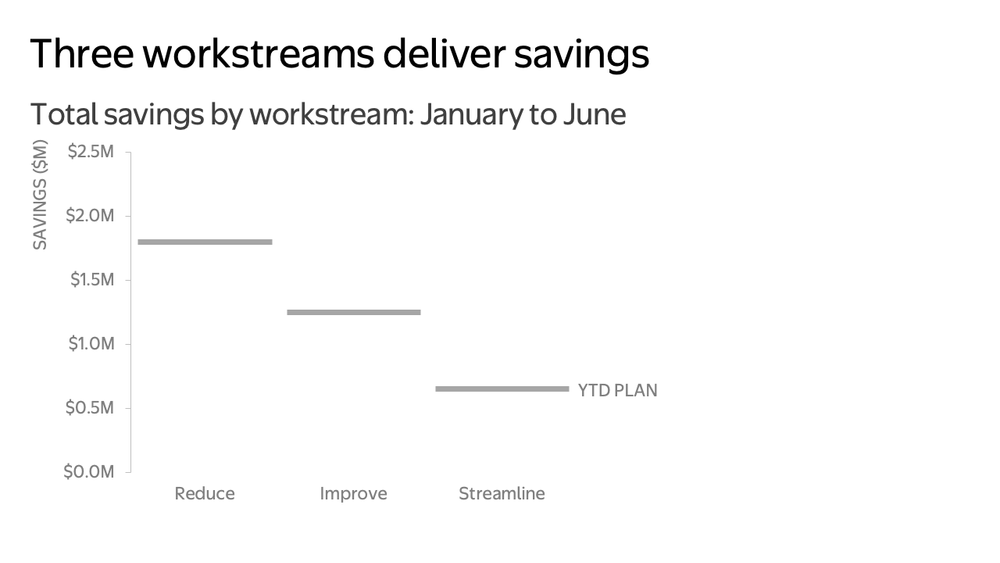
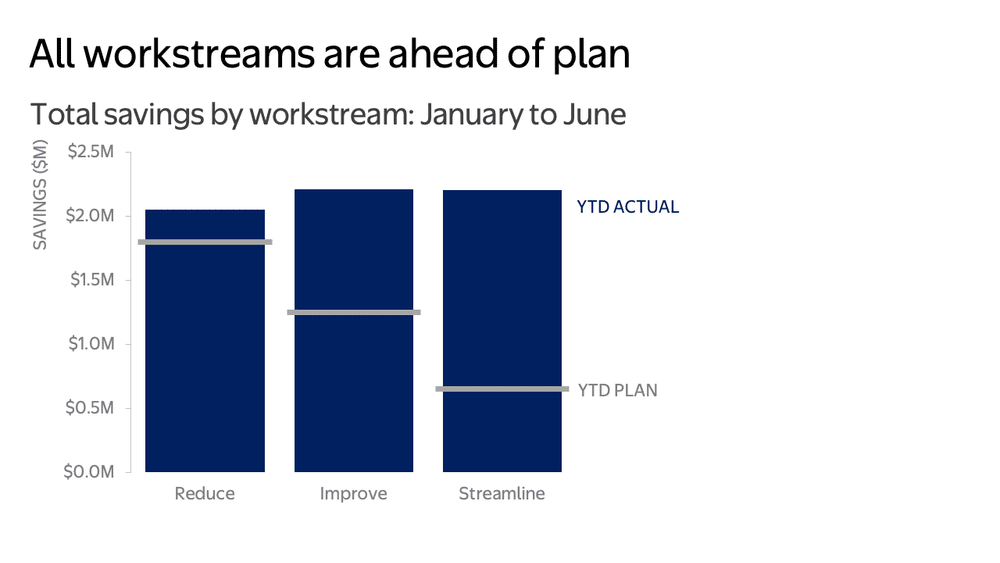
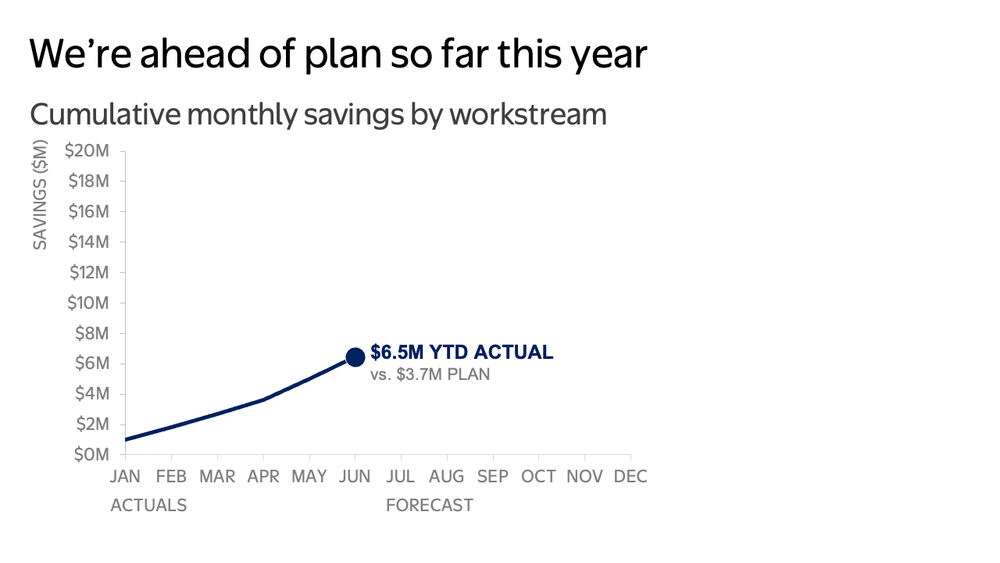
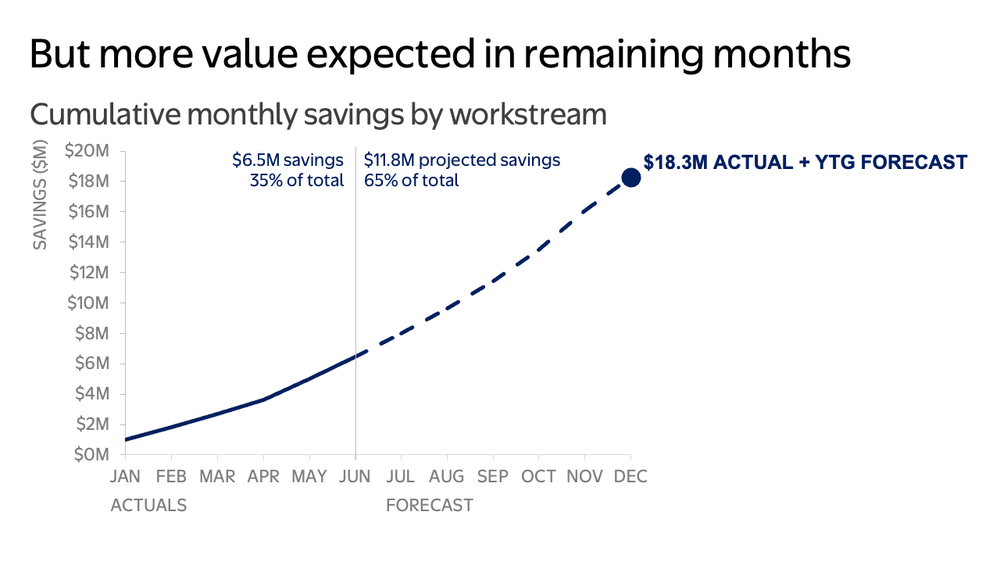
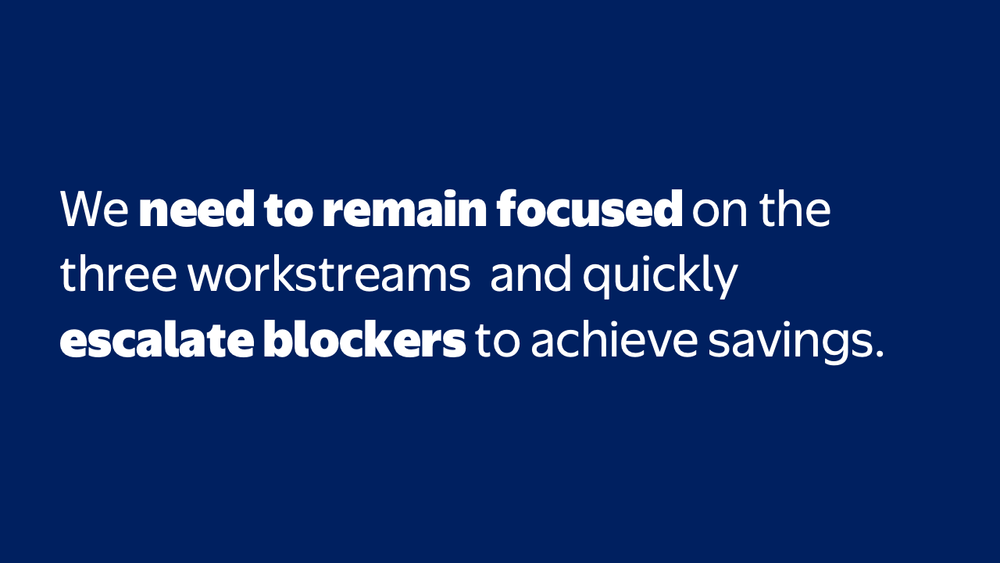
Because the story unfolds in a controlled manner, the presenter can guide the room through the information instead of hoping people find the right detail at the right moment. Takeaway titles frame the key message for each slide so the audience never has to guess. Supporting visuals reinforce the narrative rather than competing with it.
If leadership has already reviewed the pre-read, a live meeting shouldn't rehash every data point—it should focus on implications and decisions. But what about the materials that will be sent around before or after the meeting?
For a document meant to be read independently, incorporate the necessary depth without overwhelming the reader. Rather than leaving the data in dense tables, organize the content into a clear summary designed for solo reading.
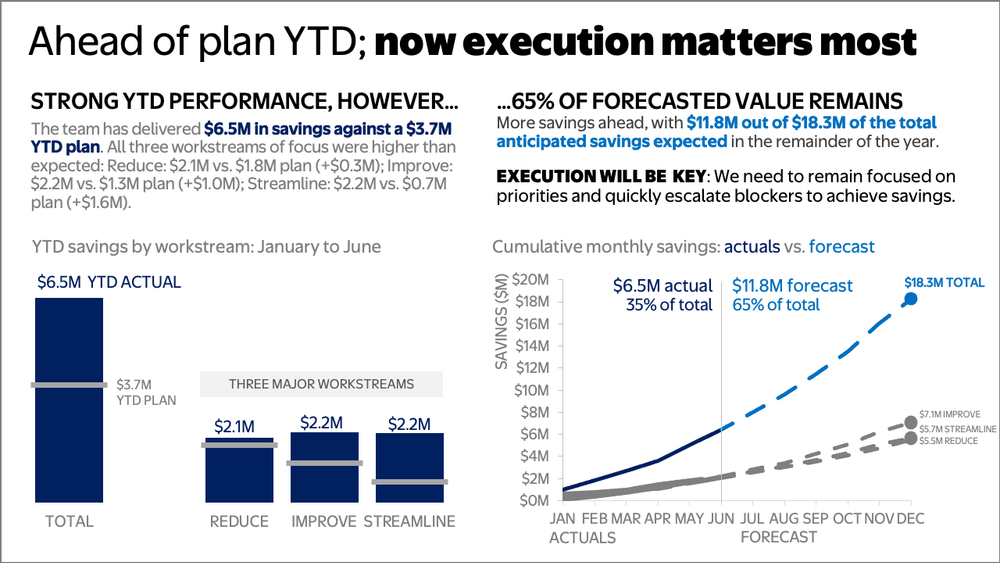
Single-slide communications often contain a lot of information, which can make it difficult to digest. By moving to a structured two-panel layout, the document establishes clear visual hierarchy. Bold takeaway headers immediately signal where to look first, while complete sentences directly beneath that provide the necessary detail and context for independent reading. Color applied intentionally and sparingly ties the text to the data it describes.
The original table views can then move to an appendix as a reference for anyone who needs the precise values for each workstream.
To recap, circulated slides and presentation decks are related, but they are not the same thing. When one communication is asked to do multiple jobs, the result is almost always compromise.
The next time you build a communication, pause and consider the medium:
For live presentations: Keep slides sparse so the audience focuses on you and your spoken narrative.
For written consumption: Build structured, detailed documents that provide complete context for independent reading.
Designing intentionally for the scenario at hand ensures your audience gets the right level of detail—and your message lands.
For more examples of visual transformations, check out the before-and-afters in our makeover gallery.