
2026-09-24 08:00:00
本文同步发布到本人的知乎。
2026 年 2 月,王邈在龙架构服务器上给 Debian 打包 normaliz 时遇到一件怪事:这个数学软件的自带测试总是超时,现象是卡在死循环里出不来。顺着代码调查,问题指向一个很常规的操作:OpenMP 的 #pragma omp atomic 对共享变量进行累加。循环的退出条件要求累加后的值等于某个数,而累加的结果总是少于这个数,就导致了死循环。由于程序太大、代码又很复杂,始终没能把问题缩减成一个人类能看懂的最小例子,这件事就被搁置了。
半年后的 8 月,王邈再次找到我,想把它重新捡起来。这回我们换了个做法:不再由人来定位问题,而是让 AI 去找最小复现,人在这个过程中负责指挥 AI 调查的方向。大概两天后,我们拿到一个稳定的复现程序,才发现事情的根源是:CPU 的原子加法指令,居然偶尔会不原子。这意味着我们找到了 CPU 的一个新 erratum,而龙芯得知这件事后,仅仅过了两周,就找到了几乎没有性能损失的修复方法,并给我们提供了测试固件。我们确认了测试固件可以解决问题,并且龙芯告诉我们,该测试固件预计在国庆(10 月 1 日)之前发布,届时读者将可以升级固件以修复该问题。
下面,让我们把整个事件的来龙去脉娓娓道来。
loong13 是社区维护的一个 Debian 13 稳定版在龙架构上的移植,王邈是维护者之一。在编译打包过程中,发现 normaliz 的自带测试会卡在循环里无法退出,导致打包超时。当时并没有立即找到问题的根源,只好先跳过这个软件包。但由于有一些其它软件包依赖 normaliz,不能一直跳过,2 月份的时候,我们开始集中精力排查这个问题。此前在构建其它软件包的过程中,我们发现过代码中暗藏的竞态条件或内存序问题,这类问题更容易在采用弱内存序的龙架构上暴露出来。因此,一开始我们推测,原因可能是该软件也存在类似的问题。但是在排查开始后,不出意外就出了意外。
第一轮排查从 normaliz 的源码开始。normaliz 使用 OpenMP 并行处理数据点,出问题的代码片段概括起来如下所示:
func (std::list<std::vector<int>> LatticePoints) { size_t nr_to_match = LatticePoints.size(); // 输入大小 size_t nr_points_matched = 0; // 维护已经处理了的点的数目 while (true) { size_t nr_points_done_in_this_round = 0; // 维护本轮处理了的点的数目 #pragma omp parallel { auto P = LatticePoints.begin(); // 线程私有的 List 指针 size_t ppos = 0; // 线程私有的 List 指针位置 #pragma omp for for (ppp = 0...nr_to_match){ if (skip_remaining) { // 特定情况下会设置 skip_remaining,从而跳过未处理的点 continue; } // 根据 ppos 和 ppp 的差值,将 P 挪动至 ppp 所指位置 // 并维护 ppos if ((*P)[0] == 0) { // 表示处理过了 continue; } #pragma omp atomic nr_points_matched++; #pragma omp atomic nr_points_done_in_this_round++; // 处理 P 所指对象 (*P)[0] = 0; } } // 一直没能执行这个 break if (nr_points_matched == nr_to_match) break; } } 这段代码的大意是:对于给定的 LatticePoints 列表,程序会并行地处理每一个点。在处理每一个数据点时,有些数据点有可能会被暂时跳过,需要反复遍历,直到所有的数据点都被处理完毕为止。具体到这段代码,其中 nr_to_match 表示总的数据点数,nr_points_matched 表示已经处理完的数据点数,nr_points_done_in_this_round 表示本轮处理的数据点数。循环终止的条件是 nr_points_matched 等于 nr_to_match,即所有的数据点都被处理。而导致死循环的直接原因是,nr_points_matched 永远达不到 nr_to_match,从而导致循环无法终止。使用 gdb 调试可以发现,在出现这种情况时,整个 LatticePoints 列表中的所有点都被标记为处理过了,因此 nr_points_matched 不再增加,但循环的退出条件始终不满足,于是就一直循环下去。那么问题就变成了:为什么计数器 nr_points_matched 的值和实际处理的数据点数不一致。根据代码,nr_points_matched 每一轮的增量会与 nr_points_done_in_this_round 相等,因为它们总是一起原子加一。但实际输出却并非如此:两个计数器的值会有些许差别,而且差距不稳定,每次运行得到的结果可能都不相同。
首先排除的是内存序问题:这段代码并不依赖原子变量来同步其它变量,也就是说,它自始至终操作和读取的都是原子变量本身,所以从代码的角度看,逻辑上是正确的。其次怀疑的是 OpenMP 的实现是否有问题:用 #pragma omp atomic 标注的原子操作是否真的保证了原子性。从反汇编结果可以看到,编译器将这些原子操作生成了 LoongArch64 的 amadd.d 指令,符合预期。为了排查这一点,我们另外设置两个 std::atomic 计数器作为对照,与原来的两个计数器同时使用,观察结果是否一致。结果发现,四个计数器的值(按每轮的增量计算)理应一致,但实际上却呈现出随机的差异。这暗示着,原子加指令会在特定情况下丢失更新。
但是,用简单的原子加程序测试原子加指令的原子性,并不能复现丢失问题。为了找到最小的复现样例,我们把前述 normaliz 的处理逻辑简化为一个类似的测试程序,同样不能复现这个问题。所以只好在 normaliz 实际运行的代码中,不断注释掉其中的运算步骤,试图找出触发原子加丢失的最小条件。一个诡异的现象是,在注释掉大部分的运算步骤后,问题依然存在。由于程序太复杂,最终还是没能找到一个能够稳定复现原子加丢失的最小代码片段。
6 个月后,问题依然没有得到解决。随着 LoongLeak/LoongBleed 漏洞的公开,normaliz 中原子加丢失的问题也重新回到我们的视线。这次,我们试图使用 AI 来协助排查。具体使用 AI 的方法是:首先向 AI 指出 normaliz 的上述代码存在死循环问题,要求 AI 确认并复现,然后找出可能原因。在第一轮对话中,AI 注意到了出问题的循环,但并没有得出原子加指令存在问题的结论。此后,我们又向 AI 提示该问题只在 LoongArch 上存在、在其它架构上不存在,AI 依然没能给出明确的结论。最后,我们直接告诉 AI 已经定位到原子加存在问题这一事实,并要求它复现并给出最小复现样例。这轮对话中,AI 最终把目光投向处理函数中的一段 memcpy 调用,而这正是第一轮排查中被忽视的部分:memcpy 的实现位于 glibc 中,glibc 会根据当前可用的硬件特性选择最优实现;如果硬件支持向量指令集(龙架构上是 LSX/LASX),glibc 的 memcpy 就会使用相应的向量指令加速内存搬运。而正是这些向量化的内存搬运,触发了 LoongArch64 上原子加指令丢失的问题。两天后,AI 给出了一个稳定复现问题的最小程序。
发现原子加指令会出现丢失更新的问题后,我们产生了新的疑问:其一,只有原子加存在问题,还是其它原子指令也存在问题;其二,其它的内存操作是否也会触发类似的问题。
对于问题一,我们首先排查了 CAS 指令,因为它可用于实现原子加法,很容易判断是否出现问题。结果发现,CAS 指令在相同条件下也存在问题。对于其它原子指令,例如原子交换、原子最大、原子最小、原子按位与、原子按位或等,由于即使发生丢失,也不容易从结果上判断出来,因此一开始并没有验证。例如,原子取最大值的过程中如果发生丢失,那么只要更新最大值的那次操作没有丢失,结果就是正确的。
经过深入思考,我们最终找到了验证方案:为了检查这类指令是否发生丢失,改为把每次操作的结果都记录下来,事后再做校验。以原子取最大值为例,如果并行地对 1 到 n 这 n 个数进行原子取最大值操作,那么最终的结果应该是 n。每次原子取最大值时,修改内存的同时,还会返回旧的最大值。对于输入为 k 的操作,如果返回的旧值小于 k,则说明此次操作更新了最大值。原子性保证了:所有更新了最大值的操作,其返回值不会出现重复。如果出现了重复,则说明发生了原子指令更新的丢失。经过验证发现,这些原子指令在相同条件下,都会发生丢失。
对于问题二,我们测试发现,只有 LASX 的向量化读内存操作(xvld)会触发原子指令丢失的问题;而正常的标量读取和 LSX 的向量化读内存操作(vld)则不会触发该问题。后来,Rong "Mantle" Bao 独立发现,当原子变量所在的内存地址与被读取的内存地址存在特定的位置关系时,正常的标量读取也可能触发原子指令丢失,意味着即使没有使用 LASX 也可能出现问题,只是概率更小。这些复杂的触发条件,解释了为什么这个问题一直没有被找到。
在介绍具体结论之前,首先介绍关于此问题的背景知识:龙芯的 3C6000/S 和 3A6000 用的是 LA664 核心,其指令集是 LoongArch64,带有 SIMD 扩展;其中,128 位的 SIMD 扩展叫 LSX,256 位的叫 LASX。较早的 LA464 核心(如 3A5000)没有这个问题。LASX 中存在读取内存指令 xvld,一次可以读取 32 字节到向量寄存器中。龙芯的原子指令可以概括为:am<OP>[_db].<width>,其中 <OP> 表示具体的原子操作,如 amadd、amcas、amswap、ammax、amxor、amand、amor 等;[_db] 表示是否带有 data barrier(db)即数据屏障;而 <width> 表示操作的数据宽度,如 .d 表示 64 位,.w 表示 32 位。
总结实验结果,复现原子操作丢失需要同时满足以下三个条件:
其中,内存读取操作可以是 LASX 的向量化读内存操作 xvld;当被读取的内存地址与原子操作的内存地址满足特定的位置关系时,内存读取操作也可以是普通的标量读取。
最小的复现方法,来自于 AI 对 normaliz 代码的简化。normaliz 每个数据点大小是 2208 字节,即是 276 个 uint64_t。两条线程各自分片遍历这些点,对每个点先做一次向量化的内存搬运(memcpy),再对三个共享计数器各做一次 relaxed 原子加(对应不带数据屏障的 amadd 指令)。一轮结束后,检查三个计数器是否相等,不相等就说明丢失了更新。
在 3C6000/S 上,用两个不同物理核(比如 CPU0 和 CPU2)、每个点 2208 字节、每次试验 200 轮、共 30 次试验,得到如下结果:
| 原子操作 | 双方都做 LASX 拷贝 | 双方都做 LASX 读 | 单侧 LASX 拷贝 |
|---|---|---|---|
amadd.d | 67% | 100% | 53% |
amadd.w | 73% | 100% | 67% |
amcas.d | 77% | 97% | 17% |
amcas_db.d | 0% | 0% | 0% |
ammax.d | 43% | 100% | 50% |
amswap.d | 53% | 100% | 53% |
表里的百分比是“30 次试验中失败的试验比例”。可以看到“双方都做 LASX 读”最容易触发问题,触发概率几乎到 100%;带 db 的 amcas_db.d 在同样条件下总是 0%。
在复现这个问题的过程中,有一个小插曲,也是整件事里最有意思的地方。在 2 月刚发现这个问题时,AOSC OS 和 Debian 都能复现 normaliz 的死循环问题。但是到了 8 月重新排查时,AOSC 那边却怎么都复现不出来,而 Debian 照旧。当时我们并不知道为什么会出现这种不一致,只是继续在 Debian 上做实验。
后来,随着 AI 定位到问题出在 memcpy,我们才明白了其中的原因。AOSC 在 2 月份之后发布的 Core 13 版本在 glibc 里错误地关掉了 --enable-multi-arch 选项,于是系统 memcpy 不再走 LASX 加速路径;而 Debian 的 glibc 正常启用向量加速,因此 memcpy 会使用 LASX。2 月份的时候,AOSC 和 Debian 都使用 LASX 加速路径;而到了 8 月,AOSC 的 memcpy 不再使用 LASX 加速,自然就触发不了。在 Debian 上,用 GLIBC_TUNABLES=glibc.cpu.hwcaps=-LASX 关掉 LASX 加速,问题也不再触发。
所以等 AOSC 发布 Core 14 版本,重新打开 --enable-multi-arch 选项后,问题也会重新复现。考虑到 memcpy 很常用,受影响的程序可能比我们想象的还要多,只是因为触发概率较小,难以发现。
存在问题的原子指令中,ammax、ammin 等指令由于目前 C 标准中没有对应的原子操作接口,所以很难被编译器生成出来;而 amcas 属于 LoongArch64 v1.1 的新增指令,因此在默认情况下也不会被编译器生成。可能存在较大影响的是 amadd,即原子加指令。该指令通常会被用于引用计数:如果引用计数的增加操作丢失,计数就会小于实际引用数,可能导致对象被提前释放,从而引发 use-after-free 或双重释放等内存安全问题。而触发的另一个条件,即向量化内存读取,则很容易被 memcpy 之类的函数触发。我们发现,在 Rust 标准库中,std::sync::Arc 的引用计数、std::sync::mpsc 的 Sender 克隆也都采用了不带数据屏障的 amadd 指令。我们构造了 safe Rust 程序,使用 Arc 或者 mpsc 都能让程序崩溃,表现为 SIGABRT 或 glibc 报告堆被破坏,这意味着出现了 use-after-free。
但是,该问题很难被用于安全攻击。因为要触发该问题,两个线程必须在同一个对象的同一个计数器上并发执行 relaxed 原子操作,而且至少有一方在执行向量化内存读取。这种触发条件意味着潜在攻击者与受害者必须处于同一进程内,无法跨越进程隔离,因此很难被单方面利用。
一般而言,由于在高级语言代码中,开发者对编译器产生的原子指令并无控制能力,因此对应用软件的开发者而言,并无直接的规避手段。在软件层面的规避方法,主要通过编译器实现,即编译器不再生成不带数据屏障的原子指令(am<OP>.*),而是生成带有数据屏障的原子指令(am<OP>_db.*),或者使用 LL/SC 循环来实现原子操作。但对于目前已经存在的二进制程序而言,则需要完全重新编译才能应用这些规避方法。因此,从软件层面上规避的代价很高昂。
向龙芯反馈后,修复来得很快:2026 年 8 月 26 日我们发邮件把问题反馈给龙芯,仅仅两周后的 2026 年 9 月 9 日就拿到了测试固件,3A6000 和 3C6000/S 实测都恢复了正常。龙芯告诉我们,这个固件预计会在国庆节(10 月 1 日)之前发布。
修复方式是将 MCSR24 的 bit 13 置为 1。MCSR24 是一个内部的 CSR,手册中并未说明其功能。设置这个 bit 之后,丢失更新的问题不再出现。经测试,性能损失很小:单核性能没有受到影响,多核性能只是略微下降。
如果受影响用户暂时不能更新固件,也可以选择在 Linux 内核里直接写入该 bit,这样等效于完成固件修复,不需要等待主板固件更新。
回过头来看,这个故事起源于一个纯软件的问题:打包时出现的死循环、偶尔算错的计数器。到最后却发现是 CPU 里的一条原子加指令,它并不原子。从发现问题到找出原因前后跨越了半年时间,其中真正有效的推进只在两天里完成,AI 和人都有不可或缺的作用。剩下的时间就是确认问题、找到触发条件、扩大测试面,等待固件修复。
事实上,类似的 erratum 在各家厂商的 CPU 中都很常见。感兴趣的读者可以翻阅 ARM 公版核的 Software Developer Errata Notice,其中不少涉及访存指令或原子指令,个别严重的甚至会导致 CPU 死锁;但真正影响到用户使用体验的其实非常少。这类问题,与其让它在未来的某一天于某个复杂系统中以一次不稳定的报错突然冒出来,不如尽早定位到具体原因并加以修复。
这项工作由王邈发起并主导,我负责复现和报告整理。在我们告知 amcas 也存在问题之后,Rong "Mantle" Bao 又发现了类似的 CPU 问题,并一并得到了修复。感谢龙芯芯片研发部和开发者社区运营部等部门在报告和修复过程中高效而专业的表现!
2026-09-24 08:00:00
In February 2026, Wang Miao ran into something strange while packaging normaliz for Debian on a LoongArch server: the math software's built-in test kept timing out, stuck in an infinite loop that it could not escape. Following the code, the problem pointed to a very ordinary operation: OpenMP's #pragma omp atomic accumulating into a shared variable. The loop's exit condition required the accumulated value to equal a certain number, but the accumulated result was always less than that number, causing the infinite loop. Because the program was large and the code complex, we never managed to reduce it to a minimal example a human could understand, so the matter was shelved.
Half a year later, in August, Wang Miao came to me again, wanting to pick it back up. This time we took a different approach: instead of having a human locate the problem, we let AI find a minimal reproduction, with the human directing the AI's investigation. About two days later, we had a stable reproducer, and only then discovered the root cause: the CPU's atomic add instruction occasionally fails to be atomic. This meant we had found a new CPU erratum, and after Loongson learned of it, only two weeks passed before they found a fix with almost no performance loss and provided us with test firmware. We confirmed that the test firmware resolves the issue, and Loongson told us the firmware is expected to be released before National Day (October 1), at which point readers will be able to upgrade their firmware to fix the problem.
Now let us tell the whole story from beginning to end.
loong13 is a community-maintained port of Debian 13 stable to LoongArch, and Wang Miao is one of its maintainers. During the build and packaging process, normaliz's built-in test was found to get stuck in a loop that it could not exit, causing the packaging to time out. At the time we did not immediately find the root cause, so we had no choice but to skip this package. But since several other packages depend on normaliz, we could not keep skipping it forever, so in February we began to focus on investigating the problem. Previously, while building other packages, we had found hidden race conditions or memory-ordering issues in the code, and such problems are more likely to surface on LoongArch, which uses a weak memory model. So at first we guessed the cause might be a similar issue in this software. But once the investigation began, surprise, surprise, there was a surprise.
The first round started from normaliz's source code. normaliz uses OpenMP to process data points in parallel. The problematic code snippet can be summarized as follows:
func (std::list<std::vector<int>> LatticePoints) { size_t nr_to_match = LatticePoints.size(); // input size size_t nr_points_matched = 0; // number of points already processed while (true) { size_t nr_points_done_in_this_round = 0; // number of points processed this round #pragma omp parallel { auto P = LatticePoints.begin(); // thread-private List pointer size_t ppos = 0; // thread-private List pointer position #pragma omp for for (ppp = 0...nr_to_match){ if (skip_remaining) { // in certain cases skip_remaining is set, skipping unprocessed points continue; } // Based on the difference between ppos and ppp, move P to the position // pointed to by ppp and maintain ppos if ((*P)[0] == 0) { // means it has been processed continue; } #pragma omp atomic nr_points_matched++; #pragma omp atomic nr_points_done_in_this_round++; // process the object pointed to by P (*P)[0] = 0; } } // this break never gets executed if (nr_points_matched == nr_to_match) break; } } The gist of this code is: for a given LatticePoints list, the program processes each point in parallel. While processing each data point, some points may be temporarily skipped, requiring repeated passes until all data points have been processed. In this code, nr_to_match is the total number of data points, nr_points_matched is the number of points already processed, and nr_points_done_in_this_round is the number of points processed this round. The loop's termination condition is nr_points_matched equaling nr_to_match, i.e. all data points processed. The direct cause of the infinite loop is that nr_points_matched never reaches nr_to_match, so the loop cannot terminate. Using gdb, one can find that when this happens, every point in the entire LatticePoints list has been marked as processed, so nr_points_matched stops increasing, yet the loop's exit condition is never satisfied, so it just keeps looping. The question then becomes: why does the value of the counter nr_points_matched not match the actual number of processed data points. According to the code, the per-round increment of nr_points_matched should equal that of nr_points_done_in_this_round, because they are always atomically incremented together. But the actual output was not so: the two counters' values differ slightly, and the gap is unstable, with the result varying from run to run.
The first thing ruled out was a memory-ordering issue: this code does not rely on atomic variables to synchronize other variables; in other words, it operates on and reads only the atomic variables themselves the whole time, so from the code's perspective it is logically correct. The next suspicion was whether the OpenMP implementation was at fault: whether the atomic operations annotated with #pragma omp atomic really guarantee atomicity. From the disassembly, one can see the compiler generated the LoongArch64 amadd.d instruction for these atomic operations, as expected. To investigate this, we set up two additional std::atomic counters as controls, used alongside the original two, to see whether the results agreed. It turned out that the four counters' values (computed from the per-round increments) should have agreed, but in fact they showed random discrepancies. This hinted that the atomic add instruction loses updates under certain conditions.
However, testing the atomicity of the atomic add instruction with a simple atomic add program could not reproduce the lost update. To find a minimal reproducer, we simplified the aforementioned normaliz processing logic into a similar test program, which also could not reproduce the problem. So we had to keep commenting out computation steps in normaliz's actually-running code, trying to find the minimal condition that triggers the lost atomic add. One bizarre phenomenon was that even after commenting out most of the computation steps, the problem persisted. Because the program was too complex, in the end we still could not find a minimal code snippet that reliably reproduced the lost atomic add.
Six months later, the problem remained unsolved. With the disclosure of the LoongLeak/LoongBleed vulnerabilities, the lost atomic add in normaliz came back into our view. This time, we tried to use AI to assist the investigation. The method was: first point out to the AI that the above normaliz code has an infinite-loop problem, ask the AI to confirm and reproduce it, and then find the possible cause. In the first round of conversation, the AI noticed the problematic loop but did not conclude that the atomic add instruction was at fault. After that, we hinted to the AI that the problem exists only on LoongArch and not on other architectures, but the AI still could not give a definite conclusion. Finally, we directly told the AI the fact that we had already localized the problem to the atomic add, and asked it to reproduce it and provide a minimal reproducer. In that round of conversation, the AI eventually turned its attention to a memcpy call in the processing function, which was exactly the part overlooked in the first round: memcpy's implementation lives in glibc, and glibc chooses the optimal implementation based on currently available hardware features; if the hardware supports a vector instruction set (LSX/LASX on LoongArch), glibc's memcpy will use the corresponding vector instructions to accelerate memory copying. And it was precisely these vectorized memory copies that triggered the lost atomic add on LoongArch64. Two days later, the AI produced a minimal program that reliably reproduces the problem.
After discovering that the atomic add instruction can lose updates, we had new questions: first, is only atomic add affected, or do other atomic instructions have the same problem; second, do other memory operations also trigger similar problems.
For the first question, we first investigated the CAS instruction, because it can be used to implement atomic addition, making it easy to tell whether something goes wrong. It turned out that CAS also has the problem under the same conditions. For other atomic instructions, such as atomic swap, atomic max, atomic min, atomic bitwise AND, atomic bitwise OR, and so on, since even a lost update is not easy to detect from the result, we did not verify them at first. For example, if a lost update happens during an atomic max, then as long as the operation that updated the maximum was not lost, the result is correct.
After much thought, we finally found a verification scheme: to check whether such instructions lose updates, we recorded the result of every operation and verified afterward. Take atomic max as an example: if you atomically take the max over the numbers 1 to n in parallel, the final result should be n. Each atomic max modifies the memory and also returns the old maximum. For an operation with input k, if the returned old value is less than k, then this operation updated the maximum. Atomicity guarantees that the return values of all operations that updated the maximum will not repeat. If a repeat occurs, then a lost update of the atomic instruction occurred. Verification showed that these atomic instructions all lose updates under the same conditions.
For the second question, we found in testing that only LASX vectorized memory reads (xvld) trigger the lost atomic instruction; normal scalar reads and LSX vectorized memory reads (vld) do not trigger the problem. Later, Rong "Mantle" Bao independently discovered that when the memory address of the atomic variable and the read memory address have a particular positional relationship, normal scalar reads can also trigger the lost atomic instruction, meaning the problem can occur even without LASX, just with lower probability. These complex triggering conditions explain why this problem went undiscovered for so long.
Before presenting the specific conclusions, let us first introduce the background: Loongson's 3C6000/S and 3A6000 use the LA664 core, whose instruction set is LoongArch64 with SIMD extensions; of these, the 128-bit SIMD extension is called LSX and the 256-bit one is called LASX. The earlier LA464 core (such as the 3A5000) does not have this problem. LASX includes the memory-read instruction xvld, which can read 32 bytes at a time into a vector register. Loongson's atomic instructions can be summarized as am<OP>[_db].<width>, where <OP> is the specific atomic operation, such as amadd, amcas, amswap, ammax, amxor, amand, amor, etc.; [_db] indicates whether it carries a data barrier (db); and <width> is the data width of the operation, e.g. .d for 64-bit and .w for 32-bit.
Summarizing the experimental results, reproducing a lost atomic operation requires all three of the following conditions at once:
Here, the memory-read operation can be the LASX vectorized memory read xvld; when the read memory address and the atomic operation's memory address have a particular positional relationship, the memory-read operation can also be an ordinary scalar read.
The minimal reproducer came from the AI's simplification of the normaliz code. Each normaliz data point is 2208 bytes, i.e. 276 uint64_ts. Two threads traverse these points in shards; for each point they first do a vectorized memory copy (memcpy), then do one relaxed atomic add on each of three shared counters (corresponding to the amadd instruction without a data barrier). After each round, they check whether the three counters are equal; if not, a lost update occurred.
On a 3C6000/S, using two different physical cores (e.g. CPU0 and CPU2), 2208 bytes per point, 200 rounds per trial, and 30 trials in total, we obtained the following results:
| Atomic Op | Both do LASX copy | Both do LASX read | One side LASX copy |
|---|---|---|---|
amadd.d | 67% | 100% | 53% |
amadd.w | 73% | 100% | 67% |
amcas.d | 77% | 97% | 17% |
amcas_db.d | 0% | 0% | 0% |
ammax.d | 43% | 100% | 50% |
amswap.d | 53% | 100% | 53% |
The percentages in the table are "the proportion of trials that failed out of 30 trials". One can see that "both do LASX read" most easily triggers the problem, with a probability of almost 100%; amcas_db.d with db is always 0% under the same conditions.
During the process of reproducing this problem, there was a small aside, and it is also the most interesting part of the whole story. When the problem was first discovered in February, both AOSC OS and Debian could reproduce the normaliz infinite loop. But when we re-investigated in August, AOSC could not reproduce it no matter what, while Debian still could. At the time we did not know why this inconsistency occurred, and just kept experimenting on Debian.
Later, as the AI localized the problem to memcpy, we understood the reason. The Core 13 release that AOSC shipped after February had mistakenly disabled the --enable-multi-arch option in glibc, so the system memcpy no longer took the LASX acceleration path; whereas Debian's glibc enables vector acceleration normally, so its memcpy uses LASX. In February, both AOSC and Debian used the LASX acceleration path; by August, AOSC's memcpy no longer used LASX acceleration, so naturally it could not be triggered. On Debian, disabling LASX acceleration with GLIBC_TUNABLES=glibc.cpu.hwcaps=-LASX also stopped the problem from triggering.
So once AOSC releases Core 14 and re-enables the --enable-multi-arch option, the problem will reappear. Considering how commonly memcpy is used, the number of affected programs may be larger than we imagine, only because the trigger probability is low that it is hard to notice.
Among the problematic atomic instructions, ammax, ammin, and the like are hard for compilers to generate because the C standard currently has no corresponding atomic operation interface; and amcas is an instruction newly added in LoongArch64 v1.1, so it is also not generated by compilers by default. The one that may have the largest impact is amadd, the atomic add instruction. This instruction is typically used for reference counting: if an increment of the reference count is lost, the count becomes smaller than the actual number of references, which may cause an object to be freed prematurely, leading to memory-safety problems such as use-after-free or double free. And the other triggering condition, vectorized memory reads, is easily triggered by functions like memcpy. We found that in the Rust standard library, the reference count of std::sync::Arc and the cloning of std::sync::mpsc's Sender also use the amadd instruction without a data barrier. We constructed a safe Rust program; using either Arc or mpsc could make the program crash, manifesting as SIGABRT or glibc reporting heap corruption, which means a use-after-free occurred.
However, this problem is hard to use for a security attack. To trigger it, two threads must concurrently perform relaxed atomic operations on the same counter of the same object, and at least one of them must be doing a vectorized memory read. This triggering condition means the potential attacker and victim must be in the same process, and cannot be separated by process isolation, so it is hard to exploit unilaterally.
In general, since in high-level language code developers have no control over the atomic instructions the compiler produces, application developers have no direct workaround. Software-level workarounds are mainly implemented through the compiler, i.e. the compiler no longer generates atomic instructions without a data barrier (am<OP>.*) but instead generates atomic instructions with a data barrier (am<OP>_db.*), or implements atomic operations using LL/SC loops. But for already-existing binaries, applying these workarounds requires a full recompile. Therefore, the cost of avoiding the problem at the software level is high.
After we reported it to Loongson, the fix came quickly: we emailed the problem to Loongson on August 26, 2026, and just two weeks later, on September 9, 2026, we received test firmware; both the 3A6000 and 3C6000/S returned to normal in our tests. Loongson told us this firmware is expected to be released before National Day (October 1).
The fix is to set bit 13 of MCSR24 to 1. MCSR24 is an internal CSR whose function is not described in the manual. After setting this bit, the lost update no longer occurs. Testing showed the performance loss is very small: single-core performance is unaffected, and multi-core performance drops only slightly.
If affected users cannot update the firmware for the time being, they can also choose to write this bit directly in the Linux kernel, which is equivalent to applying the firmware fix and avoids waiting for a motherboard firmware update.
Looking back, this story began with a purely software problem: an infinite loop during packaging, a counter that occasionally miscounts. In the end it turned out to be an atomic add instruction in the CPU that is not atomic. From discovering the problem to finding the cause spanned half a year, yet the truly effective progress took only two days, with both AI and humans playing indispensable roles. The rest of the time went into confirming the problem, finding the triggering conditions, broadening the testing scope, and waiting for the firmware fix.
In fact, similar errata are very common in CPUs from all vendors. Interested readers can browse ARM's Software Developer Errata Notice for its cores, many of which involve memory-access or atomic instructions, with a few severe ones even causing the CPU to deadlock; but those that genuinely affect the user experience are actually very few. For such problems, rather than letting one suddenly surface someday in some complex system as an unstable error report, it is better to localize the specific cause and fix it as early as possible.
This work was initiated and led by Wang Miao; I was responsible for reproduction and writing up the report. After we informed them that amcas also had the problem, Rong "Mantle" Bao discovered a similar CPU problem, which was fixed together. Thanks to Loongson's Chip R&D Department and Developer Community Operations Department, among others, for their efficient and professional work throughout the reporting and fixing process!
2026-09-22 08:00:00
最近频繁地和各家智算卡(GPU、NPU,或者统称为 xPU)厂商交流,讨论如何培养软件生态、如何进入校园。同样的观点我已经跟不同的人讲过至少五遍了,索性写成一篇博客,一次讲清楚。
故事的背景并不难理解:国内算力需求旺盛,而英伟达又难以进入,于是无论是国产厂商,还是非英伟达的海外厂商,都在设法培育国内市场。而培育市场特别关键的一步,就是培育生态。
由于我在学校里参与了多门课程的教学,接触到的也多是厂商里负责校园生态对接的员工,因此经常和他们聊起一个问题:怎样把这些算力卡的生态带进校园。国内庞大的算力需求,最终总要有人把它部署起来、用起来;而选哪家卡、能不能把卡的算力真正发挥出来,对从业者的知识储备是有要求的。如果能在学校里提前为企业培养所需的人才,生态就有机会从企业扩展到高校乃至更广的人群,这是厂商最核心的诉求。
在交流的过程中,我也从学校和公司的双重角度,分析过生态可以在校园的哪些环节切入,并向他们提了不少来自学校视角、他们目前尚未顾及的看法。这篇博客就把我的想法分享出来,供国内外各家计算卡厂商参考:如果你们想把硬件或生态推广到校园里,可以走哪些路。这些想法我不藏着掖着,全部公开写在这里。事实上,只要对学校足够理解,任何人都能得出类似的分析;真正拉开差距的,是哪家公司更有魄力,愿意真正从学校的需求和学生的需求出发,把生态这样一个长期推广项目踏实做下去,从而抢占市场先机。这也许是潜在读者最该思考的一点。下面只谈我个人的观点。
先看现状。目前校园里与算力卡相关的课程,显然还是以 GPU、更准确地说以英伟达的 GPU 为主。真正需要实际用到 GPU 的课程其实并不算多:主要是高性能计算方向,以及近几年新开的、与大模型紧密相关的课程,或许还有图形学等。这些课程往往有平台上的惯性:助教和老师过去就用英伟达平台,英伟达本身又足够成熟,于是就这么延续了下来。
所以,目前的市场生态仍牢牢握在英伟达手中。这倒不是说英伟达在学校投了多少人力,而是长达二十年的积累给了它巨大的先发优势。即便如今卡不好买、也未必有人来和学校谈合作,对学校而言,务实的选择仍然是尽量弄到能买到的英伟达卡,提供给学生做教学。
但这个现状终将改变。一方面是不好买,另一方面是大家越来越不愿意用,于是无论国内还是海外的非英伟达生态,都被列入了备选,倒不一定要立刻替换英伟达,毕竟手里的 V100、A100,甚至 4090 这类游戏卡,还能再用很久。等这批机器几年后彻底淘汰,如果那时仍然买不到好的英伟达智算卡,就不得不转向其他方案了。
而眼下这几年,恰好是一个窗口期:各家厂商都在努力推广自己的生态,校园确实是重要的切入点。毕竟无论是生产制造 xPU 的公司,还是下游使用这些卡的公司,其人才都有相当一部分来自学校。在校园层面做推广,规模相对可控,对招聘也有好处。
当然,学校有学校的特点,这往往是厂商从公司视角很难设身处地去体会的。我写这篇博客,也是想提供一个来自学校老师和学生视角的看法,给这些公司一些建议,看看有没有哪家愿意真正把这些事情落地,真心实意地做生态推广,而不是为了应付 KPI。
既然谈到学校,就先谈学校的特点。
学校里授课的主体是老师。老师讲授的内容,一部分来自自己的研究,做研究的老师,往往更倾向于开设与研究方向对应的课程;此外还有一些大家都认为应当开设的基础课程。而在设备选择上,学校有很多考量。
第一是经费。 如今大模型如此赚钱,把卡卖给企业做推理所能带来的收益,远高于放在学校里做教学。学校也很难专门为教学拨出大笔经费去买卡,更多是"为科研买卡时顺便服务教学"。如果没有科研需求,教学就更难买得起这些设备了。这是第一道门槛。
第二是严谨与公平。 教学环境需要足够的稳定,不能中途突然宕机,如果恰好在作业截止日期前出问题,后果会很严重。换句话说,教学实验环境要足够可靠,不要求多少个九,但绝不能在关键节点、尤其是截止日期或考试期间掉链子。因此,教学材料最好是离线的、部署在校内的,而不是放在云端。云端看似可用性更好,实际上网络瓶颈不少;更关键的是,本地机器出了问题可以随时派人去修,远程则时间不可控,老师们会缺乏安全感。这是很重要的一点差异。
第三是经费的使用方式。 学校的经费往往倾向于买设备,却很难用来买服务。在一些算力需求大的企业里,厂商会派团队驻场做技术支持,这种模式在企业里行得通,但在学校里很难维持:学校没有这样的经费科目,去买服务,就像我们之前想采购大量云服务一样困难。结合上面提到的可靠性问题,课程最理想的环境是:离线、线下、可靠,同时又因为缺少技术支持而必须足够好用、开箱即用。比如插上卡、装个驱动就能用,不需要找人申请权限、等人给文档。如果做不到这一点,对生态其实是相当不利的。
第四是老师的主导性。 一些学校很强调老师在课程中的主导地位。比如我们学校的一些课程会有企业参与、算力支持,但主导的仍是以老师加助教组成的教学团队,不会做太多商业化的、打广告式的内容,这方面一定是有所限制的。
于是你会看到,学校和厂商的需求往往是相悖的:
这里列举了很多困难,归根结底来自学校作为事业单位与企业作为盈利组织在性质上的差异。但这并非不可调和的矛盾。生态建设本身就是一件非常长期主义、且不太赚钱的事。换句话说,企业里做生态的人,本就和 KPI、和挣钱的目标不太兼容。只有企业愿意把做生态真正长期化,才可能和学校同频。否则结果往往是:公司为了 KPI,员工也为了 KPI,拼命往校园里塞广告,而这恰恰是学生最不愿意看到的,学生不高兴,给老师打低分,老师也是输家,厂商多半也没讨到好。
说了这么多困难,接下来该讲"扬"的部分了:厂商为什么要花这么大力气在校园里推广生态,它能带来什么,又可以从哪些方面入手。
想到智算卡生态进校园,大家的第一反应通常都是课程。但课程对卡的需求,其实差异很大,就像社会上的各类人对卡的需求也很不一样。
最浅的一层,是"只用算力、不关心卡"的人。 他们要的只是算力,用的是 PyTorch 这样非常上层的软件及其之上的生态,兼容性极好,换张卡,代码几乎不用改,重装一套环境就行。对这类需求,推动难度很小,但收益同样有限。比如我们系不少课程里都有用到 AI 的环节,但使用者并不直接碰 AI,而是通过网页或 App 间接使用。你可以告诉他"这个网站背后用的是某家的卡",让他有个印象,但因为没真正上手,印象也不会太深。这类课程其实很多,包括一些计算机入门课,尤其是面向外系的课程,会吸引大量非计算机专业的同学使用 AI。对他们来说,最主要的收获就是:这张卡确实能用,用起来和英伟达没什么区别。
这一点看起来不大,短期也未必有效果,这类用户粘性很差,对他而言用什么卡都一样,无非多了一个"某家的卡用起来和英伟达没差"的印象。但未来某天,当他参与某家企业或单位的采购决策时,可能会想起自己当年上过这门课、真正摸过这块硬件,并意识到:在某些场景下,这张智算卡确实可以替代主流国际品牌,评估结论是可以用。这就是一种非常长期、潜移默化的用户观念培养,短期之内不会有任何效果。
再深一层,是重度使用智算卡的同学。 比如清华最近新开的一些课程,要用一整个学期把大模型的训练流程完整走一遍。虽然用的也是 PyTorch 这类上层生态,但他们会长时间亲手与卡打交道,看利用率、看多卡表现等等,尽管不强调太多优化,也会有具体的使用感受。这些同学能作为真实用户较深入地体验智算卡,理解它好在哪、不好在哪,从而积累大量第一手经验。而且他们未来很可能进入本就依赖算力的企业岗位,把课程中积累的经验迁移到工作中,这会在一定程度上影响采购决策,或促进后续的算力落地,是很不错的切入角度。
这类课程相对较新,英伟达的包袱或传统没那么深;在算力紧缺的背景下,又需要课程内完成一件相对算力密集的事情,自然比那些能在单机上用 CPU 跑的小应用更依赖算力;课程新、有算力需求、硬件又昂贵,同时还没有形成很强的英伟达壁垒,因此新的计算卡相对容易进入这样的课程。
再往下一层,是真正与 GPU 深入打交道的课程,尤其是 GPU 编程和并行计算。这类课程的内容本身就大量贴合英伟达 GPU 的结构与编程方式,对口的是算子编程、编译等领域所需的人才,而算子与编译器生态恰恰是当前生态建设中很重要的一环。所以这些课程非常重要,但也没那么容易切入:一旦把 GPU 换成其他计算卡,编程模型会有不少变化。要做算子级别的编程,就不可避免地触及大量细节,这对老师和助教的知识储备要求很高,他们得有足够的使用经验,才愿意、也才敢开这门课。
一个利好是,一些国产智算卡可能早已部署在超算等领域,也有很多科研项目在上面开展。也就是说,不少课题组里的老师和博士生,其实已经积累了大量与这些智算卡"搏斗"的经验,或许有能力去改动课程内容,毕竟改动幅度不小。但关键在于,怎样让他们有足够的动力去推动这个变化,因为他很容易产生路径依赖:讲了这么多年英伟达,突然要在英伟达之外加入另一种智算卡,学生愿不愿意学?可行的做法是先从小班实验、让同学自愿报名开始,再慢慢扩大。长期来看,这一定能培养出一批懂系统、做 AI Infra 的人才。
最深的一层,是硬件本身。 国内这些课程,主要还是由做科研的老师开设的专业课。但无论国内还是国外,xPU 硬件方向的科研和业界都有较大脱节,因此很难在老师中找到做计算卡硬件的人,至少计算机系里很少,或许集成电路学院能找到。这种情况下,既难找到也难开设相关课程:老师要花大量精力去学,未必有信心开;若直接由企业来开,内容又太局限于某一款具体型号的架构,公司色彩过重,不太适合校园氛围。
所以这一层对老师的要求极高,而这恰恰是智算卡厂商非常需要的人才。前阵子廖博发了一个视频,主要讲体系结构人才的缺口:CPU 有问题,GPU 其实问题一样多。高校在这方面的人才培养,我觉得是有所不足的,确实存在空缺。这个空缺一部分来自缺失的课程,一部分来自缺失的科研,而两者本是一体的。解决它需要全链路地推进:先打通企业界与学术界的壁垒,因为现在企业做的东西和学校、科研做的东西已经相当割裂。只有放出一些课题交给学术界去做、能够发论文,才会有老师愿意投入这方面的科研,进而拿到项目、开出课程。这是一个非常长期的人才培养周期,但反过来也能帮企业把入职后的培养前移到本科或研究生阶段。
我大致从这四类课程分析了智算卡生态如何进入校园。其实这四类也正是社会人群的缩影:只用 AI、不关心用什么卡的;使用高层工具的;深入到算子的;深入到硬件的。这些课程对应着不同的需求,而其中的道理不仅适用于课程,也适用于社会上的各类人群。
除了课程,另一个重要的抓手是竞赛。这也是当前许多智算卡厂商优先切入的方向,因为竞赛门槛相对低一些,但也确实鱼龙混杂,各种层次、各种质量的比赛非常多。
首先,比赛能很好地激励学生,尤其是学有余力的学生去探索课外内容,再通过奖金、保研加分等激励,促使他们有动力参赛。而参赛本身,就是在为生态建设出一份力:要算子人才就办算子竞赛,要硬件人才就办硬件比赛,要应用人才就办应用竞赛。总之,这是相对容易定制、也容易举办的赛事。
主要的难点在于定位与赛务:怎样定位这场比赛、怎样把它办起来、怎样把你想要的人请进来。比赛不是给钱赞助就完事了,赛务决定了它的成败。办得好,能为行业和公司输送新鲜血液,也能给学生提供上升通道,让他愿意投入这个行业去学习和奋斗;办得不好,反而会影响公司声誉。所以,办比赛本身不难,难的是愿意花时间精力把它办好,这同样是一件需要长期主义的事。
每到这时我就要举龙芯杯的例子。今年正好是龙芯杯十周年,我作为往届选手参加了在西安的十周年活动。过程中我最深的感受是,龙芯公司和各位老师都非常投入。各位老师一开始是义务劳动,想推广国内的组成原理与 CPU 课程;到后来,龙芯发挥了很大作用,他们的教育事业部对这个活动的投入非常大。且不说投入了多少奖金,单看投入的人力、请来的众多专家费心费力地把比赛办好:保证公正、高效,提供良好的参赛和办赛体验,让学生学到知识,同时对公司的招聘和学生的发展都有帮助,这就已经非常难得。但要看到,这是靠十年的努力,一年一年投入积累出来的。十年是很长的时间,而公司里人员流动性往往很高。如何长期维持一支专业团队,去服务比赛的公平性,让大家相信作弊一定会被惩罚,相信平台不会成为比赛的瓶颈……这背后有大量隐性的时间和金钱成本。
因此我也建议厂商先从竞赛入手,感受一下如何与学生、老师打交道,再考虑与课程合作。竞赛门槛较低,声音也容易做大;但要持续做好,可能比课程更难。因为在课程里,真正把课做好的是学校的老师和助教;而在比赛中,如果连公司自己人都不愿意、或不觉得要把比赛办好,那还有谁能把它办好?比赛做砸了,最终损失的是自己的名誉。
除了与本科教育紧密相关的内容,我也聊了很多其他方面的生态培养。
比如,为什么英伟达的生态大家觉得好?因为它门槛确实低:随便买张卡、装个驱动就能用。但很多智算卡是"有人想用却用不了":要么买不到卡,要么买了之后要签各种保密协议,不让用、不让往外说,装个软件还得找人。这些做法非常伤害"散户"生态。对一买就是几百上千张卡的大客户,你派人驻场当然可以;但如果你的目标不止于此,而是想和英伟达竞争、把生态推广到更广的范围,那你的追求就不该是这样。
你应当把东西做得非常可用、门槛足够低、足够开放,让用户在 90% 的日常使用中不需要和你的任何人沟通,自己买卡、自己从网上获取资料,就能很好地用起来。这是长期要做的功课。短期内,国产智算卡要迈出的第一步,是先让用户觉得"这东西能用、靠谱",愿意把它当作英伟达的一个下位替代,至少先做到"可替代",再谈进一步的事情。下一步,才是去谈超越英伟达:和你一样好用,甚至更好用、更容易用,在某些方面比你做得更好,这才是未来的方向。
最后总结一下:生态想进校园,一定得让学校的人和公司的人想到一起去;否则目标不同,就常常会出现分歧。也希望各家计算卡越做越好,能撑起英伟达之外的市场。
2026-09-12 08:00:00
上文 提到,我打算用采集卡来录制鸿蒙电脑的输出,作为 OBS 的输入来做软件导播,用的采集卡型号是采用了 MS2130S 芯片的绿联 UG307-95348 采集卡。在使用过程中,遇到了清晰度和颜色的问题,下面介绍我是怎么研究和解决的。
首先是遇到了清晰度问题,在 macOS 上为 OBS 设置采集卡输入时,需要关闭 Use Preset 选项,选择 3840x2160 (16:9) - 30, 60 FPS - CS 709 - NV12 (420v),而不是 3840x2160 (16:9) - 30 FPS - CS 709 - NV12 (420v)。后者明显更糊,尽管从名称上看似乎只差一个帧率。如果勾选了 Use Preset,分辨率选 3820x2160,效果和上面第二种 4K 选项一样,也有些糊。
用下面这个 Swift 脚本打印采集卡的各种信息,可以发现 60 FPS 的那个版本经过了 MJPEG 压缩,从 dmb1 字段即可看出:
$ swift list_formats.swift 3840x2160 420v fps=30.0..30.0 dur=33333..33333us ext CVImageBufferColorPrimaries = ITU_R_709_2 ext CVImageBufferTransferFunction = SMPTE_240M_1995 ext CVImageBufferYCbCrMatrix = ITU_R_709_2 3840x2160 420v fps=60.0..60.0 dur=16667..16667us fps=30.0..30.0 dur=33333..33333us ext CVImageBufferColorPrimaries = ITU_R_709_2 ext CVImageBufferTransferFunction = SMPTE_240M_1995 ext CVImageBufferYCbCrMatrix = ITU_R_709_2 ext com.apple.cmio.format_extension.decompressed_from_format_type = 1684890161 (dmb1) 对应的 Swift 源码:
import AVFoundation import CoreMedia func fourcc(_ v: FourCharCode) -> String { let b: [UInt8] = [ UInt8((v >> 24) & 255), UInt8((v >> 16) & 255), UInt8((v >> 8) & 255), UInt8(v & 255), ] let s = String(bytes: b, encoding: .ascii) ?? "?" return s.allSatisfy { $0.isLetter || $0.isNumber } ? s : String(format: "0x%08x", v) } let session = AVCaptureDevice.DiscoverySession( deviceTypes: [.external], mediaType: .video, position: .unspecified) for d in session.devices { print("DEVICE \(d.localizedName) [\(d.uniqueID)]") print(" model=\(d.modelID) manufacturer=\(d.manufacturer)") for f in d.formats { let dim = CMVideoFormatDescriptionGetDimensions(f.formatDescription) let sub = CMFormatDescriptionGetMediaSubType(f.formatDescription) var line = " \(dim.width)x\(dim.height) \(fourcc(sub))" for r in f.videoSupportedFrameRateRanges { line += String( format: " fps=%.1f..%.1f dur=%.0f..%.0fus", r.minFrameRate, r.maxFrameRate, CMTimeGetSeconds(r.minFrameDuration) * 1e6, CMTimeGetSeconds(r.maxFrameDuration) * 1e6) } print(line) if let ext = CMFormatDescriptionGetExtensions(f.formatDescription) as? [String: Any] { for k in ext.keys.sorted() { var v = "\(ext[k]!)" // decode fourcc-valued extensions such as // com.apple.cmio.format_extension.decompressed_from_format_type if k.contains("format_type"), let n = ext[k] as? NSNumber { v = "\(n.uint32Value) (\(fourcc(n.uint32Value)))" } print(" ext \(k) = \(v)") } } } } 猜想压缩的版本,实际的分辨率更高,经过压缩后可以通过 USB 5Gbps 正常传输;不压缩的版本,由于带宽限制,内部不是真正按照 4K@30Hz 处理的,导致画质有损耗。
除了清晰度问题,采集卡采到的鸿蒙电脑画面颜色不对。在鸿蒙电脑上打开 Lagom 白饱和测试图,采集到的 RGB 与预期对不上,大致关系如下:
用 ffmpeg 观察后发现,采集卡实际给出的是 204;由于这是 limited range(16-235)下的 204,转换到 full range 后就是 (204 - 16) / 219 * 255 = 219。若把鸿蒙电脑直接接到显示器上,显示则正常。
深入研究后,我找到了一些通过设置 MS2130S 寄存器来改变其行为的方法(参考 steve-m/hsdaoh)。在 AI 的帮助下定位到了问题:只要关闭 MS2130S 自带的 luma processing(即把寄存器 0xfc8e 从原来的 0x00 改为 0x11),颜色就会恢复正常。下面这个小工具可以在 OBS 开始录制后运行,用来 toggle luma processing,从而实时看到颜色变化:
/* * ugreen_fix_toggle - minimal hidapi-only tool for the UGREEN 95348 * (MS2130S, 2b89:5348). * * Reads a video-processing register and toggles it: * 0x00 -> 0x11 (disable the chip's luma processing / fix the 200->219 lift) * 0x11 -> 0x00 (re-enable it / reproduce the bug) * * Default register is 0xfc8e (confirmed to be the luma-processing register). * Pass another address as the first argument if needed, e.g. * ./ugreen_fix_toggle 0xfc80 * * build (macOS/homebrew, hidapi only): * cc -O2 -I/opt/homebrew/include/hidapi ugreen_fix_toggle.c \ * -L/opt/homebrew/lib -lhidapi -o ugreen_fix_toggle */ #include <hidapi.h> #include <stdint.h> #include <stdio.h> #include <stdlib.h> #include <string.h> #define VID 0x2b89 #define PID 0x5348 #define DEFAULT_REG 0xfc8e static hid_device *h; /* MS2130S vendor HID feature report: * [0x01, 0xb6, addrH, addrL, val, 0, 0, 0, 0] write * [0x01, 0xb5, addrH, addrL, 0, 0, 0, 0, 0] read request * GET_REPORT returns 64 bytes; the value is byte 4. */ static int reg_write(uint16_t addr, uint8_t val) { unsigned char buf[9] = {0x01, 0xb6, addr >> 8, addr & 0xff, val, 0, 0, 0, 0}; return hid_send_feature_report(h, buf, sizeof(buf)); } static int reg_read(uint16_t addr, uint8_t *val) { unsigned char cmd[9] = {0x01, 0xb5, addr >> 8, addr & 0xff, 0, 0, 0, 0, 0}; unsigned char rsp[64]; if (hid_send_feature_report(h, cmd, sizeof(cmd)) < 0) return -1; memset(rsp, 0, sizeof(rsp)); rsp[0] = 0x01; if (hid_get_feature_report(h, rsp, sizeof(rsp)) < 0) return -1; *val = rsp[4]; return 0; } int main(int argc, char **argv) { uint16_t addr = DEFAULT_REG; uint8_t cur, next; if (argc > 1) addr = (uint16_t)strtoul(argv[1], NULL, 0); if (hid_init() < 0) { fprintf(stderr, "hid_init failed\n"); return 1; } h = hid_open(VID, PID, NULL); if (!h) { fprintf(stderr, "UGREEN %04x:%04x not found (is it plugged in?)\n", VID, PID); return 1; } if (reg_read(addr, &cur) < 0) { fprintf(stderr, "register read failed: %ls\n", hid_error(h)); hid_close(h); return 1; } if (cur == 0x00) { next = 0x11; } else if (cur == 0x11) { next = 0x00; } else { fprintf(stderr, "%04x = 0x%02x (unexpected, not touching)\n", addr, cur); hid_close(h); return 2; } if (reg_write(addr, next) < 0) { fprintf(stderr, "register write failed: %ls\n", hid_error(h)); hid_close(h); return 1; } printf("%04x: 0x%02x -> 0x%02x\n", addr, cur, next); printf("(0x11 = luma processing disabled = fix on; 0x00 = default/bug)\n"); hid_close(h); hid_exit(); return 0; } 编译和运行:
$ brew install hidapi $ cc -O2 -I/opt/homebrew/include/hidapi ugreen_fix_toggle.c -L/opt/homebrew/lib -lhidapi -o ugreen_fix_toggle # 此时是有问题的状态 $ ./ugreen_fix_toggle fc8e: 0x00 -> 0x11 (0x11 = luma processing disabled = fix on; 0x00 = default/bug) # toggle 以后,颜色问题修复 $ ./ugreen_fix_toggle fc8e: 0x11 -> 0x00 (0x11 = luma processing disabled = fix on; 0x00 = default/bug) # 再次 toggle,颜色问题重新出现 修复后,200 变成 199,244 变成 243。虽然仍有很小的偏差,但可以认为问题已经解决。
不过每次开始采集后都要重新跑一次这个工具,还是有点麻烦。一个一劳永逸的办法是参考 steve-m/ms2130_patcher,给固件打补丁,让硬件往 0xfc8e 寄存器写入 0x11 而不是 0x00。
首先用 steve-m/ms213x_flash 导出绿联 95348 自带的固件,然后让 AI 进行逆向,这个固件就是一个 8051 代码,有很多成熟的工具。具体的补丁方法和上面类似,下面直接给出 AI 对固件代码以及如何修复的分析:
0xfc8e 有两个相关的位:bit 0(掩码 0x01)和 bit 4(掩码 0x10)。流重初始化流程 FUN_CODE_c220() 会通过位掩码辅助函数 FUN_CODE_87c7(mask, addrH, addrL, value) 把这两位都清零。要写入的值通过 R3 传入:非零表示置位被掩码选中的位,零表示清零。
| CPU 地址(bank 1) | 代码 | 作用 |
|---|---|---|
c268 |
MOV R3,#01h ; JNB bit05,c26f ; MOV R3,#00hMOV R5,#01h ; MOV R7,#8eh ; MOV R6,#fch ; LJMP 87c7h
| 清除 0xfc8e 的 bit 0 |
c27e |
MOV R3,#01h ; JNB bit05,c285 ; MOV R3,#00hMOV R5,#10h ; MOV R7,#8eh ; MOV R6,#fch ; LJMP 87c7h
| 清除 0xfc8e 的 bit 4 |
两次调用之后 0xfc8e = 0x00。
把两处 MOV R3,#00h(7b 00)指令改成 MOV R3,#01h(7b 01),这样每次掩码更新都会走置位分支,寄存器最终变成 0x11。
| 文件偏移 | 原始值 | 补丁值 | 含义 |
|---|---|---|---|
0x1429e(bank1 c26e) | 00 | 01 |
0xfc8e bit 0 的取值操作数 |
0x142b4(bank1 c284) | 00 | 01 |
0xfc8e bit 4 的取值操作数 |
0x18033 | 7c | 7e | 代码校验和 0x797c → 0x797e
|
反汇编打过补丁的字节,可以看到两处立即数现在都加载 0x01:
c268: 7b01 MOV R3, #01h c26a: 300502 JNB bit05, c26fh c26d: 7b01 MOV R3, #01h <- 原来是 #00h c26f: 7d01 MOV R5, #01h c271: 7f8e MOV R7, #8eh c273: 7efc MOV R6, #fch c275: 0287c7 LJMP 87c7h 核心就是把上面我通过 hidapi 从 host 端写入寄存器的操作,换成了直接在固件里写入:固件本来是 clear,改成了 set,这样就禁用了 luma processing,持久化了这个改动。
这部分代码以及固件已经开源到 jiegec/ugreen-95348-patcher,感兴趣的读者可以尝试一下,尝试之前记得备份固件,而且有变砖的风险。
P.S. 实测发现,把 0xfc8e 改为 0x11 只对 3840x2160 (16:9) - 30, 60 FPS - CS 709 - NV12 (420v) 模式生效;对 3840x2160 (16:9) - 30 FPS - CS 709 - NV12 (420v) 模式则无效:前者画面清晰、颜色正确,后者画面模糊、颜色也不对。具体原因尚未深入分析。
其实 MS2130S 这款芯片在网络上已经有很多现成的研究,从寄存器用法、hidapi 访问到固件补丁,都能找到前人的成果。这次能比较顺利地定位并解决问题,很大程度上是站在这些探索的肩膀上,在此对这些作者表示感谢。
相关项目链接整理如下:
0xfc8e 的思路就来自这里。这些项目大多出自 steve-m 之手,感谢他的开源工作。
以下是这个采集卡的 EDID:
00ffffffffffff0054f248538d0135012b230103803c2278022895a7554ea3260f5054010000d1c081c0010001000100010001000100023a801871382d40582c4500c48e2100001e9c45007251d01e206e28550055502100001e000000fd0018501e641e000a202020202020000000fc0055475245454e2d39353334380a01c002032d724c1f222120133e3d3c5f64676223090707830100006d030c001000003c200060010203e50e616066656a5e00a0a0a0295030202500b0133200000019640080a3a02b50b0103510b01332000000352f00a0a0a0295030202500b001320000000000000000000000000000000000000000000000000000000000000058 用 edid-decode 出来的结果:
edid-decode (hex): 00 ff ff ff ff ff ff 00 54 f2 48 53 8d 01 35 01 2b 23 01 03 80 3c 22 78 02 28 95 a7 55 4e a3 26 0f 50 54 01 00 00 d1 c0 81 c0 01 00 01 00 01 00 01 00 01 00 01 00 02 3a 80 18 71 38 2d 40 58 2c 45 00 c4 8e 21 00 00 1e 9c 45 00 72 51 d0 1e 20 6e 28 55 00 55 50 21 00 00 1e 00 00 00 fd 00 18 50 1e 64 1e 00 0a 20 20 20 20 20 20 00 00 00 fc 00 55 47 52 45 45 4e 2d 39 35 33 34 38 0a 01 c0 02 03 2d 72 4c 1f 22 21 20 13 3e 3d 3c 5f 64 67 62 23 09 07 07 83 01 00 00 6d 03 0c 00 10 00 00 3c 20 00 60 01 02 03 e5 0e 61 60 66 65 6a 5e 00 a0 a0 a0 29 50 30 20 25 00 b0 13 32 00 00 00 19 64 00 80 a3 a0 2b 50 b0 10 35 10 b0 13 32 00 00 00 35 2f 00 a0 a0 a0 29 50 30 20 25 00 b0 01 32 00 00 00 00 00 00 00 00 00 00 00 00 00 00 00 00 00 00 00 00 00 00 00 00 00 00 00 00 00 00 00 58 ---------------- Block 0, Base EDID: EDID Structure Version & Revision: 1.3 Vendor & Product Identification: Manufacturer: UGR Model: 21320 Serial Number: 20251021 Made in: week 43 of 2025 Basic Display Parameters & Features: Digital display Maximum image size: 60 cm x 34 cm Gamma: 2.20 Monochrome or grayscale display First detailed timing is the preferred timing Color Characteristics: Red : 0.6523, 0.3339 Green: 0.3066, 0.6367 Blue : 0.1503, 0.0595 White: 0.3134, 0.3291 Established Timings I & II: DMT 0x09: 800x600 60.316541 Hz 4:3 37.879 kHz 40.000000 MHz Standard Timings: DMT 0x52: 1920x1080 60.000000 Hz 16:9 67.500 kHz 148.500000 MHz DMT 0x55: 1280x720 60.000000 Hz 16:9 45.000 kHz 74.250000 MHz Detailed Timing Descriptors: DTD 1: 1920x1080 60.000000 Hz 16:9 67.500 kHz 148.500000 MHz (708 mm x 398 mm) Hfront 88 Hsync 44 Hback 148 Hpol P Vfront 4 Vsync 5 Vback 36 Vpol P DTD 2: 1280x720 144.000000 Hz 16:9 108.000 kHz 178.200000 MHz (597 mm x 336 mm) Hfront 110 Hsync 40 Hback 220 Hpol P Vfront 5 Vsync 5 Vback 20 Vpol P Display Range Limits: Monitor ranges (GTF): 24-80 Hz V, 30-100 kHz H, max dotclock 300 MHz Display Product Name: 'UGREEN-95348' Extension blocks: 1 Checksum: 0xc0 ---------------- Block 1, CTA-861 Extension Block: Revision: 3 Basic audio support Supports YCbCr 4:4:4 Supports YCbCr 4:2:2 Native detailed modes: 2 Video Data Block: VIC 31: 1920x1080 50.000000 Hz 16:9 56.250 kHz 148.500000 MHz VIC 34: 1920x1080 30.000000 Hz 16:9 33.750 kHz 74.250000 MHz VIC 33: 1920x1080 25.000000 Hz 16:9 28.125 kHz 74.250000 MHz VIC 32: 1920x1080 24.000000 Hz 16:9 27.000 kHz 74.250000 MHz VIC 19: 1280x720 50.000000 Hz 16:9 37.500 kHz 74.250000 MHz VIC 62: 1280x720 30.000000 Hz 16:9 22.500 kHz 74.250000 MHz VIC 61: 1280x720 25.000000 Hz 16:9 18.750 kHz 74.250000 MHz VIC 60: 1280x720 24.000000 Hz 16:9 18.000 kHz 59.400000 MHz VIC 95: 3840x2160 30.000000 Hz 16:9 67.500 kHz 297.000000 MHz VIC 100: 4096x2160 30.000000 Hz 256:135 67.500 kHz 297.000000 MHz VIC 103: 3840x2160 24.000000 Hz 64:27 54.000 kHz 297.000000 MHz VIC 98: 4096x2160 24.000000 Hz 256:135 54.000 kHz 297.000000 MHz Audio Data Block: Linear PCM: Max channels: 2 Supported sample rates (kHz): 48 44.1 32 Supported sample sizes (bits): 24 20 16 Speaker Allocation Data Block: FL/FR - Front Left/Right Vendor-Specific Data Block (HDMI), OUI 00-0C-03: Source physical address: 1.0.0.0 Maximum TMDS clock: 300 MHz Extended HDMI video details: HDMI VICs: HDMI VIC 1: 3840x2160 30.000000 Hz 16:9 67.500 kHz 297.000000 MHz HDMI VIC 2: 3840x2160 25.000000 Hz 16:9 56.250 kHz 297.000000 MHz HDMI VIC 3: 3840x2160 24.000000 Hz 16:9 54.000 kHz 297.000000 MHz YCbCr 4:2:0 Video Data Block: VIC 97: 3840x2160 60.000000 Hz 16:9 135.000 kHz 594.000000 MHz VIC 96: 3840x2160 50.000000 Hz 16:9 112.500 kHz 594.000000 MHz VIC 102: 4096x2160 60.000000 Hz 256:135 135.000 kHz 594.000000 MHz VIC 101: 4096x2160 50.000000 Hz 256:135 112.500 kHz 594.000000 MHz Detailed Timing Descriptors: DTD 3: 2560x1440 60.000199 Hz 16:9 88.860 kHz 241.700000 MHz (analog composite, sync-on-green, 944 mm x 531 mm) Hfront 48 Hsync 32 Hback 80 Hpol N Vfront 2 Vsync 5 Vback 34 Vpol N DTD 4: 2560x1440 49.997581 Hz 16:9 74.146 kHz 256.250000 MHz (analog composite, sync-on-green, 944 mm x 531 mm) Hfront 176 Hsync 272 Hback 448 Hpol N Vfront 3 Vsync 5 Vback 35 Vpol N DTD 5: 2560x1440 30.000099 Hz 16:9 44.430 kHz 120.850000 MHz (analog composite, sync-on-green, 944 mm x 513 mm) Hfront 48 Hsync 32 Hback 80 Hpol N Vfront 2 Vsync 5 Vback 34 Vpol N Checksum: 0x58 ---------------- Preferred Video Timing if only Block 0 is parsed: DTD 1: 1920x1080 60.000000 Hz 16:9 67.500 kHz 148.500000 MHz (708 mm x 398 mm) Hfront 88 Hsync 44 Hback 148 Hpol P Vfront 4 Vsync 5 Vback 36 Vpol P ---------------- Preferred Video Timings if Block 0 and CTA-861 Blocks are parsed: DTD 1: 1920x1080 60.000000 Hz 16:9 67.500 kHz 148.500000 MHz (708 mm x 398 mm) Hfront 88 Hsync 44 Hback 148 Hpol P Vfront 4 Vsync 5 Vback 36 Vpol P VIC 31: 1920x1080 50.000000 Hz 16:9 56.250 kHz 148.500000 MHz Hfront 528 Hsync 44 Hback 148 Hpol P Vfront 4 Vsync 5 Vback 36 Vpol P ---------------- Native Video Resolution if only Block 0 is parsed: 1920x1080 ---------------- Native Video Resolutions if Block 0 and CTA-861 Blocks are parsed: 1280x720 1920x1080 ---------------- edid-decode SHA: 84ddf9155376 2021-10-03 10:37:45 Warnings: Block 1, CTA-861 Extension Block: IT Video Formats are overscanned by default, but normally this should be underscanned. Failures: Block 0, Base EDID: Standard Timings: Use 0x0101 as the invalid Standard Timings code, not 0x0100. Standard Timings: Use 0x0101 as the invalid Standard Timings code, not 0x0100. Standard Timings: Use 0x0101 as the invalid Standard Timings code, not 0x0100. Standard Timings: Use 0x0101 as the invalid Standard Timings code, not 0x0100. Standard Timings: Use 0x0101 as the invalid Standard Timings code, not 0x0100. Standard Timings: Use 0x0101 as the invalid Standard Timings code, not 0x0100. Detailed Timing Descriptor #1: Mismatch of image size 708x398 mm vs display size 600x340 mm. Block 1, CTA-861 Extension Block: Detailed Timing Descriptor #3: Mismatch of image size 944x531 mm vs display size 600x340 mm. Detailed Timing Descriptor #4: Mismatch of image size 944x531 mm vs display size 600x340 mm. Detailed Timing Descriptor #5: Mismatch of image size 944x513 mm vs display size 600x340 mm. Required 640x480p60 timings are missing in the established timings and the SVD list (VIC 1). HDMI VIC Codes must have their CTA-861 VIC equivalents in the VSB. Missing VCDB, needed for Set Selectable RGB Quantization to avoid interop issues. EDID: Base EDID: Some timings are out of range of the Monitor Ranges: Vertical Freq: 24.000 - 144.000 Hz (Monitor: 24.000 - 80.000 Hz) Horizontal Freq: 18.000 - 108.000 kHz (Monitor: 30.000 - 100.000 kHz) CTA-861: Native progressive timings are a mix of several resolutions. EDID conformity: FAIL 也就是说,它的 4K 60Hz 从输入侧已经是 YCbCr 4:2:0 了,也就是每 2x2 的四个像素里,有四个 Y,一个 Cb 和一个 Cr。这样平均下来,8-bit 深度下每个像素的空间是 \((4*8+8+8)/4 = 12\) bit。如果是 4:2:2 的话,每 2x2 的四个像素里,有四个 Y,两个 Cb 和两个 Cr,平均下来,8-bit 深度下每个像素的空间是 \((4*8+2*8+2*8)/4 = 16\) bit。如果直接保存 RGB 4:4:4,8-bit 深度下就是 \(3*8=24\) bit。
2026-09-11 08:00:00
最近在设计上课所用设备的音视频路由,借此机会梳理一下教室里现有的音视频路由,并记录一种可行的方案。
教室里原有的音视频路由大致如下。先看信号源:
这些信号经过一个可在讲台上操控的导播台(下称「讲台」,实际设备未必位于讲台内部),可以输出到以下位置:
画成路由图大致如下。视频部分:
flowchart TD 笔记本显示输出 -->|HDMI| 讲台1[讲台] 一体机显示输出 --> 讲台1 教室摄像头 --> 讲台1 教室摄像头 --> 讲台2[讲台] 讲台1 --> 投影 讲台1 --> 返显 讲台1 --> 显示器 讲台2 --> 一体机视频输入 讲台2 -->|USB| 笔记本视频输入音频部分:
flowchart TD 笔记本音频输出 -->|HDMI| 讲台 一体机音频输出 --> 讲台 话筒 --> 讲台 讲台 --> 音响 话筒 --> 讲台1[讲台] 讲台1 --> 一体机音频输入 讲台1 -->|USB| 笔记本音频输入回到我的课程。我希望能在多个信号源之间方便地切换,包括 Mac 笔记本、鸿蒙电脑以及一台便携摄像头。讲台自带的导播功能不足以支撑这么复杂的切换,手上又没有 ATEM Mini 导播台(怀念以前学生节的日子),于是打算在 Mac 笔记本上用 OBS 做软件导播。
那么音视频路由该如何设计?下面是我最终采用的路由方式。视频部分:
flowchart TD 鸿蒙电脑 -->|HDMI| 采集卡 采集卡 -->|Type-C| Mac电脑 便携摄像头 -->|USB| Mac电脑 Mac电脑 -->|HDMI| 讲台 Mac电脑 --> OBS直播或录像 教室摄像头 --> 讲台1[讲台] 讲台 --> 投影 讲台 --> 返显 讲台 --> 显示器 讲台1 -->|USB| Mac电脑音频部分:
flowchart TD 鸿蒙电脑 -->|HDMI| 采集卡 采集卡 -->|Type-C| Mac电脑 便携摄像头 -->|USB| Mac电脑 Mac电脑 -->|HDMI| 讲台 Mac电脑 --> OBS直播或录像 话筒 --> 讲台 话筒 --> 讲台1[讲台] 讲台 --> 音响 讲台1 -->|USB| Mac电脑这样,Mac 上的 OBS 就能获得来自鸿蒙电脑、Mac 自身屏幕、教室摄像头和话筒的音视频输入;再通过 OBS 的 Projector 把画面输出到扩展屏,经由讲台投到教室的各种投影和显示器上,音频则从音响放出来。之后要录像或直播,直接使用 OBS 自带的功能即可。
针对上课 4K 30 FPS 但是静态为主的场景,在 OBS 设置里,Output 选择 Advanced,对于 Streaming,Vido Encoder 选 Apple VT H264 Hardware Encoder,Rate Control 选 CBR,Bitrate 选 8000 Kbps,Keyframe Interval 选 2s,Profile 选 high,勾选 Use B-Frames;对于 Recording,Recording Format 选 Matroska Video (.mkv),Video Encoder 选 x264,Rate Control 选 CRF,Quality 选 18,Keyframe Interval 选 5s,CPU Usage Preset 选 medium,Profile 选 high,Tune 选 None。
可以打开 OBS 的 View -> Stats,看看实时码率,有没有 missed or skipped frame。
另一个候选方案是使用 HDMI 分配器:把展示用的鸿蒙电脑信号一分为二,一份直连讲台投出,另一份经采集卡进入 Mac 电脑的 OBS。此时视频拓扑变为:
flowchart TD 鸿蒙电脑 -->|HDMI| 分配器[HDMI分配器] 分配器 -->|HDMI| 采集卡 采集卡 -->|Type-C| Mac电脑 便携摄像头 -->|USB| Mac电脑 分配器 -->|HDMI| 讲台 Mac电脑 --> OBS直播或录像 教室摄像头 --> 讲台1[讲台] 讲台 --> 投影 讲台 --> 返显 讲台 --> 显示器 讲台1 -->|USB| Mac电脑这种设计把 OBS 放到了旁路,避开了采集卡可能出现的一些问题(后文会提到);缺点是投出来的内容只能来自鸿蒙电脑,无法通过 OBS 二次加工。
采集卡用的是绿联的 UG307-95348 4K60Hz MS2130S 视频采集卡,USB 名称是 UGREEN 95348,VID 0x2b89,PID 0x5348。
便携摄像头用的是:
HDMI 分配器用的是绿联的 AP502-55493 4K60Hz 一进二出 HDMI 分配器,输入规格为 5V/1A,支持一路 HDMI 输入、两路 HDMI 输出。从 EDID 来看,采用的是 IT6664 方案,可以通过拨码开关切换不同的模式:
仅供参考,不构成购买建议。
在使用绿联 UG307-95348 采集卡的过程中,还遇到并修复了一些清晰度和颜色问题,具体方法见 修复绿联 UG307-95348 HDMI 采集卡清晰度与颜色问题。
在使用绿联 AP502-55493 HDMI 分配器的过程中,也遇到了一些显示问题:在特定教室里,在默认的 1 上 2 上配置(自动计算 EDID)下,两路输出只有一路可以正常显示,比如 OUT1 接教室的投影是正常的,OUT2 接采集卡就黑屏。调整成 1 下 2 下,即复制 OUT1 设备的 EDID,把 OUT1 接教室的投影,把 OUT2 接上面的采集卡,这两路又都能正常工作。初步怀疑和 EDID 有关系,后续考虑把两路输出的 EDID 导出来对比一下,也看看 HDMI 分配器给输入侧暴露的 EDID 是怎么样的。
音频方面也踩到了一些坑,而且都和立体声有关。
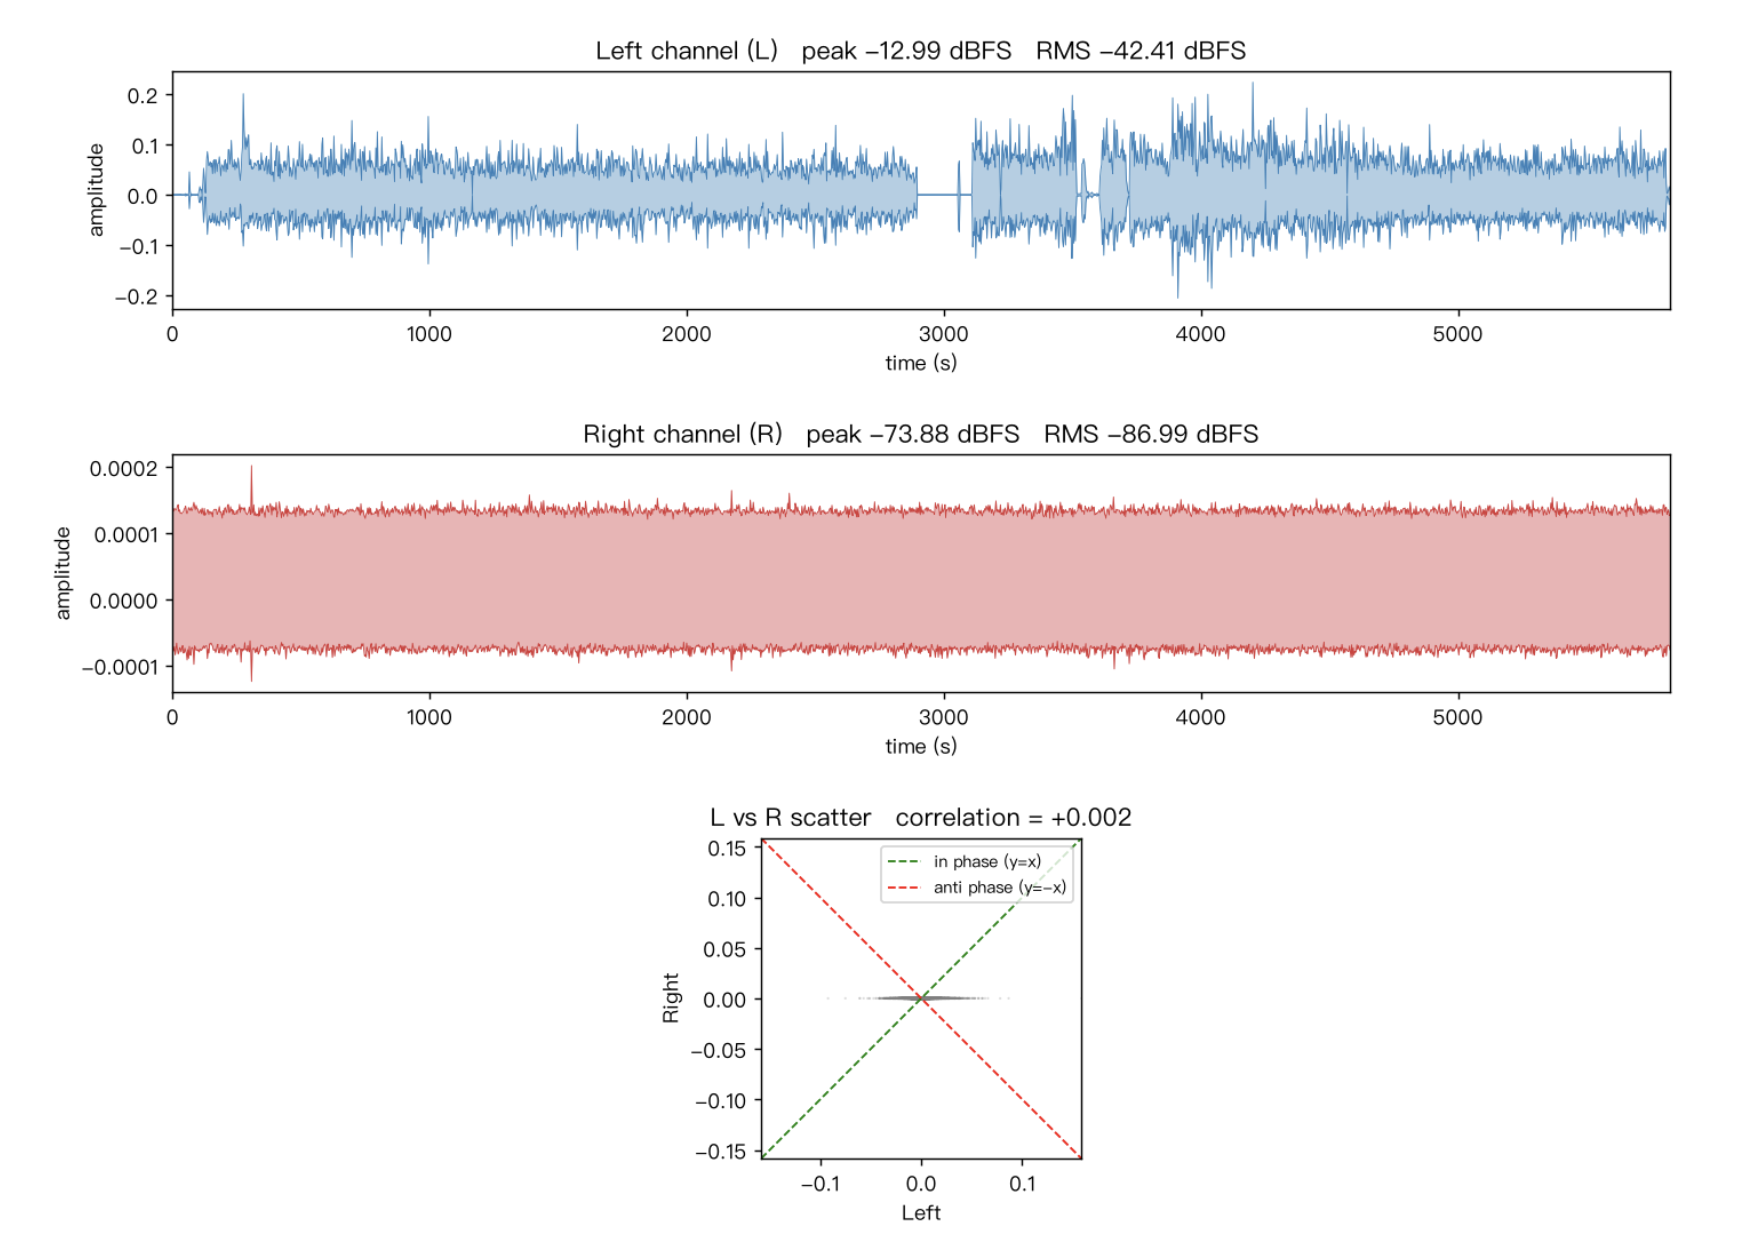
第一个坑:某个教室录出来的音频虽然标称双声道,但实际上只有左声道有声音,右声道几乎静音。
第二个坑:另一个教室录出来的音频同样是双声道,但右声道是左声道的反相,两个声道一旦叠加就会互相抵消。
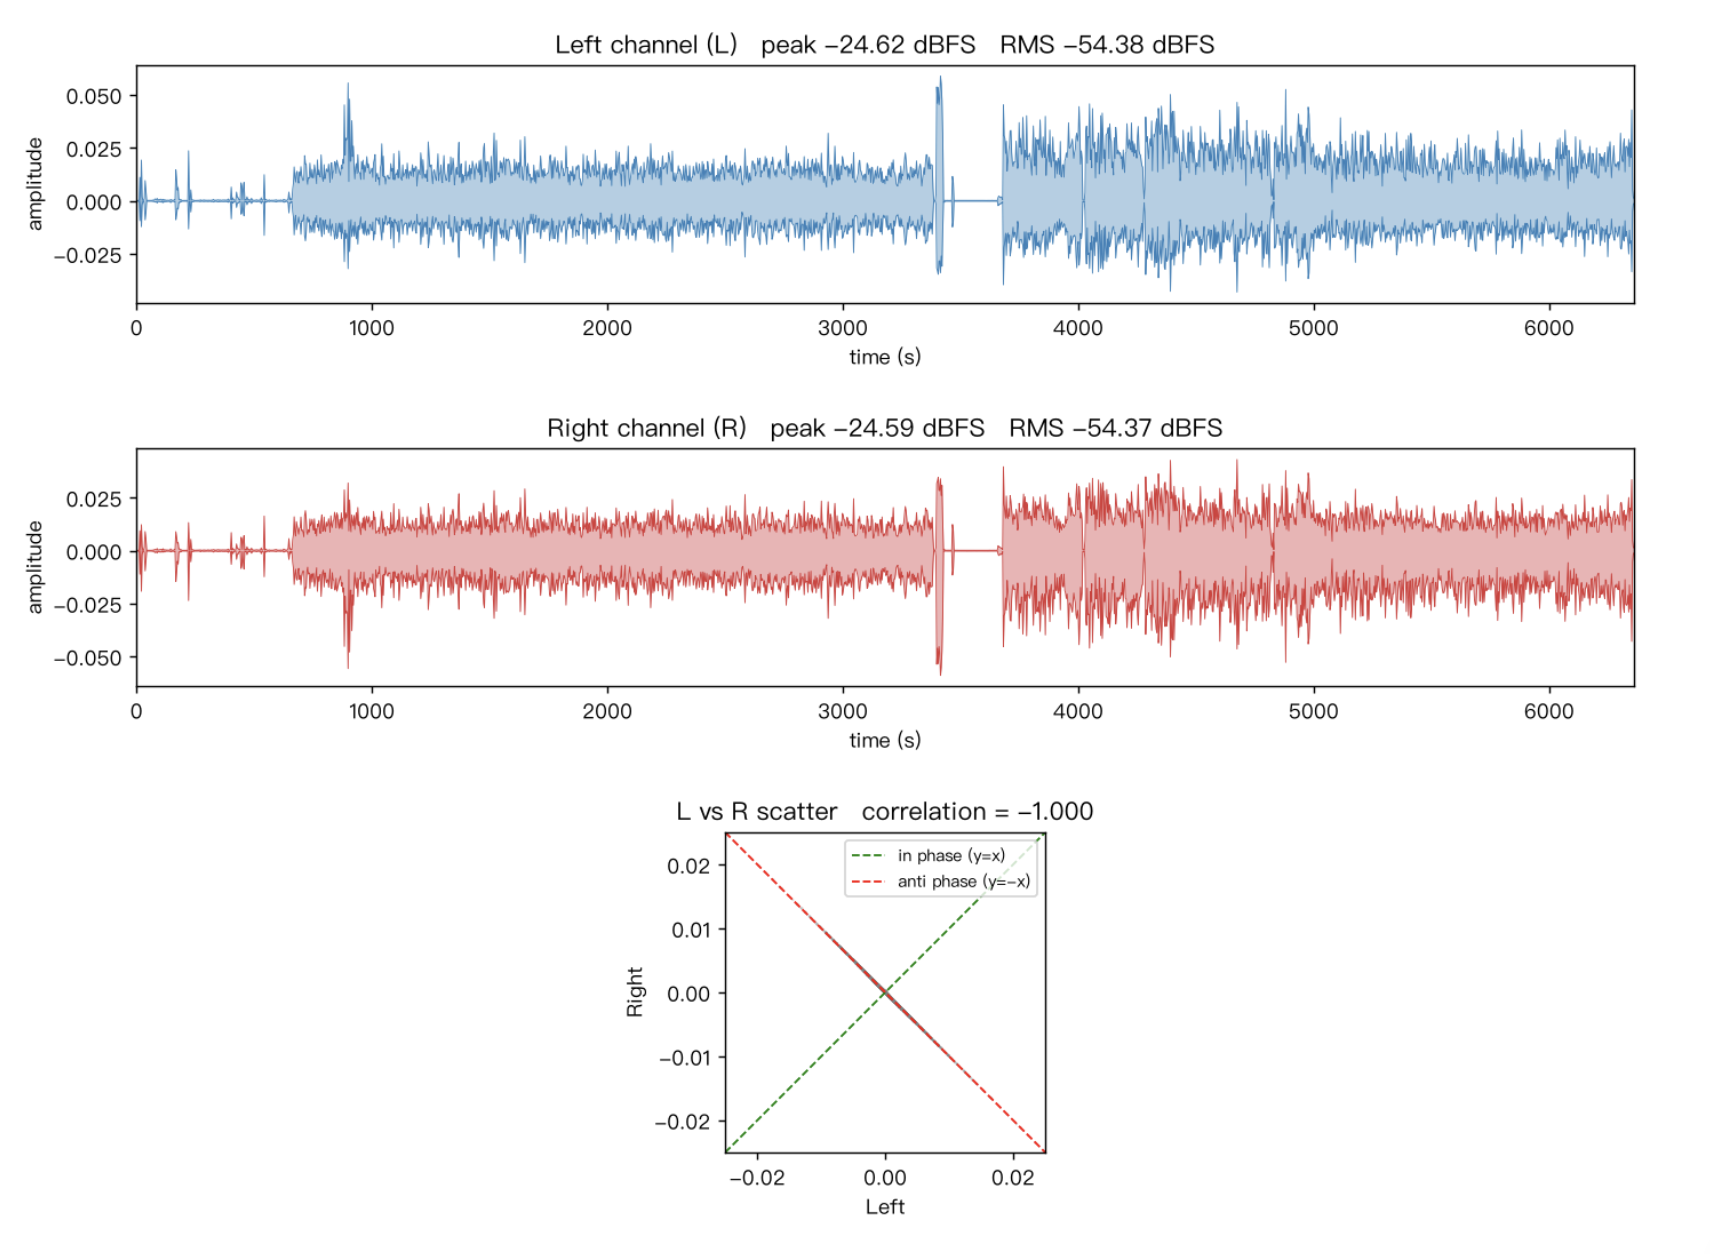
上面两张图都是用 stereo_check.py 绘制的。
此外,上课途中还遇到过突发情况:采集卡采集的视频出现闪屏和黑屏,不确定是采集卡的问题还是 HDMI 线的问题。下课后又无法复现,不知道是否和温度有关。
ffmpeg 常用命令行:
# 截取视频中的一帧 ffmpeg -i source.mp4 -ss hh:mm:ss.xxx -frames:v 1 output.png # 截取视频中的一部分,以左上角为坐标原点,x 轴向右,y 轴向下,从 (x,y) 到 (x+w, y+h) # 用 https://ffmpeg.party/tools/cropper/ 辅助确定坐标 ffmpeg -i source.mp4 -vf "crop=w:h:x:y" output.mp4 # 原样保留视频 ffmpeg -i source.mp4 -c:v copy output.mp4 # 标准化视频中音频的响度 ffmpeg -i source.mp4 -af "loudnorm=I=-16:TP=-1.5:LRA=11" output.mp4 # 只保留双声道里的左声道 ffmpeg -i source.mp4 -af "pan=mono|c0=c0" output.mp4 # 只保留左声道的同时,标准化音频响度 ffmpeg -i source.mp4 -af "pan=mono|c0=c0,loudnorm=I=-16:dual_mono=true:TP=-1.5:LRA=11:print_format=summary" -ar 48k output.mp4 # 原样保留音频 ffmpeg -i source.mp4 -c:a copy output.mp4 # 测量前 10s 的音量大小 ffmpeg -i source.mp4 -af "volumedetect" -f null -t 10 - LosslessCut:以关键帧的粒度,快速剪辑
2026-09-10 08:00:00
最近在做 PPT,用了一个在 Windows 上制作的 PPT 模板,它用到了 微软雅黑 Light 字体,在 macOS 上显示不正常,因此做了一些细致的研究和排查,找到了原因和解决方案。
遇到的问题是这样的:在 macOS 上做了一个 PPT,放到 Windows 或者鸿蒙的 WPS 上显示,发现字体渲染并不一致。如果在 macOS 上保存 PPT 的时候选择内嵌字体,它也会提示“微软雅黑 Light”字体不存在。说明 macOS 上并没有找到正确的字体,fallback 到了其他字体来显示。然后在 Windows 上找到了正确的字体,导致了效果的不同。
但实际上,macOS 上的 Office,是附带了微软雅黑的字体文件的:
> ls /Applications/Microsoft\ PowerPoint.app/Contents/Resources/DFonts/msyh*.ttc '/Applications/Microsoft PowerPoint.app/Contents/Resources/DFonts/msyh.ttc'* '/Applications/Microsoft PowerPoint.app/Contents/Resources/DFonts/msyhbd.ttc'* '/Applications/Microsoft PowerPoint.app/Contents/Resources/DFonts/msyhl.ttc'* 对应了微软雅黑的不同的字重,其中 msyhl 就是对应了 Light。也就是说,虽然 macOS 没有字体,但 PowerPoint 自带了,理应正常支持。
然后,用 Python 探索了一下这些字体里的各种信息,发现了一些端倪:
──────────────────────────────────────────────────────────────────────────────────────────────────────────── ■ face #1/2 Microsoft YaHei Light / Regular / MicrosoftYaHeiLight ──────────────────────────────────────────────────────────────────────────────────────────────────────────── # platform enc language nameID 含义 len off 文本 1 Windows(3) 1 英文(en) 1 Family 42 250 Microsoft YaHei Light 2 Windows(3) 1 英文(en) 2 Subfamily 14 292 Regular 17 Windows(3) 1 简体中文(zh-Hans) 1 Family 20 2220 微软雅黑 Light 18 Windows(3) 1 简体中文(zh-Hans) 2 Subfamily 14 292 Regular 这是微软雅黑 Light 的 name table,它的字体名称有英文和中文两个版本。如果我把字体改成 Microsoft YaHei Light,它就可以正常找到字体,说明我的英文 macOS 上的 PowerPoint 没有正确匹配字体的中文名。
我做了一个测试的 PPT,三行字,第一行是微软雅黑 Light 字体,第二行是 Microsoft YaHei Light 字体,第三是 Microsoft YaHei UI 字体。能明显看出第一行字体有问题,和第三行一样,而第二行字体是正确的:
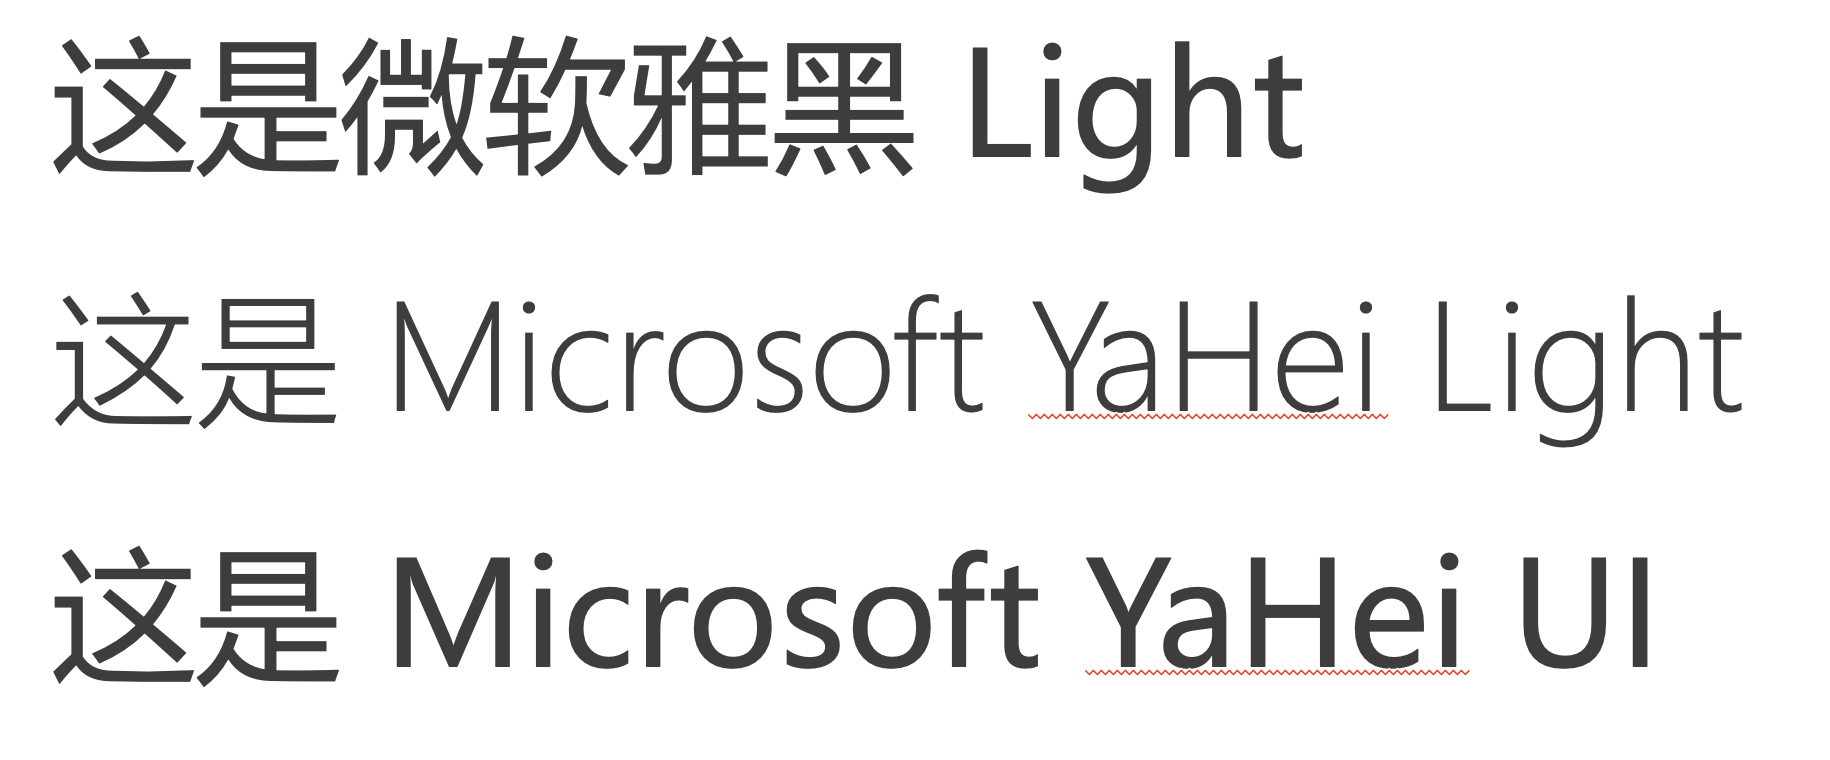
后两行正确匹配了字体,所以渲染没问题。而同样的文件,放到 Windows PowerPoint 里打开,可以看到正确的显示结果:
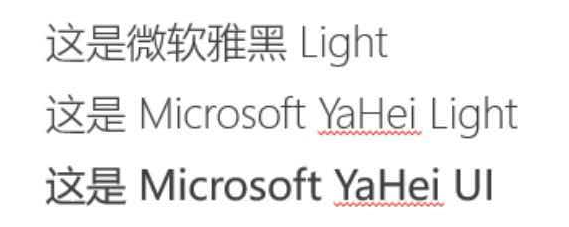
前两个字体是同一个,和第三个不同,这是预期结果。
因此最后的解决办法就是:把模板里的字体,从微软雅黑 Light,改成 Microsoft YaHei Light。这样就可以在 macOS 和 Windows 上都能正常显示了。
至于鸿蒙 WPS 怎么办:从虚拟机 Windows 里复制 msyh*.ttc 字体,安装到鸿蒙里,就可以正常显示了。


