2026-06-21 08:00:00

注意力透支,是现代人的新型亚健康。
一个人平均一天要接受六千到一万条广告,无论是有意无意。
这个数量对于 20 年前来说又增长了一倍。
而这些钱可以从广告庄家的兜里看出来,比如腾讯广告从 20 年前的 2 亿到现在的千亿级别。
为了保护自己的注意力,我最近做了一些改变。首先从生活中最离不开的微信下手
微信集合了聊天、公众号、视频号、直播、音乐、购物、游戏等,甚至自带小程序这样的微型操作系统为一体的庞然大物。而它最开始的模样,也仅仅只有登录、加好友和发消息而已。
微信依靠着关系网,已经深度绑定了每个人,目前生活没有办法完完全全脱离微信。既然如此,那就拿起剃刀,做个改造:
第一,取消关注所有公众号和服务号,同时,关闭个性化推荐和视频号消息推荐。
第二,删除了两百多位好友,退出了四十多个群聊,剩余全部折叠起来。
第三,关闭发现页所有功能,包括朋友圈、视频号、直播、看一看、搜一搜等等。
第四,关闭所有服务,包括信用卡还款、手机充值、生活缴费、出行服务、酒店民宿等等。
第五,关闭微信的焦点通知、桌面角标、悬浮通知、锁屏通知、发声和震动,仅仅保留了微信电话来电。
做了这些,我得到了一个青春版的微信,比较遗憾的是,微信不支持把我页面中的状态、朋友圈、作品、小店卡包和表情关闭掉。
当然,这需要经过一段时间的戒断反应,我以前很喜欢刷朋友圈、公众号和视频号。但同样了,减少了大量的消息偷袭和信息洪涝,我发现我被微信偷走的注意力又回来了 ,并且已经相当适应,不想再回去了。
2026-04-25 08:00:00
一般来说,React 的状态都来源于自身,比如通过 useState 创建的状态。
但是有时候,我们的状态也有来源于别人家,来看 React 官网的经典例子:
监听网络是否在线,如果在线,就显示 ✅ Online,否则显示 ❌ Disconnected:
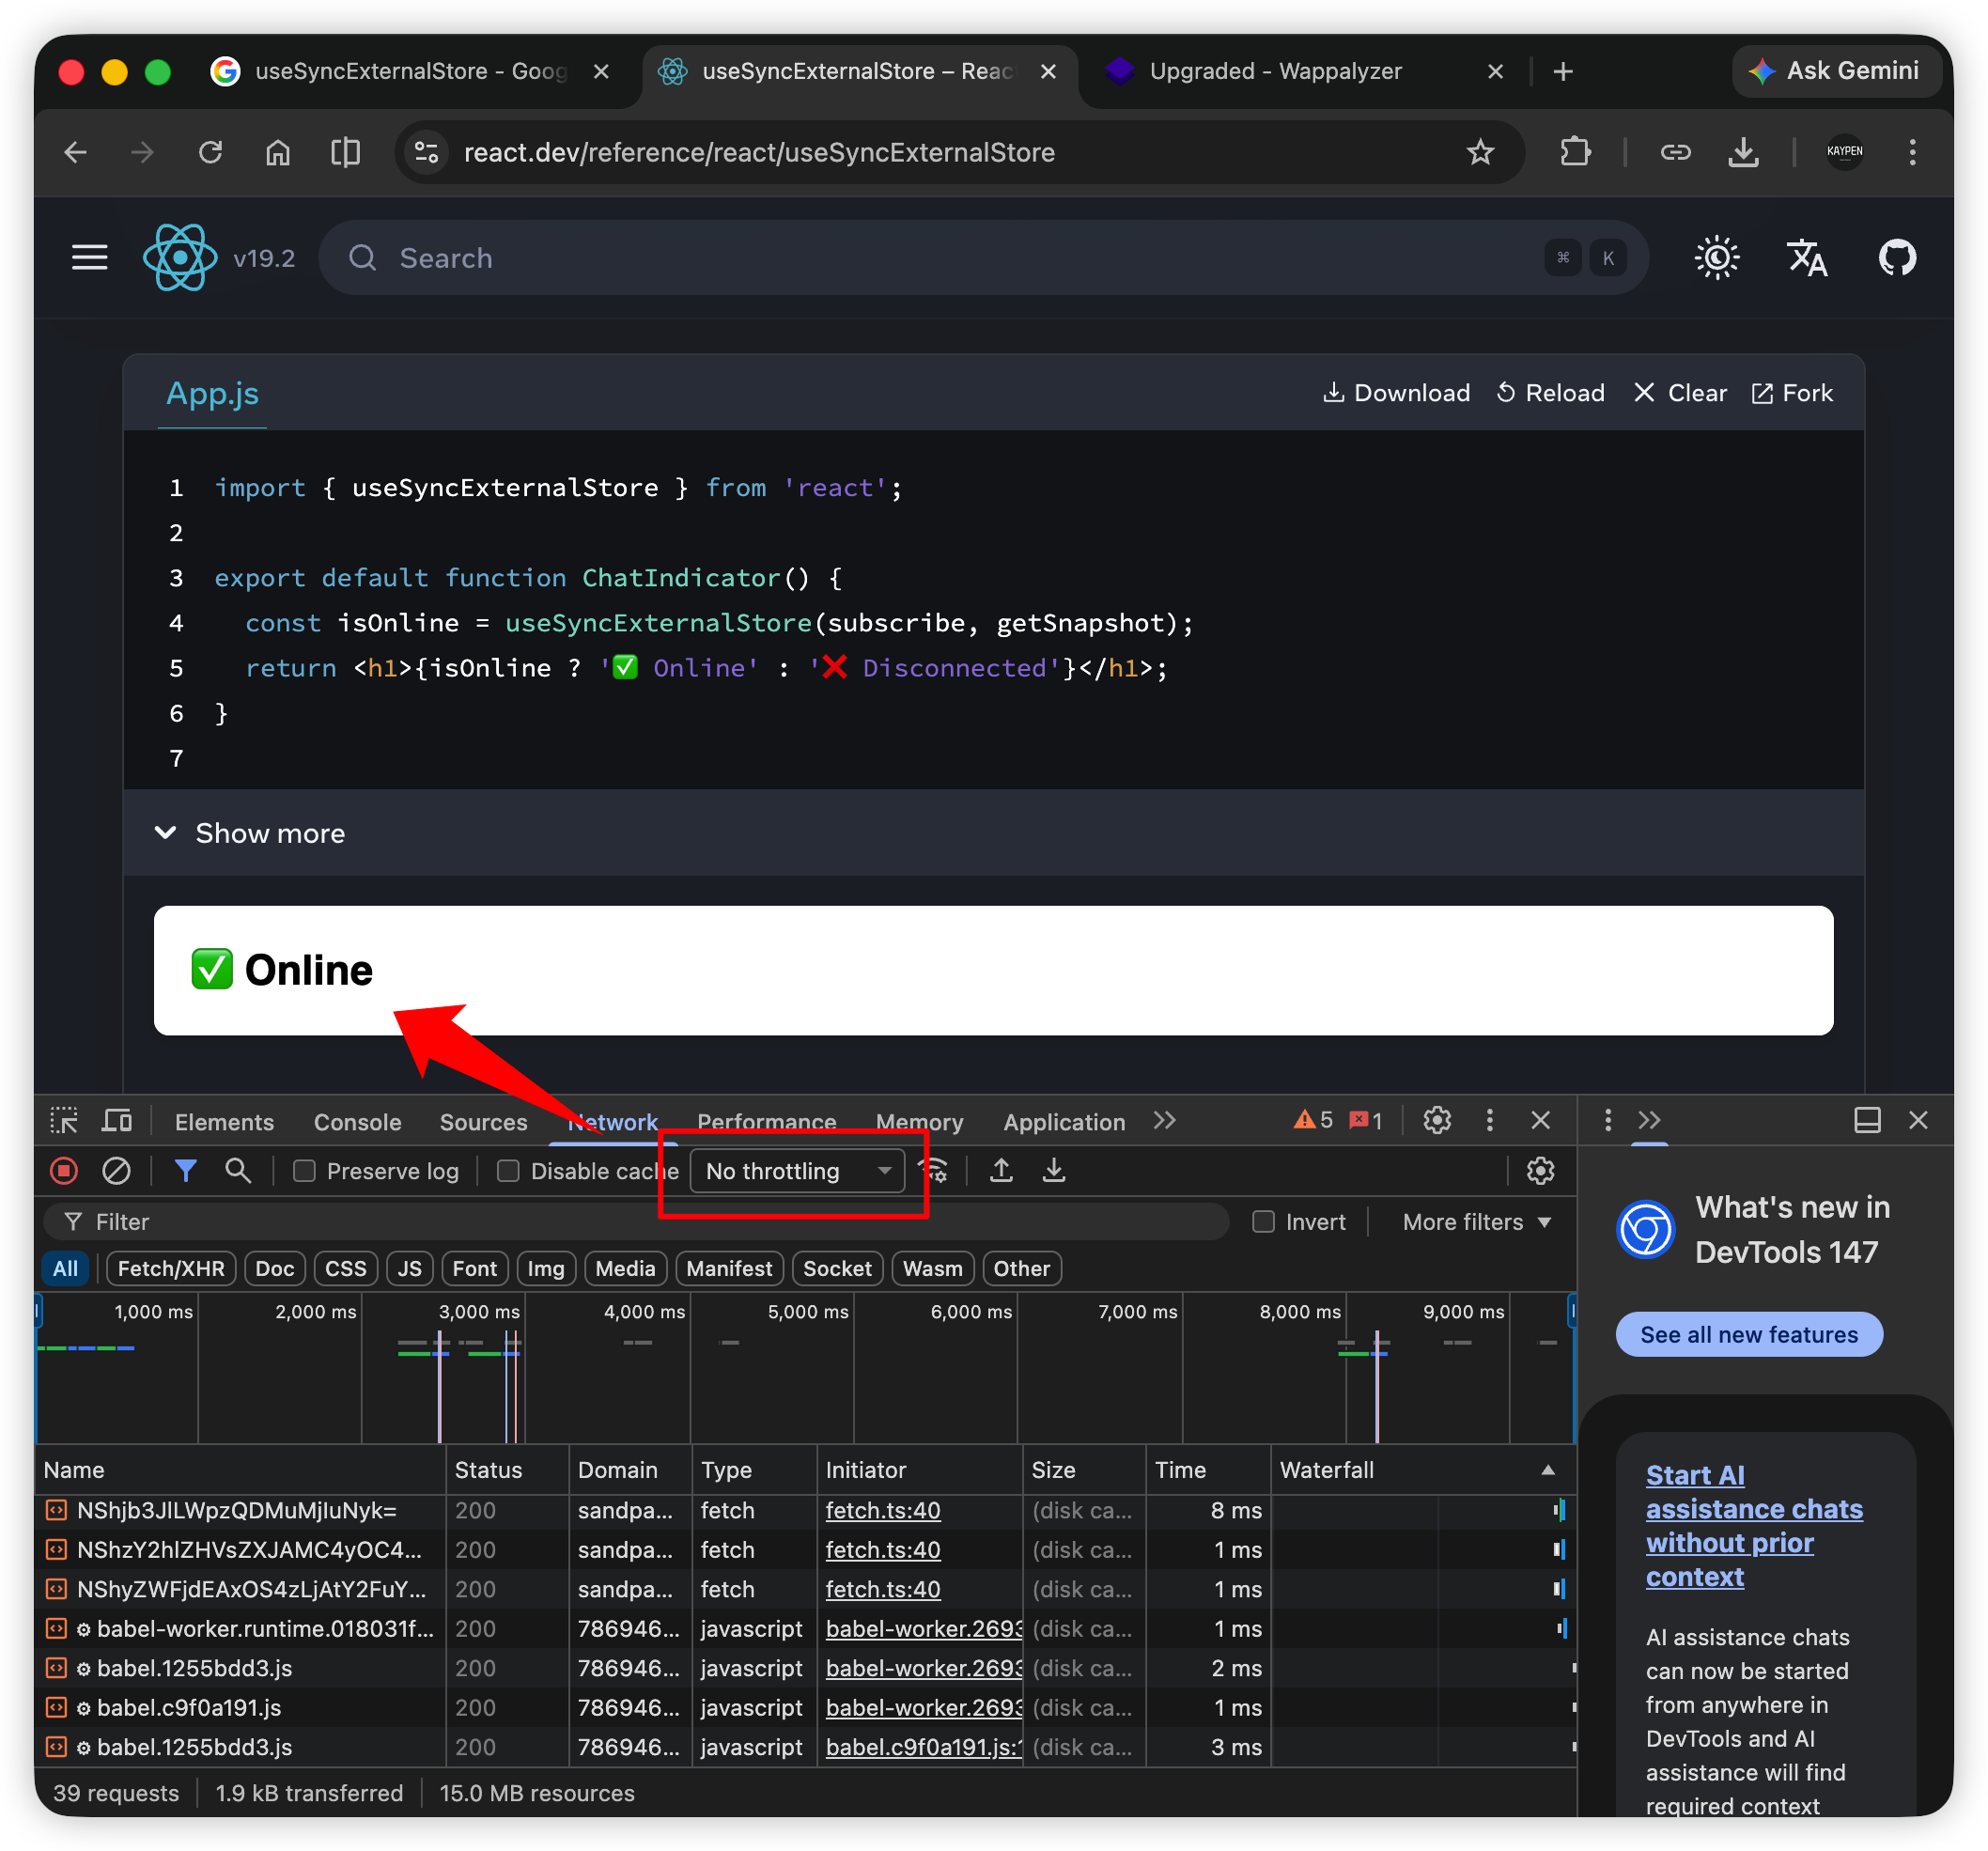
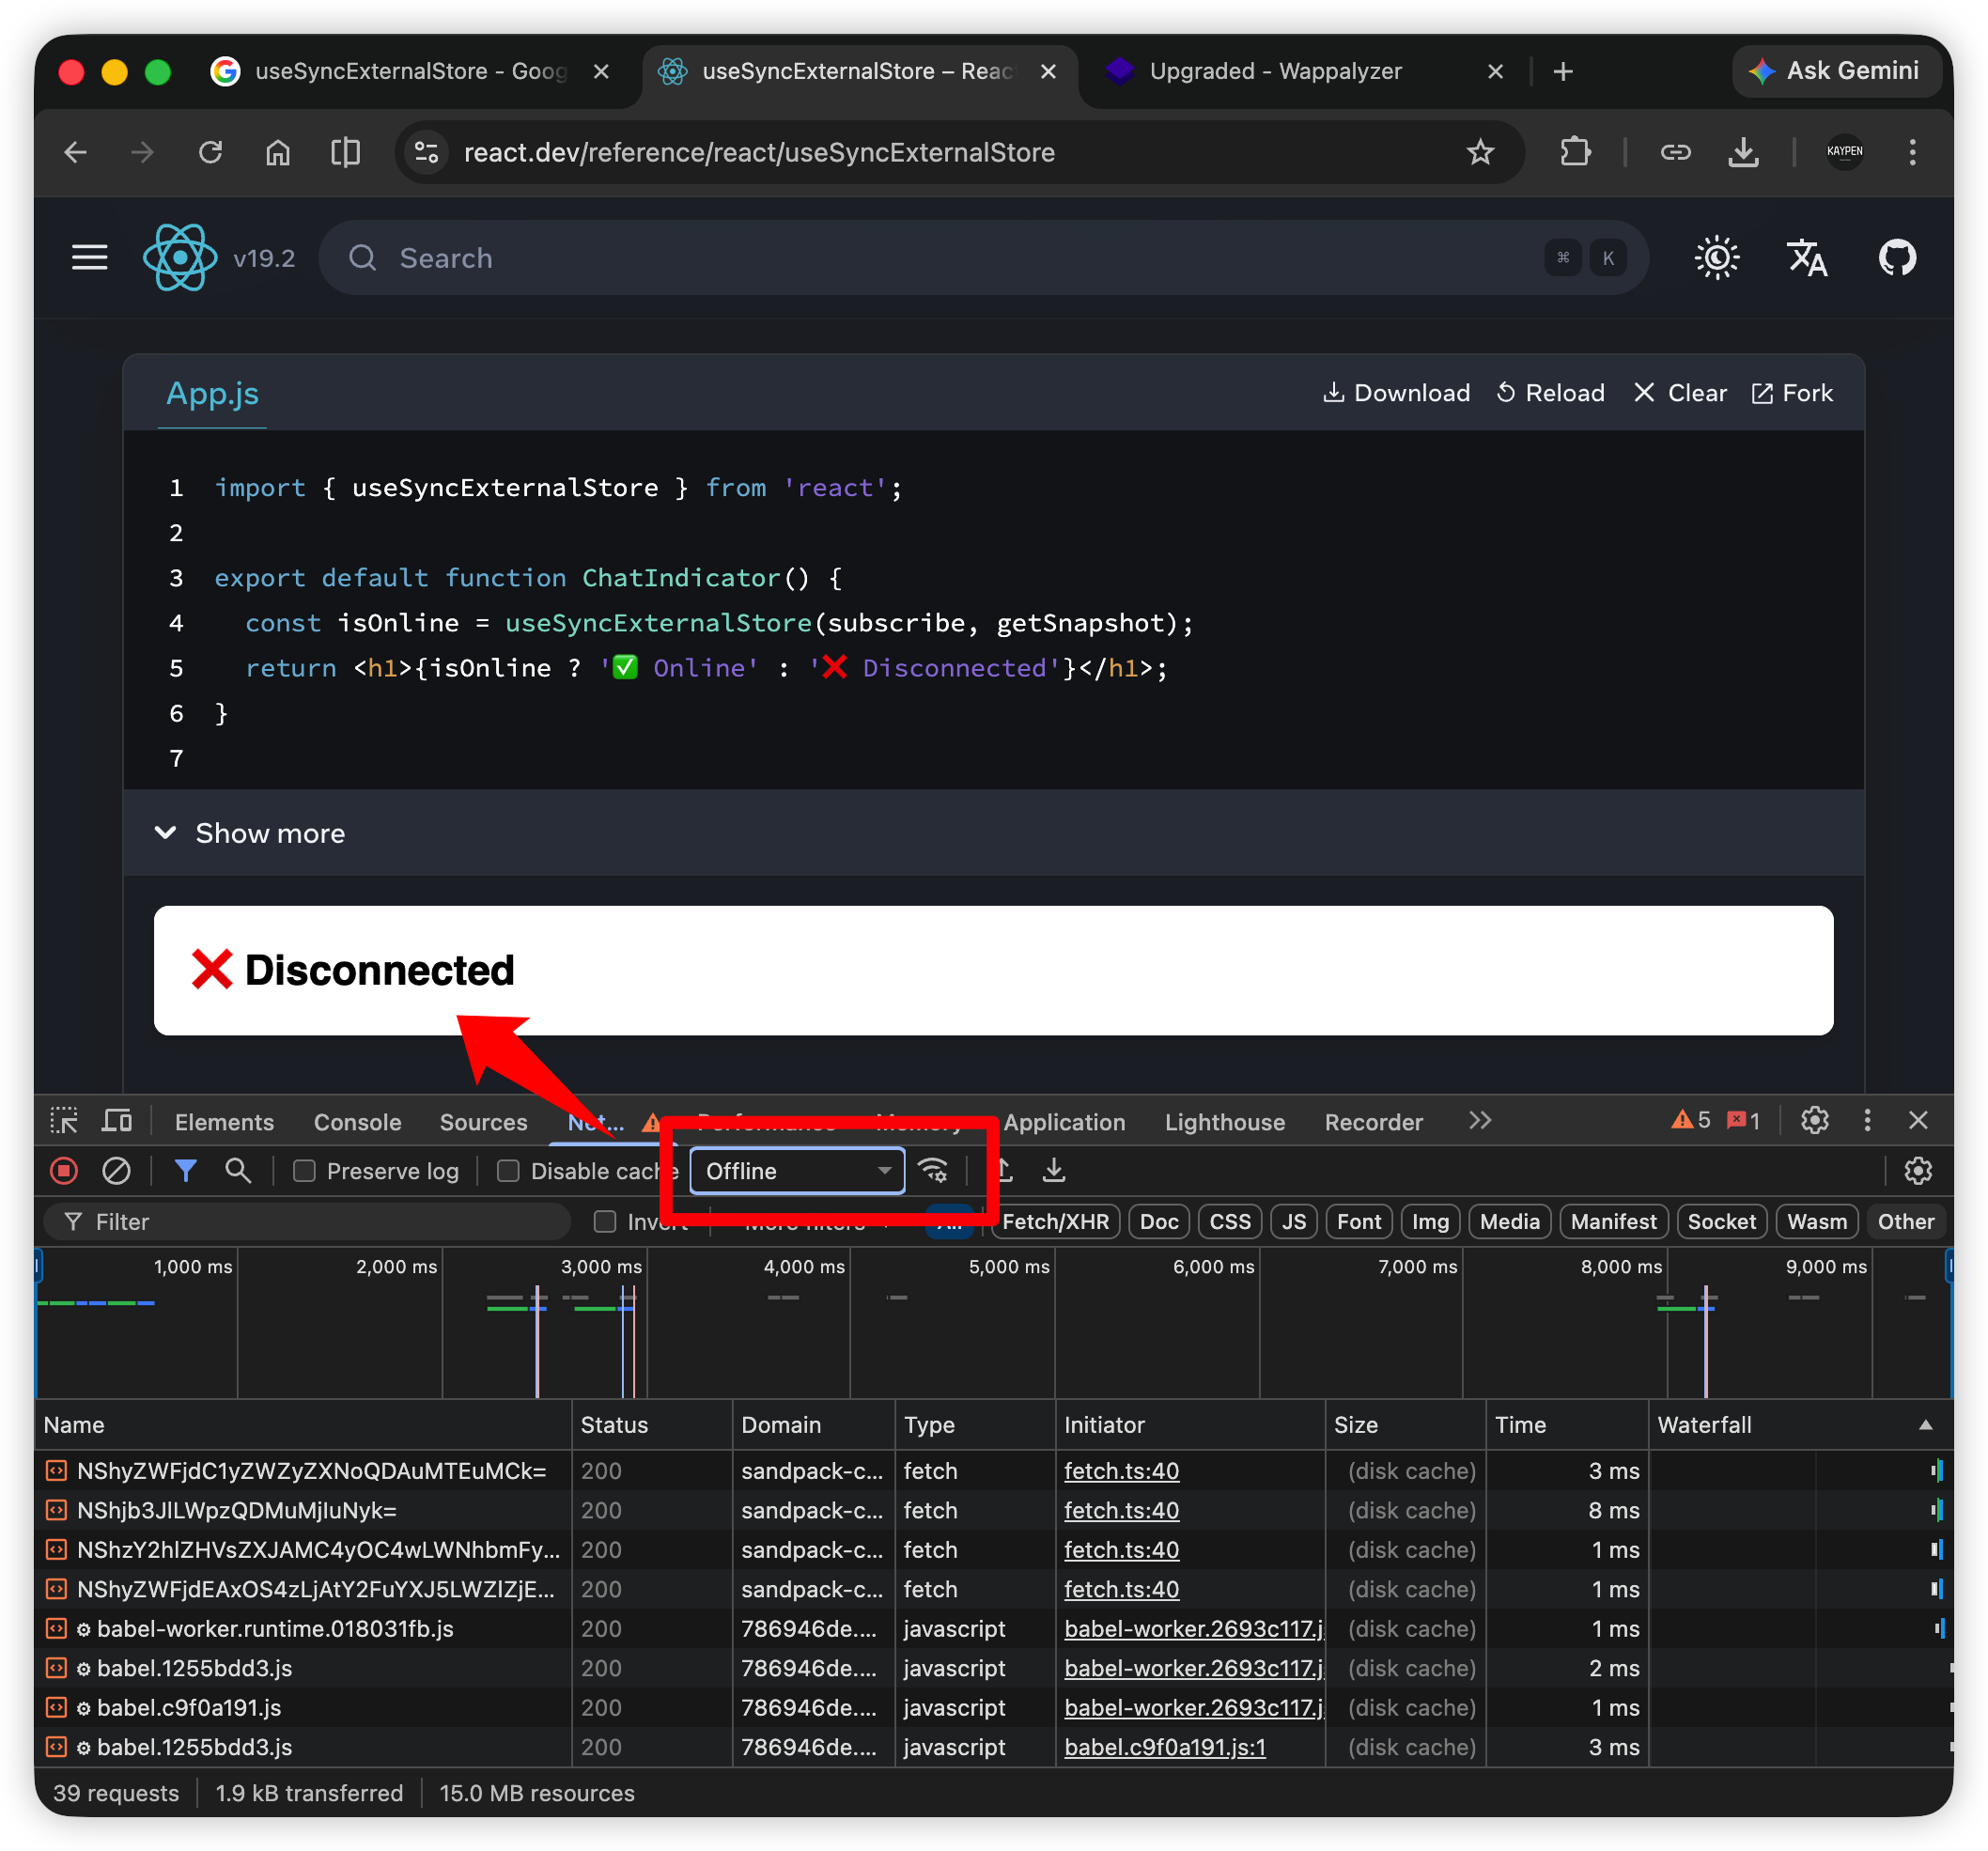
使用 Chrome DevTools > Network 模拟在线、离线状态
这里的在线状态就来自于外部的 navigator.onLine,用 useSyncExternalStore 再合适不过:
import { useSyncExternalStore } from 'react';

export default function ChatIndicator() {
  const isOnline = useSyncExternalStore(subscribe, getSnapshot);
  return <h1>{isOnline ? '✅ Online' : '❌ Disconnected'}</h1>;
}

function getSnapshot() {
  return navigator.onLine;
}

function subscribe(callback) {
  window.addEventListener('online', callback);
  window.addEventListener('offline', callback);
  return () => {
    window.removeEventListener('online', callback);
    window.removeEventListener('offline', callback);
  };
}
可以看到,享用 useSyncExternalStore 的基础配置,一个是订阅函数 subscribe,另一个是获取快照函数 getSnapshot:
const isOnline = useSyncExternalStore(subscribe, getSnapshot);
仔细看订阅函数 subscribe:在函数内部执行逻辑,调用 callback,最后返回一个取消订阅的函数。是不是跟平常用的副作用钩子 useEffect 很类似:
function subscribe(callback) {
  window.addEventListener('online', callback);
  window.addEventListener('offline', callback);
  return () => {
    window.removeEventListener('online', callback);
    window.removeEventListener('offline', callback);
  };
}
这个 callback 需要注意,它是 React 叫的快递小哥,会去调用 getSnapshot,如果拿到新的值,就马上通知商家,重新渲染组件。
在上这个例子中,似乎用 useEffect 也能够完成同样的事情:
import { useState, useEffect } from 'react';

export default function ChatIndicator() {
  const [isOnline, setIsOnline] = useState(navigator.onLine);

  useEffect(() => {
    const handleOnline = () => setIsOnline(true);
    const handleOffline = () => setIsOnline(false);

    window.addEventListener('online', handleOnline);
    window.addEventListener('offline', handleOffline);

    return () => {
      window.removeEventListener('online', handleOnline);
      window.removeEventListener('offline', handleOffline);
    };
  }, []);

  return <h1>{isOnline ? '✅ Online' : '❌ Disconnected'}</h1>;
}
既然 useEffect 可以实现同样的效果,那使用 useSyncExternalStore 是不是脱裤子放屁,多此一举呢?
这就不得不说起 React 的撕裂了,来看一下简单的小组件:

仔细看,在打开的瞬间,这些计数器 Counter 对应的数字都不一样,有 218、219、220,随后统一变成 221。
实际上,这些计数器背后都引用同一个外部数据源。按道理,这些计数器应该始终保持一致。
但是 React 18 新引入的并发渲染机制就是不讲道理。
由于并发,造成了部分组件同步了最新的外部数据,但有些组件落后还没来得及更新。
落后就要挨打,这就是造成了在视觉上,组件被“撕裂”了~。
这就是 useSyncExternalStore 存在的必要性,它会在渲染前调用 getSnapshot 瞟一眼——当前的值最新的吗?如果不是,那就立即丢弃渲染,用新值进行同步、非阻塞的渲染:
2025-11-05 08:00:00
@tanstack/react-query (下称 RQ)在 GitHub 上已经累积了 4w+ 的 ⭐,称得上 React 技术栈中必不可少的工具。
它并不像 Zustand 这些通用的状态管理库,而是针对请求这一场景,做了相关的深度优化和功能定制。
RQ 在当前项目已经引入将近两个月,但是使用情况并不多,障碍可能来自于 RQ 的学习曲线和心智认知,所以开展本次 RQ 分享,让团队各位更多地了解 RQ 的能力,进而利用好 RQ,提高开发效率。
目前我们的项目中使用 Axios 作为请求器,而 RQ 并不是用来替代 Axios,而是用来增强 Axios 的。
看一下例子:
// 👉 这是用 Axios 去实现的获取站内信未读总数的接口方法
export function getUnreadNotificationCount(): Promise<number> {
  return clientApi.get(URL.GET_UNREAD_NOTIFICATION_COUNT, {
    fetchOptions: {
      experimental_throw_all_errors: true,
      experimental_no_toast_when_error: true,
    },
  });
}

// 👉 使用 RQ 通过 hook 封装的方式,去增强未读总信接口
import { useQuery } from '@tanstack/react-query';
export const useUnreadNotificationCount = () => {
  return useQuery({
    queryKey: ['notification', 'unread-count'],
    // 👉 RQ 最终调用我们提供给接口方法
    queryFn: getUnreadNotificationCount,
  });
};
所以 RQ 其实是请求框架无关的工具,它可以和 Axios,GraphQL,或者原生 fetch() 方法等结合使用。
假设我们不使用 RQ,那么正常调用一个接口就是:
import { useState, useEffect } from 'react';

function NotificationBadge() {
  // 👉 定义一堆状态
  const [count, setCount] = useState(0);
  const [isLoading, setIsLoading] = useState(true);
  const [error, setError] = useState(null);

  useEffect(() => {
    // 👉 手动控制各个状态
    const fetchCount = async () => {
      try {
        setIsLoading(true);
        const count = await getUnreadNotificationCount();
        setCount(count);
        setError(null);
      } catch (err) {
        setError(err);
      } finally {
        setIsLoading(false);
      }
    };

    fetchCount();
  }, []);

  if (isLoading) return <div>Loading...</div>;
  if (error) return <div>Error loading notifications</div>;

  return <div>Unread: {count}</div>;
}
如果这个接口在多个地方使用,我们需要封装为一个自定义 hook:
// 👉 创建自定义 hook
import { useState, useEffect } from 'react';

export function useUnreadNotificationCount() {
  const [count, setCount] = useState(0);
  const [isLoading, setIsLoading] = useState(true);
  const [error, setError] = useState(null);

  useEffect(() => {
    const fetchCount = async () => {
      try {
        setIsLoading(true);
        const count = await getUnreadNotificationCount();
        setCount(count);
        setError(null);
      } catch (err) {
        setError(err);
      } finally {
        setIsLoading(false);
      }
    };

    fetchCount();
  }, []);

  return [count, isLoading, error];
}

function NotificationBadge() {
  const { count, isLoading, error } = useUnreadNotificationCount();

  if (isLoading) return <div>Loading...</div>;
  if (error) return <div>Error loading notifications</div>;

  return <div>Unread: {count}</div>;
}
使用 RQ 之后:
// 1. 用 RQ 封装自定义 hook
import { useQuery } from '@tanstack/react-query';
export const useUnreadNotificationCount = () => {
  return useQuery({
    queryKey: ['notification', 'unread-count'],
    queryFn: getUnreadNotificationCount,
  });
};

// 2. 引用该 hook
function NotificationBadge() {
  const { data: count, isLoading, error } = useUnreadNotificationCount();

  if (isLoading) return <div>Loading...</div>;
  if (error) return <div>Error loading notifications</div>;

  return <div>Unread: {count}</div>;
}
RQ 相当于语法糖,简化了自定义 hook 的封装,可以大大减少我们写样板代码。
在我们的通知页中,中间菜单和右侧内容都有标题【点赞】以及未读数【3】,这里的未读数都是通过接口获取:

那么两个地方引用了相同的数据,没有 RQ 的情况下,处理方式有:
状态提升。把请求接口提升到他们的共同的父组件中。
function NotificationPage() {
  const [unreadCount, setUnreadCount] = useState(0);
  const [isLoading, setIsLoading] = useState(true);

  useEffect(() => {
    fetchUnreadCount();
  }, []);

  const fetchUnreadCount = async () => {
    try {
      setIsLoading(true);
      const count = await getUnreadNotificationCount();
      setUnreadCount(count);
    } catch (err) {
      console.error(err);
    } finally {
      setIsLoading(false);
    }
  };

  return (
    <div>
      <MiddleMenu unreadCount={unreadCount} />
      <RightContent unreadCount={unreadCount} onRefresh={fetchUnreadCount} />
    </div>
  );
}
Context API:使用 <Context> 组件,跨层级共享数据。
const NotificationContext = createContext();

function NotificationProvider({ children }) {
  const [unreadCount, setUnreadCount] = useState(0);
  const [isLoading, setIsLoading] = useState(true);

  const fetchUnreadCount = async () => {
    try {
      setIsLoading(true);
      const count = await getUnreadNotificationCount();
      setUnreadCount(count);
    } catch (err) {
      console.error(err);
    } finally {
      setIsLoading(false);
    }
  };

  useEffect(() => {
    fetchUnreadCount();
  }, []);

  return (
    <NotificationContext.Provider value={{ unreadCount, isLoading, refetch: fetchUnreadCount }}>
      {children}
    </NotificationContext.Provider>
  );
}

// 使用
function MiddleMenu() {
  const { unreadCount, isLoading } = useContext(NotificationContext);
  return <div>未读: {unreadCount}</div>;
}

function RightContent() {
  const { unreadCount, refetch } = useContext(NotificationContext);
  return <div>未读: {unreadCount}</div>;
}
封装 Hook:把请求封装到 hook 中
使用 RQ 之后:
function useUnreadNotificationCount() {
  return useQuery({
    queryKey: ['notificationCount'],
    queryFn: getUnreadNotificationCount,
  });
}

function MiddleMenu() {
  const { data: unreadCount, refresh } = useUnreadNotificationCount();
  return <div>未读: {unreadCount}</div>;
}

function RightContent() {
  const { data: unreadCount } = useUnreadNotificationCount();
  return <div>未读: {unreadCount}</div>;
}
优点:
✅ 自动去重: 两个组件同时挂载只发 1 次请求(queryKey 相同)
✅ 无需 Provider: 不需要包裹父组件
✅ 组件独立: 每个组件独立使用,不依赖父组件传递
这里提到"两个组件同时挂载只会发起 1 次请求",其原理就是 RQ 会缓存请求的数据。RQ 的很多功能都是基于缓存来操作。
还是通知的例子,当用户打开"点赞"页面,在这里查看消息的时候,【未读数】需要动态更新:

没有 RQ 的情况下,我们需要对这么多个组件做数据联动,方案还是状态提升、Context,当然,还可以通过事件总线(EventEmitter)的方式:
// 定义一个事件总线通用方法:eventBus.js
class EventBus {
  constructor() {
    this.events = {};
  }

  on(event, callback) {
    if (!this.events[event]) this.events[event] = [];
    this.events[event].push(callback);
  }

  emit(event, data) {
    if (this.events[event]) {
      this.events[event].forEach(callback => callback(data));
    }
  }

  off(event, callback) {
    if (this.events[event]) {
      this.events[event] = this.events[event].filter(cb => cb !== callback);
    }
  }
}

export const eventBus = new EventBus();


// 对于左侧菜单
function LeftMenu() {
  const [totalUnreadCount, setTotalUnreadCount] = useState(0);

  useEffect(() => {
    const fetchCount = async () => {
      const count = await getUnreadTotalNotificationCount();
      setTotalUnreadCount(count);
    };

    fetchCount();

    // ⚠️ 监听刷新事件
    const handleRefresh = () => fetchCount();
    eventBus.on('notification:read', handleRefresh);

    return () => {
      eventBus.off('notification:read', handleRefresh);
    };
  }, []);

  return <div>通知 ({totalUnreadCount})</div>;
}

// 对于中间的菜单
function MiddleMenu() {
  const [unreadCount, setUnreadCount] = useState(0);

  useEffect(() => {
    const fetchCount = async () => {
      const count = await getUnreadNotificationCount();
      setUnreadCount(count);
    };

    fetchCount();

    // ⚠️ 监听刷新事件
    const handleRefresh = () => fetchCount();
    eventBus.on('notification:read', handleRefresh);

    return () => {
      eventBus.off('notification:read', handleRefresh);
    };
  }, []);

  return <div>点赞 ({unreadCount})</div>;
}

// 对于右侧内容
function RightContent() {
  const handleMarkAsRead = async (id) => {
    await markNotificationAsRead(id);

    // ⚠️ 触发刷新事件
    eventBus.emit('notification:read');
  };

  return (
    <button onClick={() => handleMarkAsRead(123)}>
      标记已读
    </button>
  );
}
使用 RQ,利用它的 invalidateQueries() 方法可以实现同样的效果:
// 对于左侧菜单
function LeftMenu() {
  const { data: unreadTotalCount, refresh } = useQuery({
    queryKey: ['totalNotificationCount'],
    queryFn: getTotalUnreadNotificationCount,
    staleTime: Infinite,
  });

  return <div>点赞 ({unreadCount})</div>;
}


// 对于中间的菜单
function MiddleMenu() {
  const { data: unreadCount } = useQuery({
    queryKey: ['notificationCount'],
    queryFn: getUnreadNotificationCount,
  });

  return <div>点赞 ({unreadCount})</div>;
}

// 对于右侧内容
function RightContent() {
  const queryClient = useQueryClient();
  const { data: unreadCount } = useQuery({
    queryKey: ['notificationCount'],
    queryFn: getUnreadNotificationCount,
  });

  const { data: notifications } = useQuery({
    queryKey: ['notifications', 'print-and-collect'],
    queryFn: () => getNotifications('print-and-collect'),
  });

  const markAsReadMutation = useMutation({
    mutationFn: markNotificationAsRead,
    onSuccess: () => {
      // ✅ 自动让所有相关查询失效并重新获取
      queryClient.invalidateQueries({ queryKey: ['totalNotificationCount'] });
      queryClient.invalidateQueries({ queryKey: ['notificationCount'] });
      queryClient.invalidateQueries({ queryKey: ['notifications'] });
    },
  });

  return (
    <div>
      <h2>点赞 (未读: {unreadCount})</h2>
      {notifications?.map(n => (
        <div key={n.id}>
          {n.content}
          {!n.isRead && (
            <button onClick={() => markAsReadMutation.mutate(n.id)}>
              标记已读
            </button>
          )}
        </div>
      ))}
    </div>
  );
}
优势:
✅ 零配置自动同步: invalidateQueries 一个方法搞定
✅ 组件完全解耦: <RightMenu>,<MiddleMenu> 和 <RightContent> 互不依赖
✅ 数据一致性: 始终从服务器获取最新数据
✅ 无需手动管理: 不需要回调、Context、事件总线
✅ 乐观更新: 可以先更新 UI,再同步服务器
RQ 底层也是使用发布/订阅(pub/sub)设计模式。
乐观更新对应的是悲观更新,悲观更新也就是比较传统的做法——先请求 API,再更新 UI。
而乐观更新是先更新 UI,再请求 API。
| ✅ 适合场景 | ❌ 不适合场景 |
|---|---|
| 点赞/收藏(高概率成功) | 支付、转账等关键操作 |
| 标记已读/未读 | 复杂的业务逻辑(服务器可能拒绝) |
| 切换开关状态 | 数据结构复杂,难以预测结果 |
| 简单的增删改操作 | 需要服务器计算的数据(如库存扣减) |
| 用户期望即时反馈的操作 |
了解了乐观更新,我们来引用它去优化上一节提到的内容,先更新未读数的 UI,再请求 API:
const markAsReadMutation = useMutation({
  mutationFn: markNotificationAsRead,

  // ✅ 乐观更新:立即更新 UI,不等待服务器响应
  onMutate: async (notificationId) => {
    // 取消正在进行的查询
    await queryClient.cancelQueries({ queryKey: ['notificationCount'] });

    // 保存之前的值(用于回滚)
    const previousCount = queryClient.getQueryData(['notificationCount']);

    // 立即更新未读数
    queryClient.setQueryData(['notificationCount'], (old) => old - 1);

    return { previousCount };
  },

  // ❌ 如果失败,回滚
  onError: (err, variables, context) => {
    queryClient.setQueryData(['notificationCount'], context.previousCount);
  },

  // ✅ 无论成功失败,最终都重新获取确保数据一致
  onSettled: () => {
    queryClient.invalidateQueries({ queryKey: ['notificationCount'] });
  },
});
RQ 提供了一个 Devtools,可以作为调试使用,可以提升我们的开发效率。
可以在项目本地开发环境下集成 Devtools,在右下角这个浮动按钮:
TODO
对于 Devtools 来说,比较好用的主要有 Actions 和 Data Explorer,可以手动查看相关数据,也可以触发 RQ 的相关方法:
TODO
中文文档
目前官方文档只有英文,目前有挺多的相关中文文档镜像,比如:
https://tanstack.com.cn/query/latest/docs/framework/react/overview
也可以自行 google "tanstack 中文文档"
沉浸式翻译
一款 web 插件,一键把英文翻译成中文,原汁原味,适合 RQ 原文档学习。
https://chromewebstore.google.com/detail/bpoadfkcbjbfhfodiogcnhhhpibjhbnh?utm_source=item-share-cb
Zread
如果想进一步了解 RQ 的源码或者功能,可以使用 Zread,它已经索引了 RQ 的 GitHub 仓库,并且提供 AI 问答,目前免费: https://zread.ai/TanStack/query
留一个问题
2025-09-09 08:00:00
最近,在很多依赖库的类型定义文件中,经常能看到了一个陌生的朋友:satisfies。
相信很多人都和我一样,看完 TypeScript 的相关文档,对这个关键字还是一头浆糊。
satisfies 关键字是 TypeScript 4.9 版本引入的,用于类型断言。
先看一下连接数据库的例子:
type Connection = {}

declare function createConnection(
  host: string,
  port: string,
  reconnect: boolean,
  poolSize: number,
): Connection;
这里,我们声明了一个函数 createConnection,它接收四个参数,返回一个 Connection 类型。
接着:
type Config = {
  host: string;
  port: string | number;
  tryReconnect: boolean | (() => boolean);
  poolSize?: number;
}
我们又声明了一个 Config 类型,它包含了四个属性:host、port、tryReconnect 和 poolSize。
接下来:
const config: Config = {
  host: "localhost",
  port: 3000,
  tryReconnect: () => true,
}
我们声明了一个 config 变量,它包含这三个属性的值:host、port、tryReconnect。
OK,现在我们来调用 createConnection 函数,并传入 config 参数:
function main() {
  const { host, port, tryReconnect, poolSize } = config;
  const connection = createConnection(host, port, tryReconnect, poolSize);
}
问题出现了:

这里 port 的类型是 string | number,而 createConnection 函数的参数类型是 string,所以会报错。
为了解决类型定义问题,我们需要加上类型断言的逻辑代码:
function main() {
  let { host, port, tryReconnect, poolSize } = config;

  if (typeof port === "number") {
    port = port.toString();
  }

  const connection = createConnection(host, port, tryReconnect, poolSize);
}
port 类型正确了,但 tryReconnect 类型错误了:

我们一次性将这些类型修复:
function main() {
  let { host, port, tryReconnect, poolSize } = config;

  if (typeof port === "number") {
    port = port.toString();
  }
  if (typeof tryReconnect === "function") {
    tryReconnect = tryReconnect();
  }
  if (typeof poolSize === "undefined") {
    poolSize = 10;
  }

  const connection = createConnection(host, port, tryReconnect, poolSize);
}
port、tryReconnect、poolSize 都进行了类型断言,问题解决了。
但是,这样写起来很麻烦,有没有更简单的方法呢?
一种方式是,去掉 config 的类型定义,放飞自我,让它自动被推断:
const config = {
  host: "localhost",
  port: 3000,
  tryReconnect: () => true,
}
这样,我们可以一步到位:
function main() {
  let { host, port, tryReconnect } = config;

  const connection = createConnection(host, port.toString(), tryReconnect(), 10);
}
但这样放飞类型,会引起另外的错误,比如 config 随便添加一个属性:
const config = {
  host: "localhost",
  port: 3000,
  tryReconnect: () => true,
  pool: 10, // 新增了一个属性
}
这样 TypeScript 是一点都不会报错,但却会埋下隐藏炸弹,在代码上线的时候,可能会抓马,为什么 poorSize 不生效?
层层排查,最后才发现原来 poolSize 写错成了 pool。
这个时候,satisfies,千呼万唤始出来:
const config = {
  host: "localhost",
  port: 3000,
  tryReconnect: () => true,
  pool: 10,
} satisfies Config;

不负众望,TypeScript 终于报错,告诉我们 pool 属性不存在。
satisfies 关键字为我们提供了一种两全其美的解决方案:
Config)。如果你写了多余的属性(如 pool),或者属性类型不匹配,TypeScript 会立刻报错。这避免了“放飞自我”带来的隐患。: Config) 不同,satisfies 不会改变变量被推断出的原始具体类型。变量 config 的 port 属性类型仍然是 number,tryReconnect 属性类型仍然是 () => boolean。总结来说,satisfies 的核心优势在于:在不丢失(泛化)原始推断类型的前提下,对该值进行类型检查。
这使得我们既能获得编辑器对于具体类型的智能提示和类型推断的好处,又能确保这个值的结构符合我们预先定义好的更宽泛的类型约束,从而写出更安全、更灵活的代码。
2025-07-03 08:00:00
哈喽,我是楷鹏。
今天想要分享 Chrome 的一个小技巧,可以一次性打开多个干净独立的 Chrome,让你的开发更丝滑。
开头做个小调查,你平时开发的时候,会使用哪些浏览器呢?
我平时开发的时候,主力就是使用 Chrome。
Chrome 的 DevTools 功能非常强大,满足前端开发调试的绝大数需求。
但是长期来有一个困扰我的问题,就是我的日常使用和开发是耦合在一起的。
比如,我的 Chrome 会装载很多的插件:
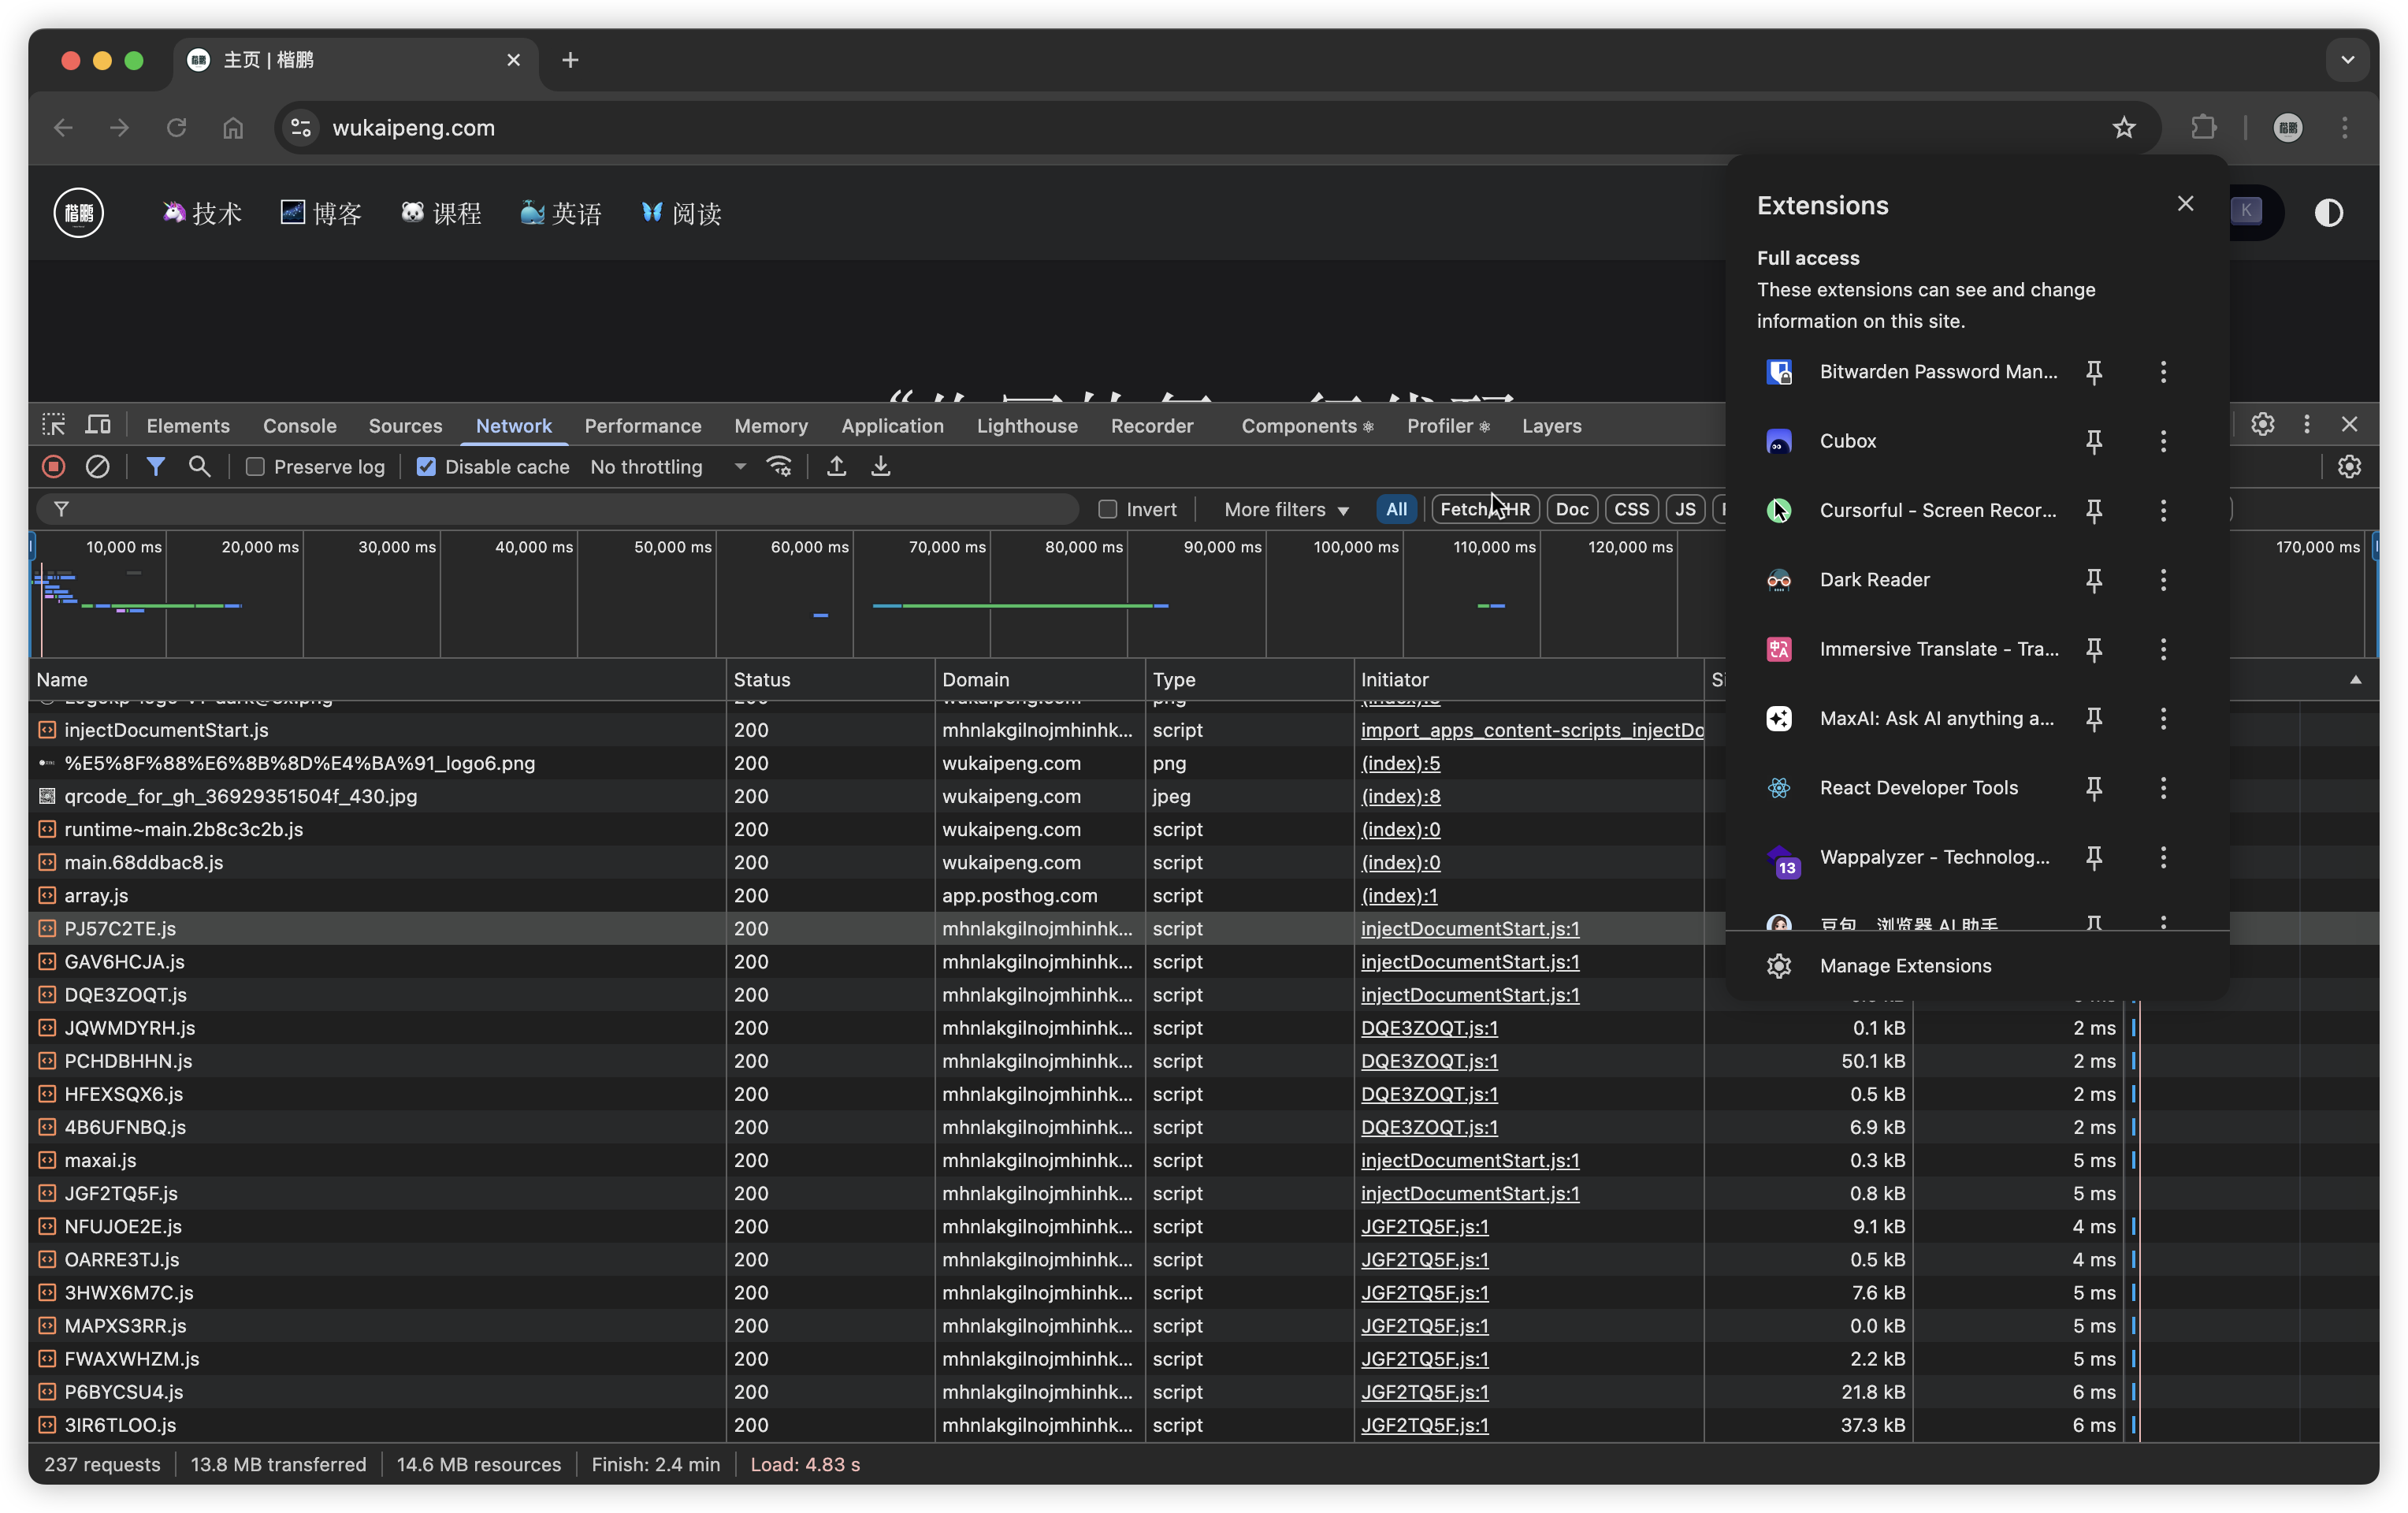
这些插件会影响我的开发,因为他们可能在页面中会插入 HTML 或者 CSS 代码,以及会产生很多额外的请求,干扰我的正常开发调试。
比如下面侧边栏的插件 HTML:

此时的选择,要么是开启无痕窗口,要么是换另外一个浏览器。
这两种方式都不错,但无痕窗口还是使用同一个 Chrome 实例,并且重新打开无痕窗口,所有的状态都会被清空。
另外一种方式是换另外一个浏览器,我曾经尝试过,但是后来又放弃了,换一个浏览器就相当于换一种全新的开发环境,需要重新适应界面、操作习惯等等,真的很别扭。
最近学到了另一种新方式,就是可以通过使用不同的用户数据目录,来创建不同的 Chrome 实例。
运行命令:
/Applications/Google\ Chrome.app/Contents/MacOS/Google\ Chrome --user-data-dir="/tmp/chrome_user_dir_1"
你就可以创建一个全新的 Chrome 实例,并且这个实例的配置、插件、历史记录等都是独立的。
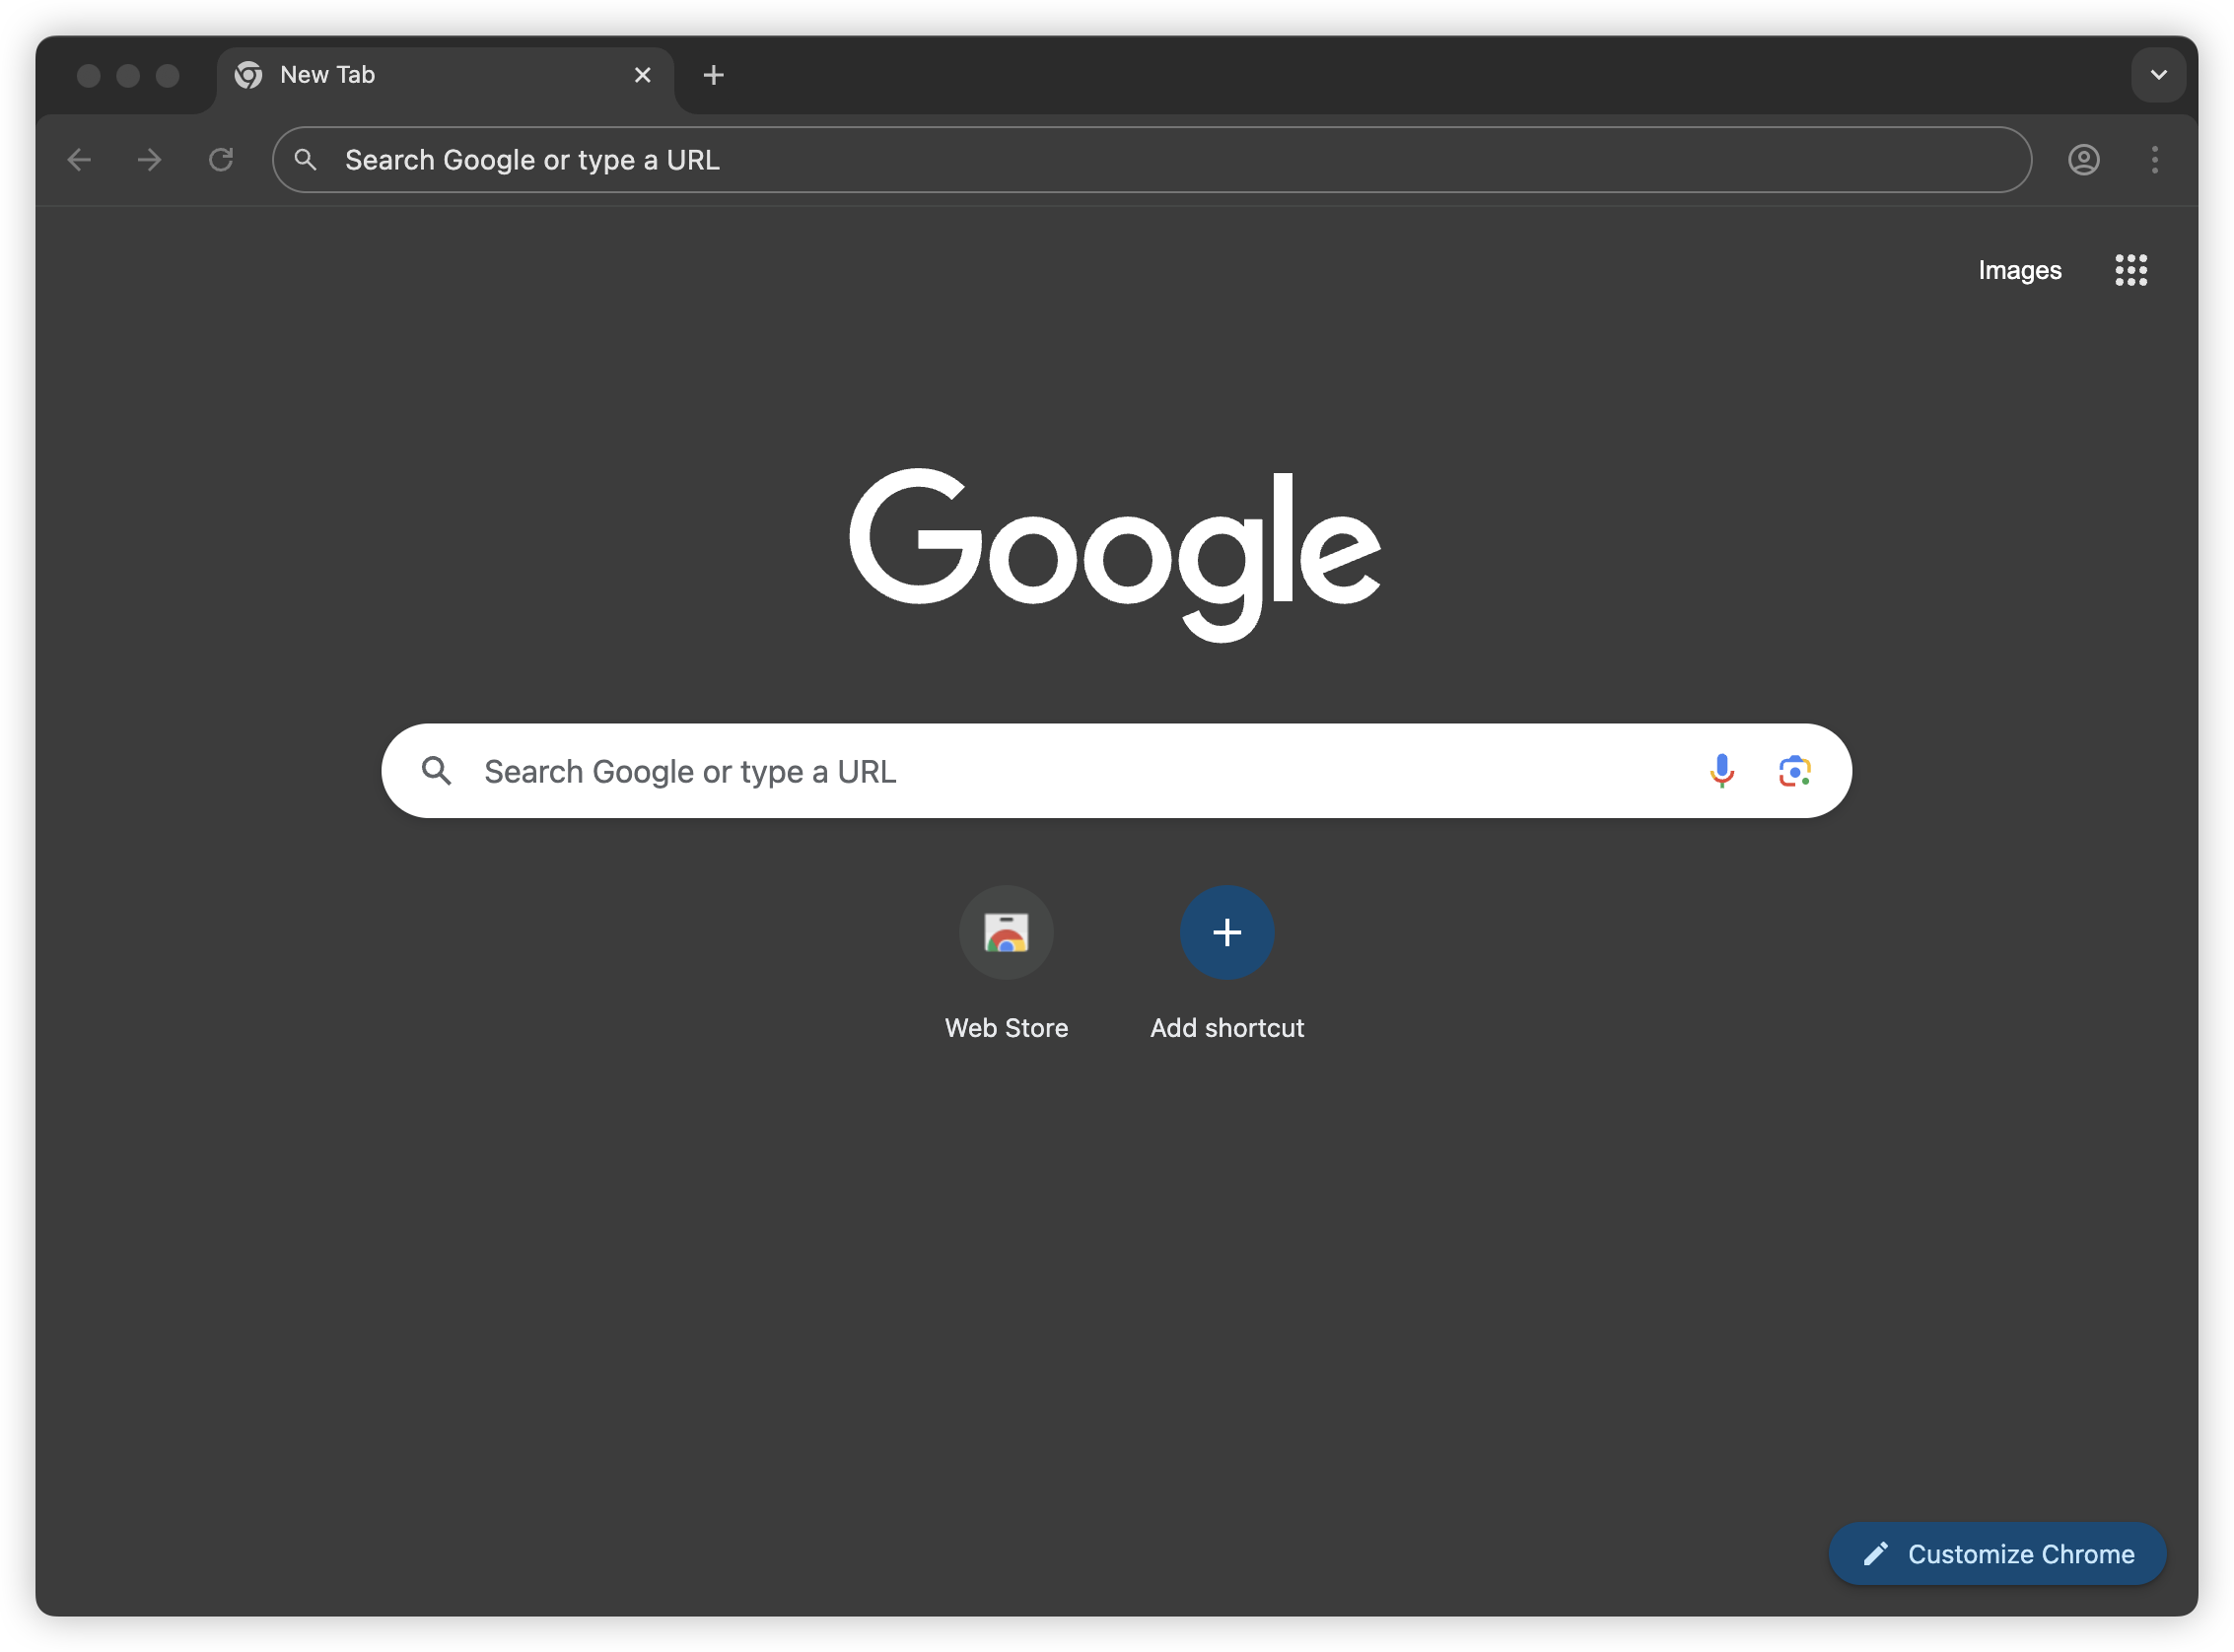
甚至在 Dock 栏,你还可以看到两个 Chrome 图标:
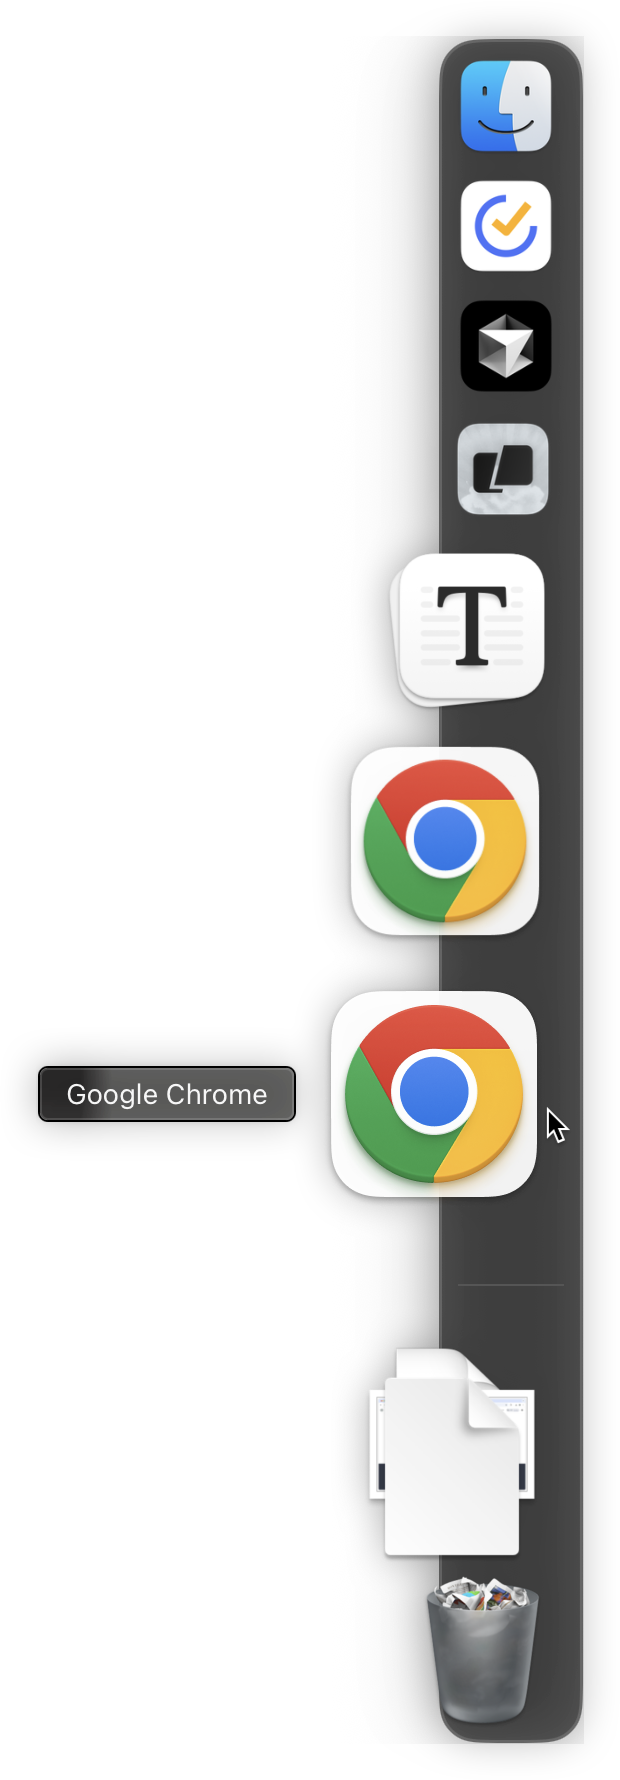
这个新创建的 Chrome 实例,完全可以看作是一个全新的 Chrome 浏览器。
你可以修改主题,来和其他 Chrome 实例区分开来:
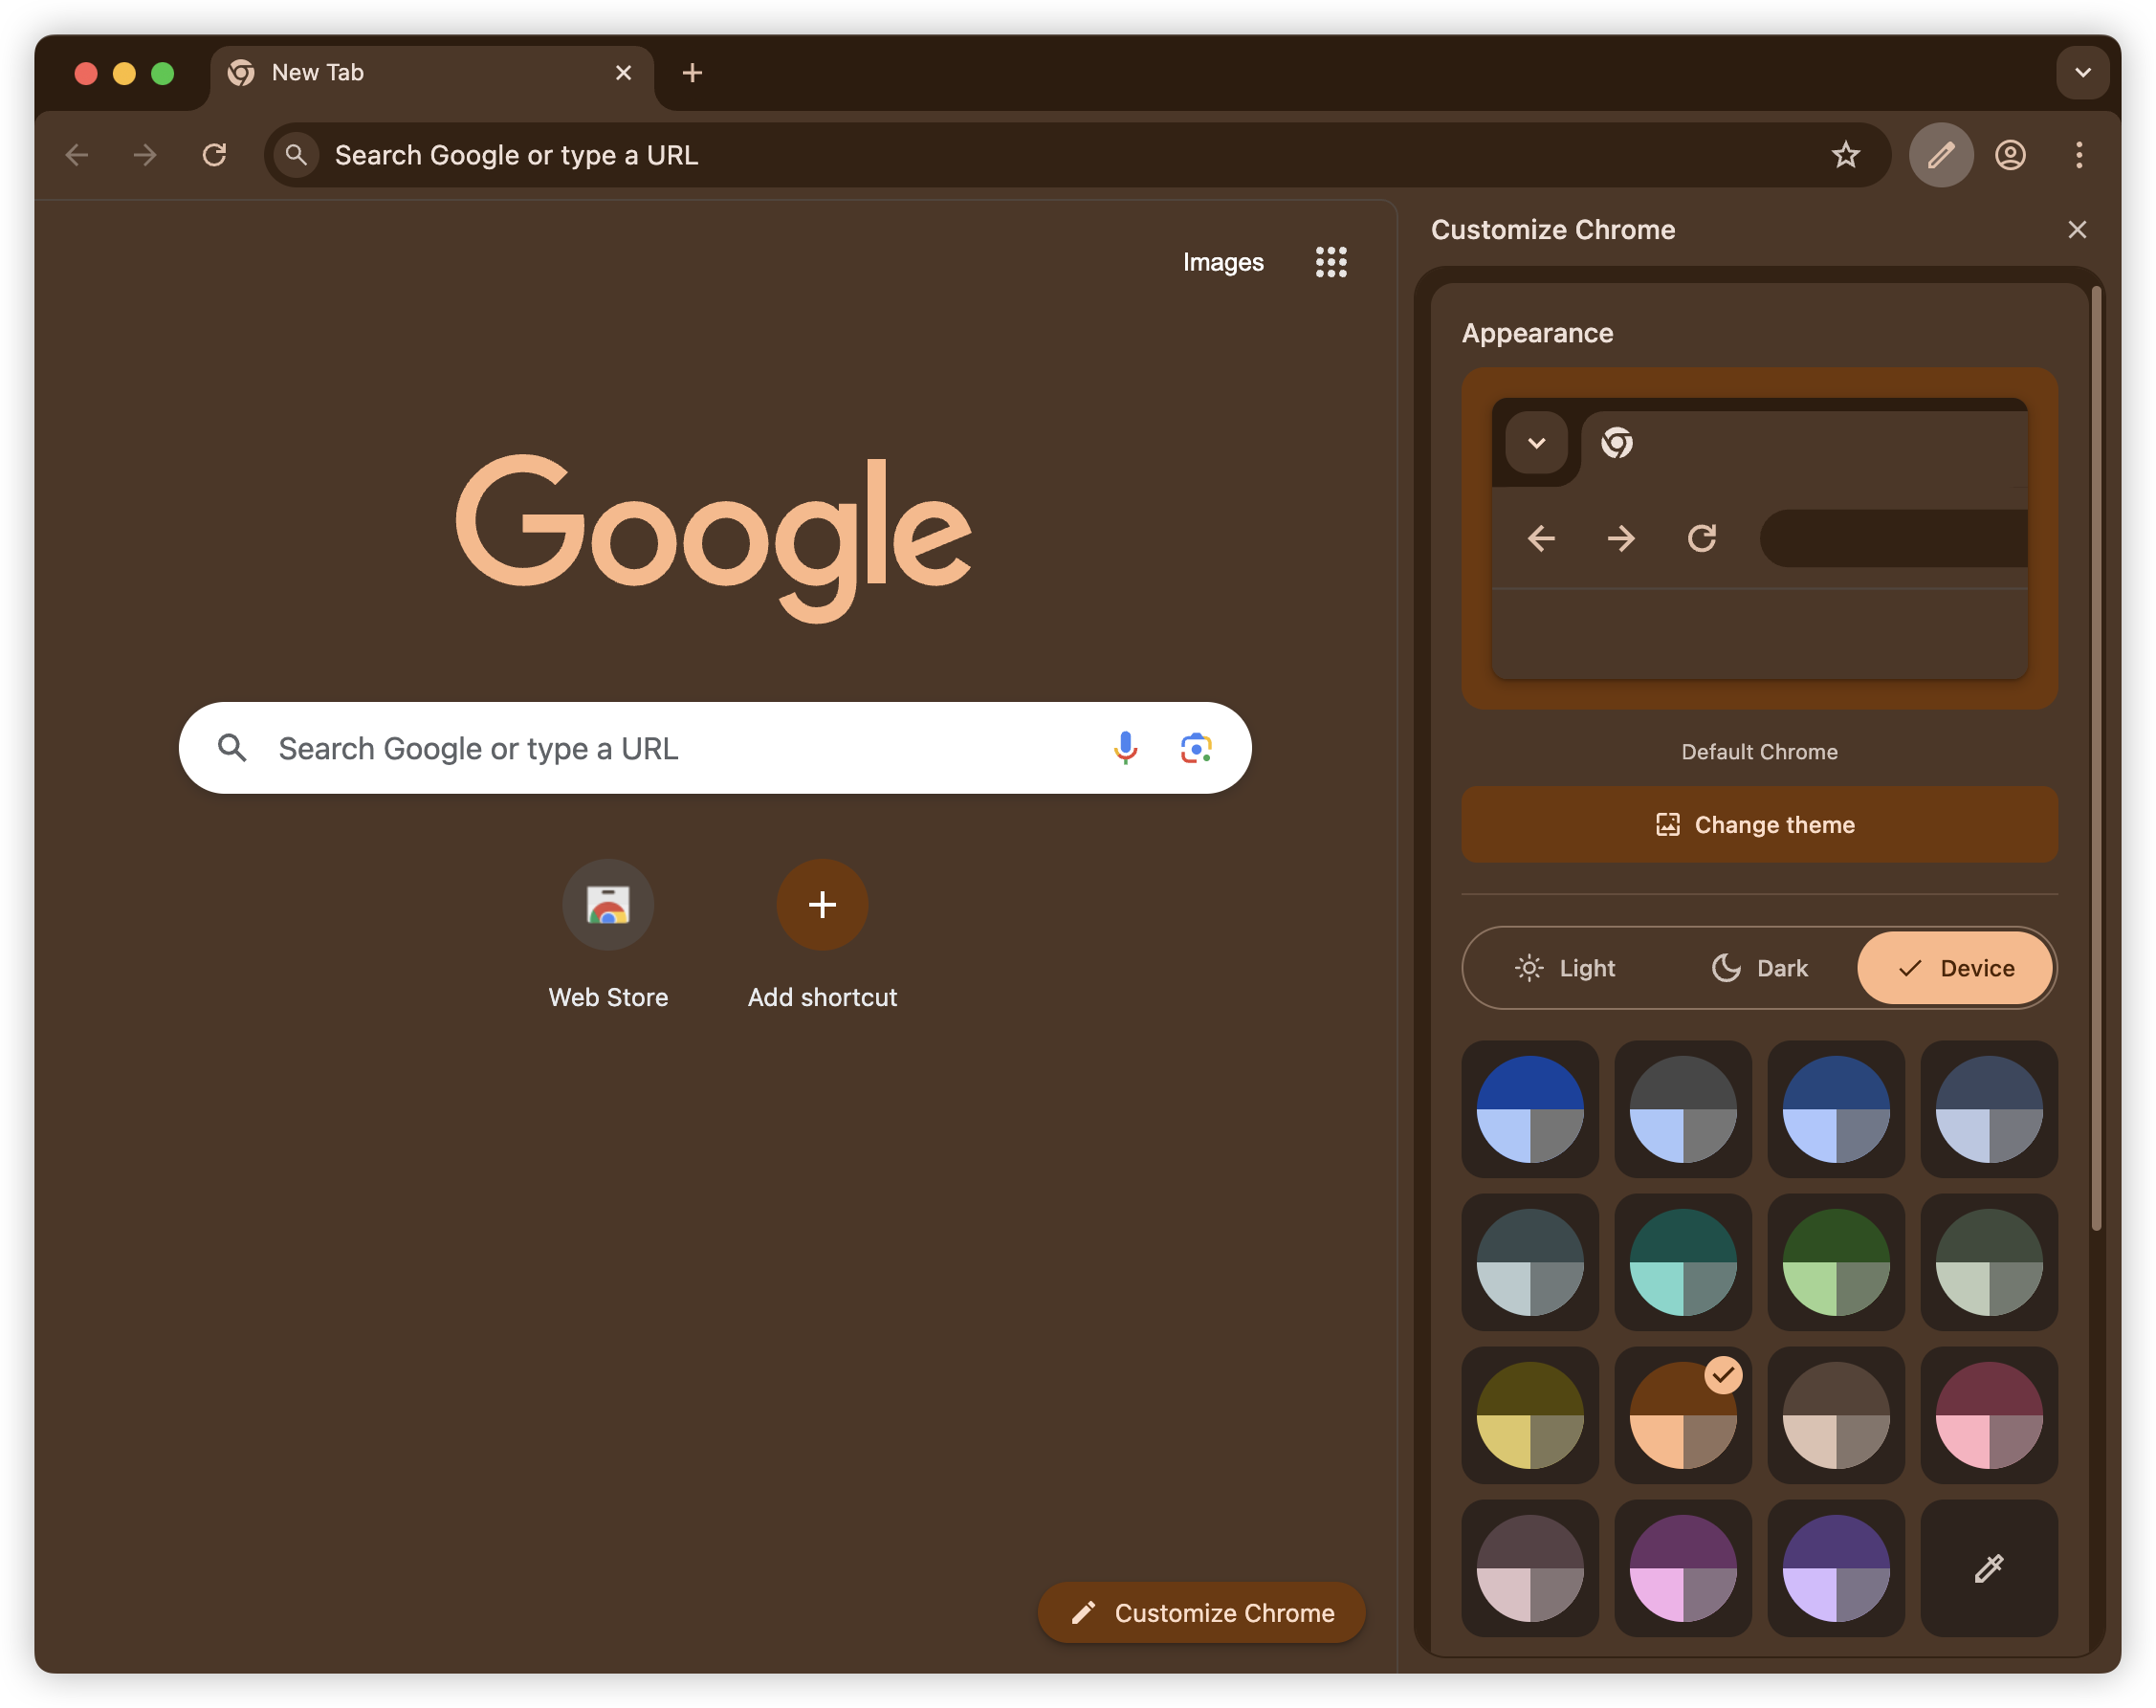
或者登录不同的账号等等操作,这是完全属于你的第二 Chrome。
通过运行这条命令,理论上你可以创建无限个 Chrome 实例,只需要修改 --user-data-dir 参数即可,比如:
/Applications/Google\ Chrome.app/Contents/MacOS/Google\ Chrome --user-data-dir="/tmp/chrome_user_dir_2"
/Applications/Google\ Chrome.app/Contents/MacOS/Google\ Chrome --user-data-dir="/tmp/chrome_user_dir_3"
/Applications/Google\ Chrome.app/Contents/MacOS/Google\ Chrome --user-data-dir="/tmp/chrome_user_dir_4"
......
不过平时实际使用的时候,我一般使用两个 Chrome 实例,来回切换,一个用于网站浏览,一个用于开发调试。
在开发调试的时候,每次打开项目再打开新的 Chrome 会有一点点烦躁,所以你可以考虑将这条命令写入到你的前端项目 package.json 的脚本中:
  "scripts": {
    "dev": "next dev --turbopack",
    "open-chrome": "/Applications/Google\\ Chrome.app/Contents/MacOS/Google\\ Chrome --args --user-data-dir=/tmp/ChromeNewProfile http://localhost:3000",
    "dev:chrome": "npm run open-chrome && npm run dev"
  },
这样你就可以通过 npm run dev:chrome 来打开 Chrome 实例,并且自动运行 next dev 命令。
Windows PowerShell 用户可以使用:
 "scripts": {
   "dev": "next dev --turbopack",
   "open-chrome": "powershell -Command \"Start-Process 'C:\\Program Files\\Google\\Chrome\\Application\\chrome.exe' -ArgumentList '--user-data-dir=D:\\temp\\ChromeNewProfile', 'http://localhost:3000'\"",
   "dev:chrome": "npm run open-chrome && npm run dev"
 },
如果你希望打开 Chrome 实例的时候,同时打开 localhost:3000 页面来看到页面效果,可以在命令后面直接添加 http://localhost:3000:
{
  "scripts": {
    "dev": "next dev",
    "dev:chrome": "/Applications/Google\ Chrome.app/Contents/MacOS/Google\ Chrome --user-data-dir=\"/tmp/chrome_user_dir_1\" http://localhost:3000 && npm run dev"
  }
}
好了,这就是本期的全部内容,如果对你有帮助,欢迎点赞、收藏、转发。
我是楷鹏,我们下期再见。
2025-06-09 08:00:00
本期已录制 B 站视频 👉 【Next.js】路由跳转显示进度条
哈喽,我是楷鹏。
先来看一个反面教材。
在 Dify.ai 中,当点击跳转页面之后,会有一段需要等待的时间,然后才会跳转页面。

然而,中间这段时间我并不知道是否跳转成功了,所以我会多点了几下,直到跳转。
这种体验很不好 👎
解决方案很简单,我们来看一下 GitHub 的跳转交互。

可以看到,GitHub 在跳转期间,会显示一个进度条,清晰地告诉用户——"我正在跳转,请稍等"。
那么在 Next.js 中,如何实现这个效果呢?
我们可以借助 BProgress 这个库来实现。

BProgress 是一个轻量级的进度条组件库,支持 Next.js 15+,同时也支持 Remix、Vue 等其他框架。
对于 BProgress 的使用,我做了一个 demo 项目 nextjs-progress-bar-demo,我们可以把这个项目先 clone 下来:
git clone [email protected]:wukaipeng-dev/nextjs-progress-bar-demo.git
然后进入项目目录:
cd nextjs-progress-bar-demo
先安装依赖:
npm install @bprogress/next
启动项目:
npm run dev

可以看到,这是一个简单的 Next.js 项目,包含三个页面:首页、登录页、注册页。
main 分支已经配置好了进度条,我们切换到分支 without-progress-bar-demo:
git checkout without-progress-bar-demo
当前分支下,我们没有配置进度条,所以跳转页面时,不会显示进度条。
接下来我们在根布局 app/layout.tsx 中引入 ProgressProvider:
'use client';

import "./globals.css";
import { ProgressProvider } from '@bprogress/next/app';

export default function RootLayout({
  children,
}: Readonly<{
  children: React.ReactNode;
}>) {
  return (
    <html lang="en">
      <body>
        <ProgressProvider
          height="4px"
          color="#4c3aed"
          options={{ showSpinner: false }}
          shallowRouting
          >
          {children}
        </ProgressProvider>
      </body>
    </html>
  );
}
接下来,我们可以看一下,在首页和登录页、登录页和注册页之间跳转,都会显示一个进度条。

ProgressProvider 的参数如下:
height:进度条的高度color:进度条的颜色options:进度条的配置,这里 showSpinner 设置为 false,表示不显示一个动画的加载图标。shallowRouting:是否启用浅层路由,如果开启的话,只改变路由的 query 参数,比如 ?page=1 变成 ?page=2,那么进度条不会重新加载。但是,当我们登录成功之后,再点击跳转,却不会显示进度条。

这是因为,首页和登录页、登录页和注册页之间,是使用 <Link> 组件进行跳转的。
<Link> 组件实际会渲染成 <a>,BProgress 通过给所有 <a> 组件添加点击事件,来显示进度条。
我们可以看下在 DevTools → Elements → <a> → Event Listeners 中,是否添加了点击事件:

但是,当我们登录成功之后,则是使用 router.push 进行跳转的。
BProgress 不会给 router.push 添加点击事件,自然也不会显示进度条。
不用慌,BProgress 为我们提供了 useRouter 方法。
将 Next.js 的 useRouter 替换为 BProgress 提供的 useRouter:
// import { useRouter } from 'next/navigation';
import { useRouter } from '@bprogress/next/app';
然后,正常使用即可:
const router = useRouter();

router.push('/');
这时,你可以看到,在登录成功之后,自动跳转首页时,进度条就能正常显示了。

但如果你的项目已经封装过了自己的 useRouter,那么你可以将封装过的 useRouter 作为参数 customRouter 传入,进行二次封装:
import { useRouter } from '@bprogress/next/app';
import { useRouter as useNextIntlRouter } from '@/i18n/navigation';

export default function Home() {
  const router = useRouter({
    customRouter: useNextIntlRouter,
  });

  return (
    <button
      onClick={() =>
        router.push('/about', {
          startPosition: 0.3,
          locale: 'en',
        })
      }
    >
      Go to about page
    </button>
  );
}
最后,让我们回到 app/layout.tsx,这里我们引入了 ProgressProvider,但却把 app/layout 变成了一个客户端组件,我们来把 ProgressProvider 抽离到其他地方,仍然保持 app/layout 是一个服务端组件。
// app/components/ProgressWrapper.tsx
'use client';

import { ProgressProvider } from '@bprogress/next/app';

interface ProgressWrapperProps {
  children: React.ReactNode;
}

export function ProgressWrapper({ children }: ProgressWrapperProps) {
  return (
    <ProgressProvider
      height="4px"
      color="#0000ff"
      options={{ showSpinner: false }}
      shallowRouting
    >
      {children}
    </ProgressProvider>
  );
}
在 app/layout.tsx 中,我们引入 ProgressWrapper:
import { ProgressWrapper } from './components/ProgressWrapper';

export default function RootLayout({
  children,
}: Readonly<{
  children: React.ReactNode;
}>) {
  return (
    <html lang="en">
      <body>
        <ProgressWrapper>
          {children}
        </ProgressWrapper>
      </body>
    </html>
  );
}
好的,不愧是你,完成了一个 Next.js 集成路由跳转显式进度条的封装。
以上就是本期的全部内容,希望对你有所帮助。
感谢观看!👏